VIVE 3DSP Audio SDK Unreal Plugin
Contents |
System Requirements
Unreal Engine version 4.22 or higher
Windows® 7 SP1, Windows® 8 or later, Windows® 10
Intel® Core™ i5-4590 or AMD FXTM 8350 equivalent or better
NVIDIA® GeForce® GTX 1060 or AMD™ Radeon™ RX 480, equivalent or better graphics card
VIVE 3DSP Audio SDK Unreal Plugin Guide
Getting Started
Enable Audio Mixer Functionality
VIVE 3DSP Audio Plugin requires the latest Audio Mixer function in Unreal Engine 4.22 (or later) to be turned on.
In the Epic Games Launcher, click Unreal Engine > Library.
In the Unreal Engine, click

> Create Shortcut.
On the computer desktop, duplicate the shortcut that was just created.
Next, Change the command-line argument of the Unreal Engine shortcut when launching the Unreal Editor.
On the computer desktop, right-click one of the Unreal Editor shortcuts and select Properties.
Click the Shortcut tab.
In Target, add -audiomixer at the end of the command line.
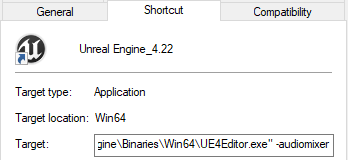
Click OK.
Enable VIVE 3DSP Audio Plugin
Before using VIVE 3DSP Audio Plugin in Unreal Engine, it is necessary to add the VIVE 3DSP Audio Plugin and enable it for the Unreal project.
Create a Plugins folder under the game project directory.
Copy the HTC folder to the Plugins folder.
Launch Unreal Editor (or game.) The VIVE 3DSP Audio Plugin needs to be enabled, if not, follow these steps:
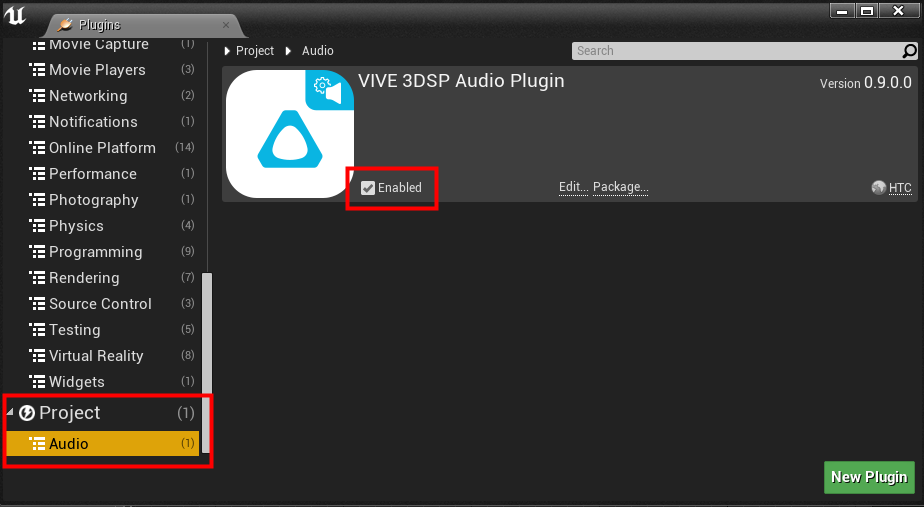
In the Unreal Editor main menu, click Edit > Plugins.
In the left pane of the Plugins window, click Project > Audio.
In the list of plugins, look for VIVE 3DSP Audio Plugin, and then select Enabled.
Note
VIVE 3DSP supports 3rd order Ambisonics for spatializer and 1st order Ambisonic deocder.
Note
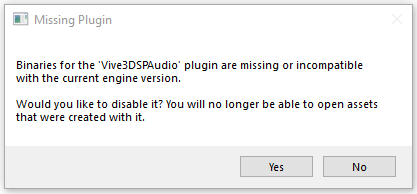
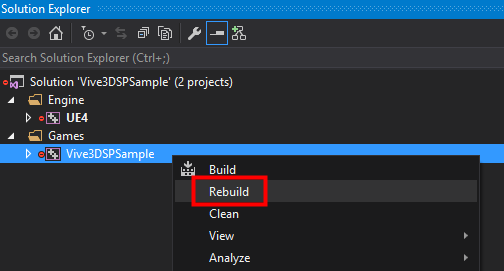
If a warning message like the one below appears, try rebuilding the project to solve the issue.
To rebuild the project
Open the project folder and right-click .uproject file.
In the drop-down menu, select Generate Visual Studio project files.
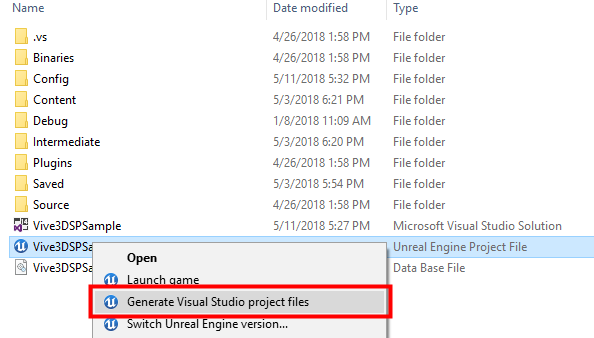
Double-click the .sln file to start Visual Studio.
In Solution Explorer, right-click the folder of your project and select Rebuild.
Set Up Required Plugins
In Unreal Engine, the spatialization, occlusion, and reverb plugins can be configured individually. Currently, the VIVE 3DSP Audio Plugin only supports the Windows platform.
In the Unreal Editor main menu, click Edit > Project Settings.
In Platforms, select Windows.
In Audio, select VIVE 3DSP Audio for all the plugins.
Note
VIVE 3DSP Audio needs to be selected in all three plugins.
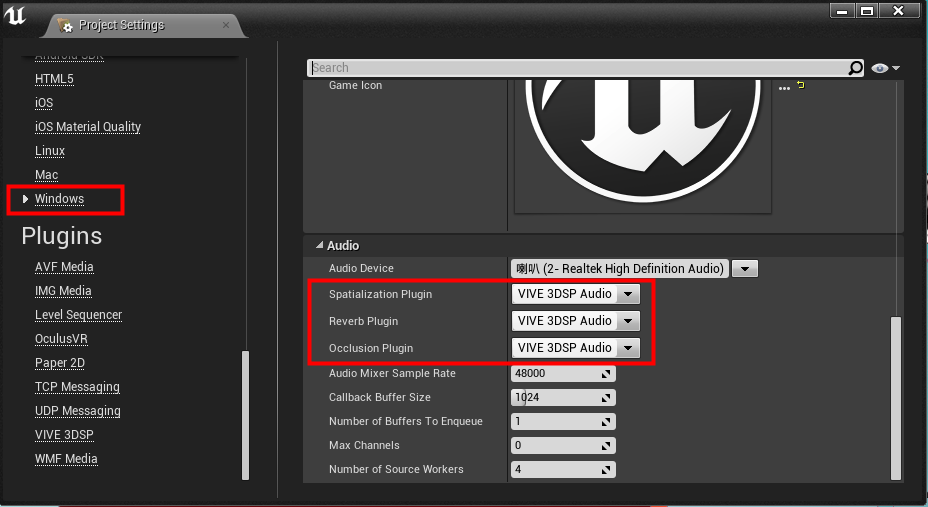
Restart Unreal Editor.
Try VIVE 3DSP Sample Maps
The VIVE 3DSP Audio Plugin includes three sample maps where a listener can hear different sound effects. The green sphere in the map represents an audio source.
In the Content Browser, select View Options on the bottom-right corner, and then select Show Plugin Content. The Vive3DSPAudio Content folder will then show on the left.
The sample maps are in Vive3DSPAudio Content > Maps. Double-click one to experience the effect.

Click Play in the Unreal Editor. The sample map can be played in VR Preview or Selected View Port.
Note
For an immersive spatialized, reverbed, or occluded audio experience, use headphones.
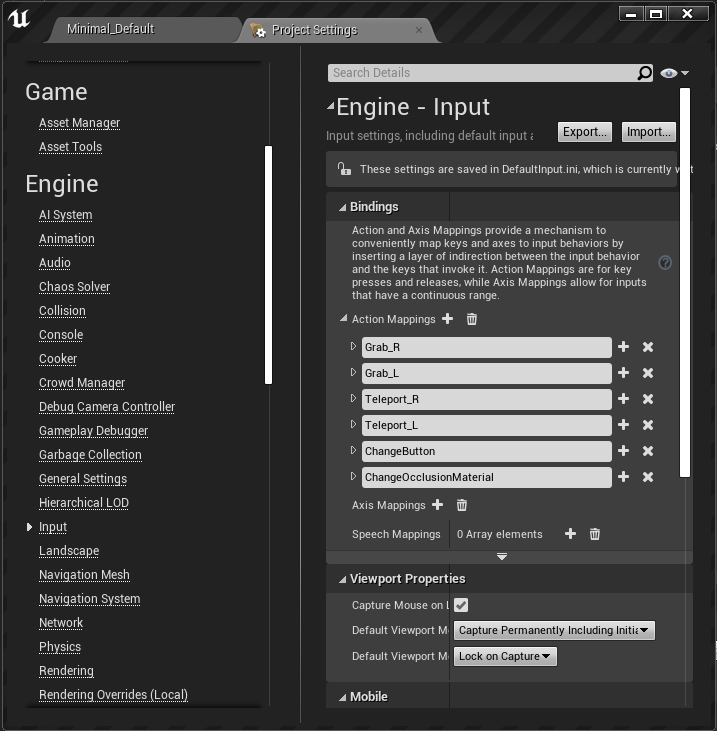
For sample maps to work in VR Preview, import the input settings file by going to the Project Settings tab, and clicking Engine > Input > Import. The file input_default_setting.ini is located in the 4.22, 4.23, and 4.24 folders.
In Unreal Engine 4.24, if the controller in the sample maps cannot be detected, try the following steps:
In the SteamVR Input menu, click Regenerate Action Manifest, Regenerate Controller Bindings, and Reload Action Manifest.
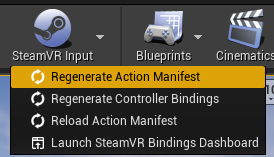
Make sure these operations are successfully executed by checking the output log in Window > Developer Tools > Output log. If these operations are successfully executed and the controller still cannot be detected, try the following steps.
Disable the SteamVR plugin in plugins > Virtual Reality > SteamVR and restart the Unreal Editor.
Enable the SteamVR plugin again and restart the Unreal Editor.
Redo step a. If the controller still cannot be detected after doing the above steps, troubleshoot the problem based on the log message.
Interact with the scene using the keyboard or controller by following the instructions on the floating panel.
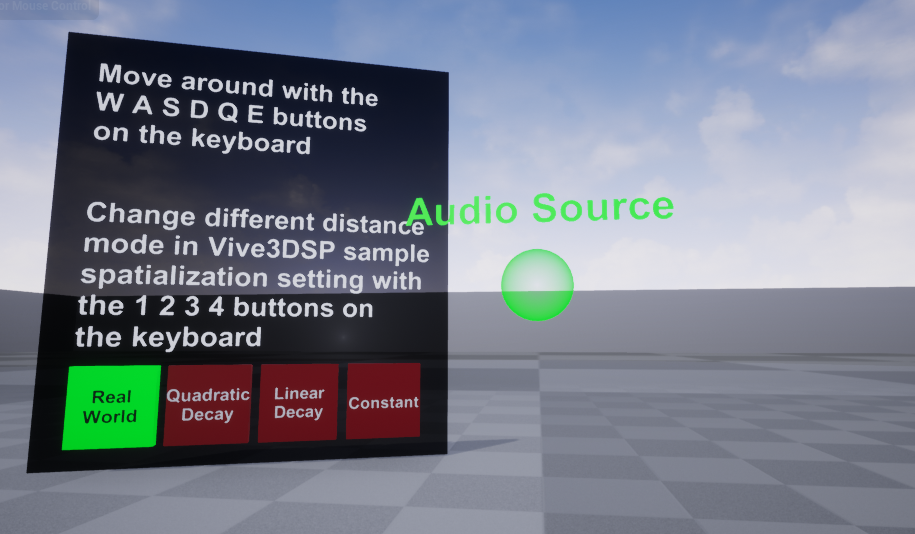
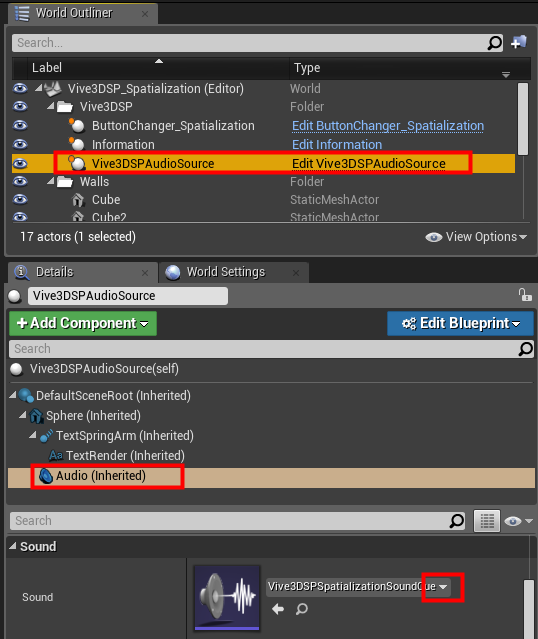
To change the audio, in the World Outliner, select Vive3DSPAudioSource. Then, in the Details tab, select Audio Component to change the Sound.
Note
Currently, UE4 only supports mono audio sources to be spatialized, reverbed, or occluded.
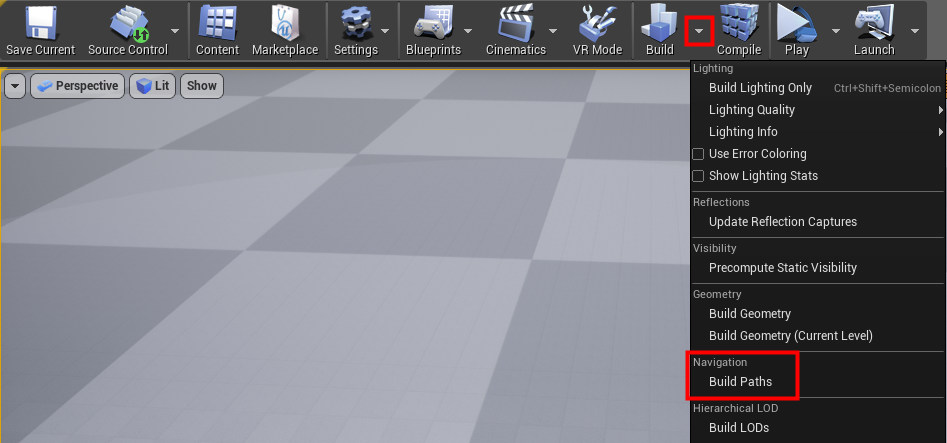
If you cannot teleport in VR Preview, rebuild the navigation by clicking Build > Navigation Build Paths.
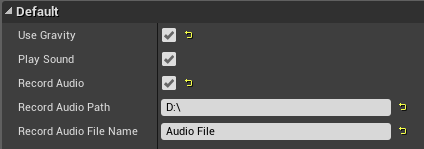
Record Audio: One built-in feature of Unreal is recording audio.
There are two Unreal functions for recording audio:
Start Recording Output: Start recording audio. By leaving the Submix To Record field empty, you can record the master output of the game.
Finish Recording Output: Stop recording audio. Path can be absolute, or relative (to the /Saved/BouncedWavFiles folder). By leaving the Submix To Record field empty, you can record the master output of the game.
References: References 1 , References 2
Note
For Record Audio to work, the path must be set and be in Unreal Play Mode.
Select Record Audio to record whatever the listener is listening to in the map and export it as an audio file. In Record Audio Path and Record Audio File Name, set the location where to save the exported audio file and the filename to use. When Unreal Play Mode is stopped, an audio file will be exported in WAV audio format. Currently, audio files can only be exported in the WAV format.
VIVE 3DSP Audio Plugin Settings
VIVE 3DSP Audio Plugin provides optimized audio tuning for the VIVE Pro. If VIVE Pro is used, set it as the headset model. The following steps here build on the completed steps in Getting Started.
VIVE 3DSP Audio Plugin provides optimized audio tuning for the VIVE Pro. If you are using the VIVE Pro, set it as the headset model.
Click Edit > Project Settings in the Unreal Editor main menu.
Select Vive 3DSP in Plugins.
Select VIVE Pro to tune and optimize the audio experience in Headset Model. If using a different device, select Generic.
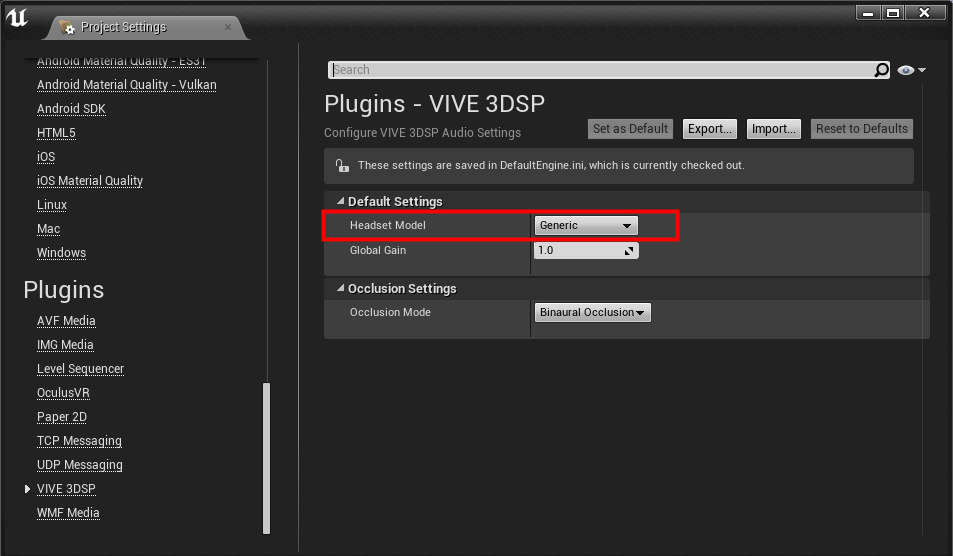
The Global Gain is the total volume of the audio sources from the VIVE 3DSP Audio Plugin.
The occlusion type of the VIVE 3DSP Audio Plugin can be set by choosing the Occlusion Mode. Select Mono Occlusion to render the same occlusion effect in both ears; select Binaural Occlusion to render the occlusion effect separately in both ears.
VIVE 3DSP Spatialization Effect
VIVE 3DSP Audio Plugin offers an easy way to add 3D Audio for VR content. VIVE 3DSP Audio Spatialization is applied to any Actor in the scene that contains an Audio Component. The following steps here build on the completed steps in Getting Started.
Configure Spatialization Plugin Settings
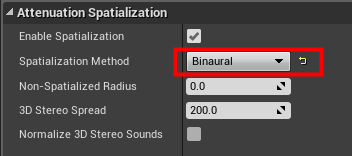
Select the Actor that contains the Audio Component that you want to spatialize in the World Outliner tab.
Select the Audio Component that you want to spatialize in the Details tab.
Select Override Attenuation under Attenuation.
Select Binaural under Attenuation Spatialization > Spatialization Method.
Click + in Attenuation Plugin Settings > Spatialization Plugin Settings, and click the drop-down arrow.
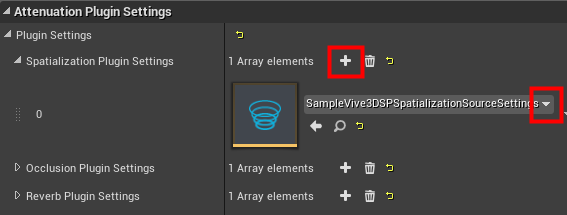
If a Spatialization Plugin Settings asset has been created, select it from the list. If not, click Vive3DSP Audio Source Spatialization Settings under Create New Asset.
Give the new asset a name, then double-click it in the Content Browser tab.
VIVE 3DSP Ambisonic Decoder
Audio recordings for 360 and VR videos are now mostly achieved by sound field microphones in the 4-channel B-format. Here, these channels are not translated to a fixed representation of sound. Instead, the Ambisonic decoder can interpret and reshape the sound recordings such that it can dynamically render a stereo audio according to a listener’s rotation. This feature requires Unreal Engine version 4.22 or higher.
The following steps here build on the completed steps in Getting Started.
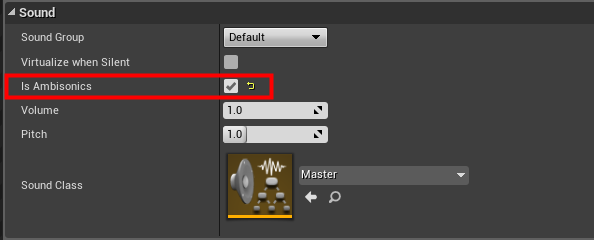
Import an AmbiX file into your project
Before importing the Ambisonic-formatted audio file into a project, append _ambix to its file name. This is required so that Unreal can decode the Ambisonic audio file correctly.
Click Import or drag the audio file into the Content Browser.
Double-click the imported audio file.
In the Details panel > Sound, make sure the Is Ambisonics option is selected.
Drag the Ambisonic file to the scene and click Play. You will hear the Ambisonic file decoded binaurally using the VIVE 3DSP Ambisonic decoder.
VIVE 3DSP Spatialization Settings
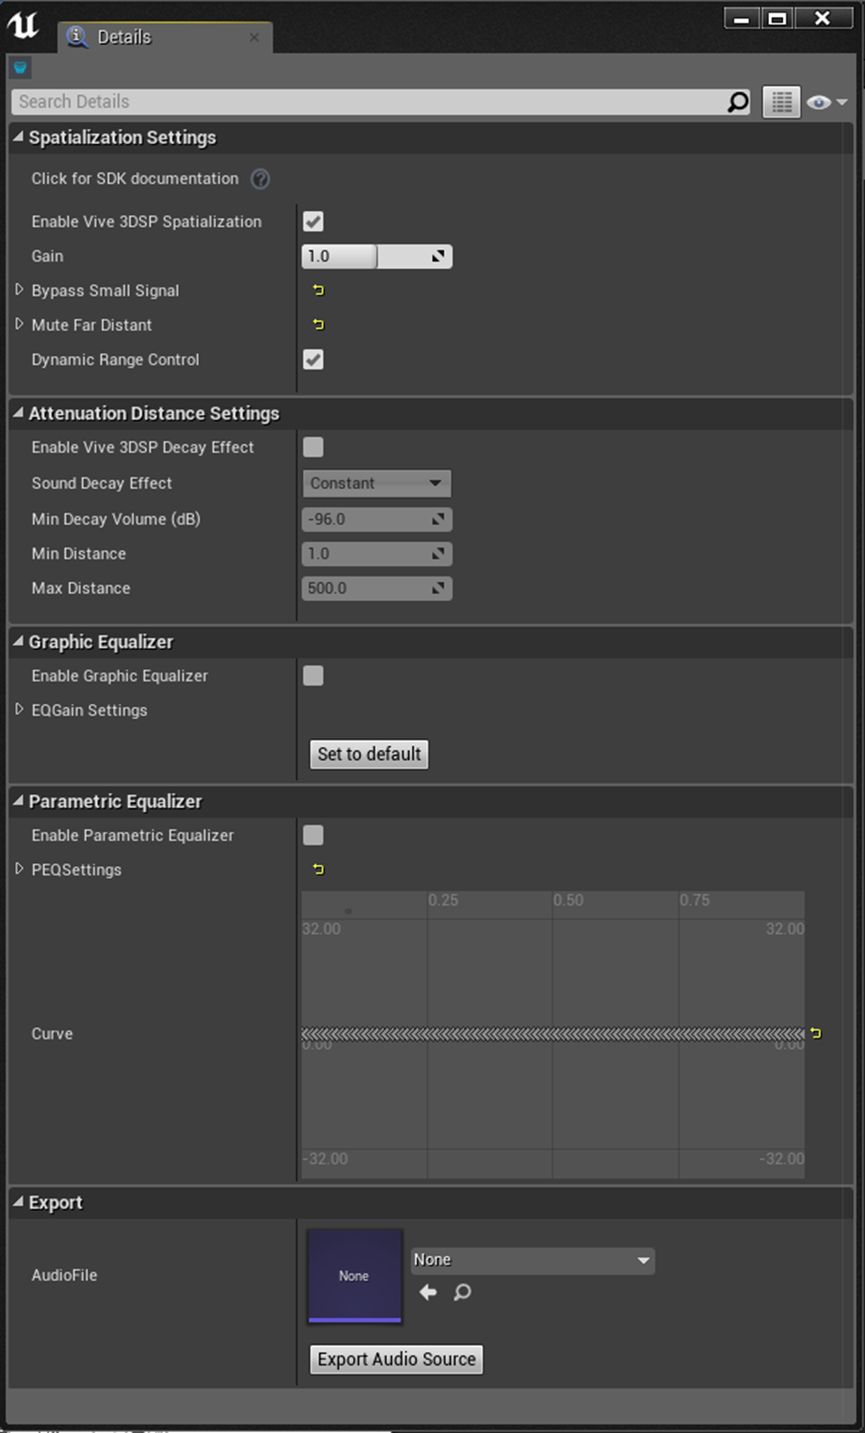
Configure the following settings:
Enable Vive 3DSP Spatialization: This option turns on or off the spatialization effect.
Gain (dB): Set the output gain of the specific audio source. It ranges from 0.0 dB to 1.0 dB.
Bypass Small Signal: In this feature, VIVE 3DSP will not process the input signal if its level is lower than the defined value (in dB). It ranges from -96.0 dB to -40.0 dB.
Note
The volume of all audible sounds should be higher than the Gain value setting in Bypass Small Signal (i.e. all audible sounds should be processed).
Mute Far Distant Source: This feature sets the audible range of the audio source. The audio source would be silent when the distance from the audio source to the listener is larger than the setting value in this item. The Radius slider is adjustable for setting the maximum audible distance. It ranges from 0.0 M to 2000.0 M.
Dynamic Range Control: This option prevents the audio signal from sound clipping.
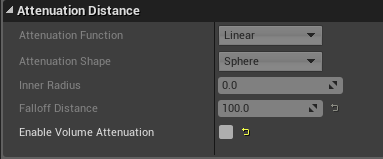
Enable Vive 3DSP Sound Decay Effect: This option turns on or off the 3D Sound effect, which includes the directional sound feeling and sound decay properties. Turn it off to use the UE4 built-in attenuation function.
Note
Clear the Enable Volume Attenuation option under Attenuation Distance in the Details tab to close the UE4 built-in attenuation.
If both (Vive 3DSP Audio Plugin and UE4 built-in) attenuations are turned on, the sound source will be processed by both functions.
Sound Decay Effect: This option sets the decay effect for a specific audio source.
Real World Decay: This is the sound decay effect that is based on the real-world measurement database.
Point Source Decay: This is the sound decay effect that is based on inverse-square law. It behaves as the point source where the sound energy decreased ratio is based on the propagation area (the square of the propagation distance).
Line Source Decay: This is the sound decay effect that is based on inverse law. It behaves as the line source where the sound energy decreased ratio is based on the propagation distance.
Linear Decay: It is the customized sound decay effect. The volume decay is linearly proportional to the distance between the source and listener. These parameters can be adjusted:
Minimum Distance (M): When the distance is lower than the minimum distance, the volume decay rate is 1.0.
Maximum Distance (M): The volume decay rate will be the Minimum Decay Volume (dB) if the distance is longer than the Maximum Distance.
Constant: No sound decay effect will be applied in this audio source.
Note
Selecting Constant means no attenuation effect.
Minimum Decay Volume (dB) can be set in this application.
Graphic Equalizer: The graphic equalizer is a convenient tool for tuning audio. In VIVE 3DSP Audio Source, there are 20 bands in the graphic equalizer. The level bar of each band ranges from -12dB to 12dB. The Set to default button sets all level bars to 0dB.

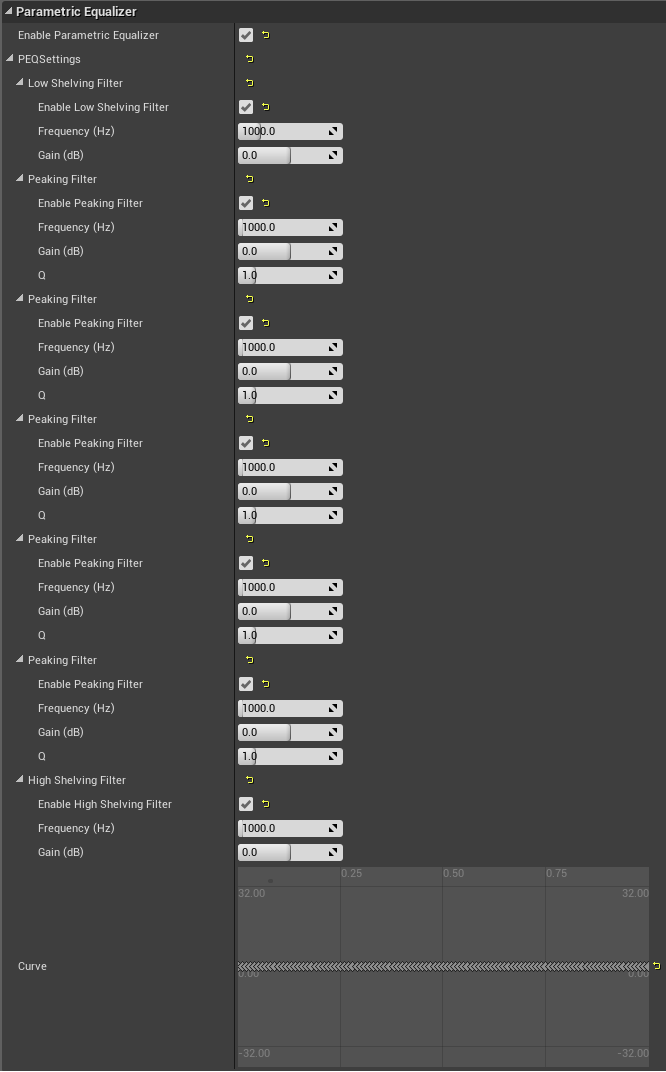
Parametric Equalizer: The option sets the cutoff frequencies and tunes the gains and bandwidths to apply expected sound effects. Low/High Shelving Filters are effective at frequencies lower/higher than the user-defined cutoff frequency. Peaking filters boost/cut the frequency curve based on the user-defined frequencies. These parameters are defined as:
Frequency: This option defines the center frequency for the Peaking Filter and the cutoff frequency for the Low/High Shelving Filter. It ranges from 20 Hz to 20 kHz.
Gain: This option defines the amount in dB which the frequency curve is raised or lowered. It ranges from -12 dB to 12 dB.
Q: Q means the quality factor of the equalizer. This option controls the sharpness of the frequency curve of the Peaking Filter. A larger Q value corresponds to a sharper frequency curve. It ranges from 0.2 to 5.
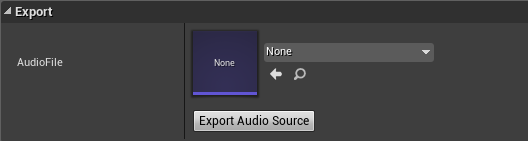
Export Audio File: This function exports a specific audio source attached with the VIVE 3DSP effects as an audio file. Here, the effects include the Gain, Graphic Equalizer, and Parametric Equalizer.
Note
For this function, the selected audio clip in the Unreal Audio Source needs to be in the WAV audio format.
VIVE 3DSP Reverb Effect
VIVE 3DSP Audio Plugin analyzes the size and material properties of the audio rooms in the scene. It uses this information to automatically calculate the reverb effects as the sound flows from the source to the listener. VIVE 3DSP Reverb Effect can be applied to any Actor in the scene that contains an Audio Component. The following steps here build on the completed steps in Getting Started.
Configure Reverb Plugin Settings
Select the Actor that contains the Audio Component that you want to have a reverb effect in the World Outliner tab.
Select the Audio Component that you want to add the reverb effect to in the Details tab.
Select the Enable Reverb Send option under Attenuation Reverb Send.
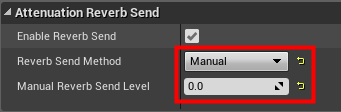
Note
To achieve the best VIVE 3DSP reverb effect, it is recommended to set Reverb Send Method to Manual and Manual Reverb Send Level to 0.0.
Click + in Attenuation Plugin Settings > Reverb Plugin Settings, and then click the drop-down arrow.
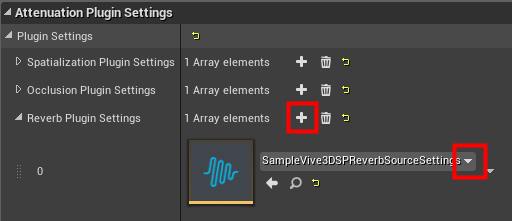
Click Vive3DSP Audio Source Reverb Settings under Create New Asset and select Reverb Settings asset from the list.
Give the new asset a name, then double-click it in the Content Browser tab.
VIVE 3DSP Reverb Settings
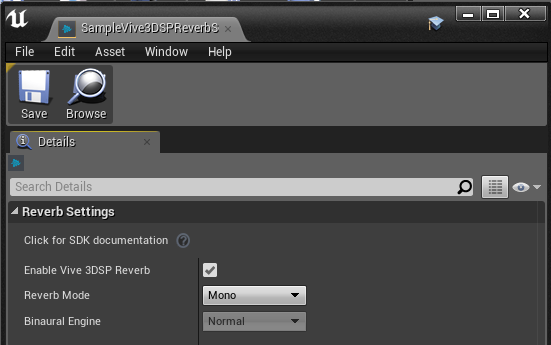
Configure these settings:
Enable Vive 3DSP Reverb: The option turns on or off the room audio application.
Reverb Mode: There are two options in this mode: Mono and Binaural. Mono means the same reverberant outputs are generated for both ears. Binaural means the spatial effect of the reflected sound is considered in the sound reverberation. The sound feelings of both ears are different.
Binaural Engine: When the Binaural mode is selected, two binaural engines can be selected.
Speed Up: The numerical simplification method is considered and the computing cost is minimal.
Normal: It is the theoretically accurate method for calculating the binaural output. Theoretically accuracy requires high computing power.
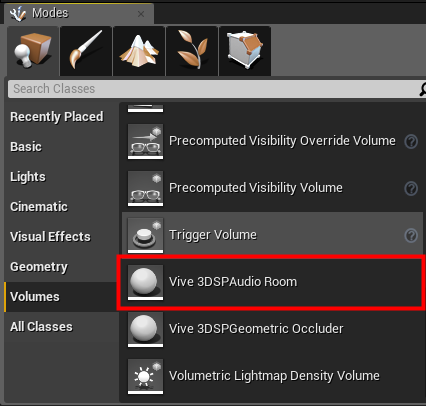
Create VIVE 3DSP Audio Room
VIVE 3DSP Audio Room needs to be placed in the scene to have a reverb effect. VIVE 3DSP Audio Room passes their room transform properties (position, rotation and dimensions) and the room effect parameters to the VIVE 3DSP Reverb Plugin. The VIVE 3DSP Audio Plugin enables multiple room effect volumes in a single level. This provides an intuitive visual interface for creating multiple reverberant environments.
Click Volumes, and then select Vive 3DSP Audio Room in the Modes tab.
Drag and drop the Vive 3DSP Audio Room into the editor window.
Adjust the position and size of the Vive 3DSP Audio Room so that it covers the audio source.
Adjust the Vive 3DSP Audio Room settings in the Details panel.
VIVE 3DSP Audio Room Settings
In the VIVE 3DSP Audio Room, there are reverberations that can be set to create a specific room sound effect. All sounds inside a room are affected by the room size, wall materials, etc. How much influence these variables have on the sound depends on the reflection and reverb levels.
VIVE 3DSP Audio Plugin provides several reverb presets that are used most frequently. Select Custom to select from a list of surface materials and customize the surface material’s properties. The background sound feature is also provided in our audio room.
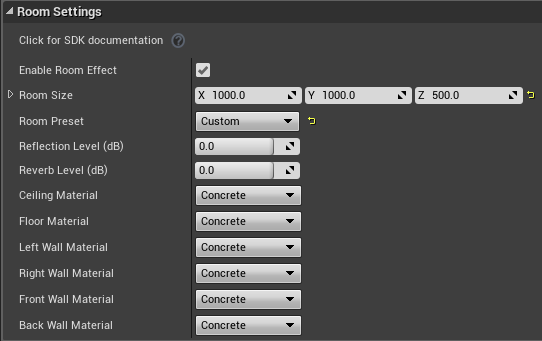
Enable Room Effect: This option can be turned on to apply the room reverberation effect.
Room Size: Dimension units of the room are in meters. The factor, Scale in “Transform” of the attached object, is considered here.
Room Preset: Set the default room preset or select Custom to customize the following parameters.
Reflection Level: This option sets the strength of the early reflections, it ranges from -30 dB to 10 dB.
Reverb Level: This option sets the strength of the late reverberations, it ranges from -30 dB to 10 dB.
Room Surface Material: This option shows the material of the walls. It will change the ingredients of the reflected sound. There are pre-defined material presets for each wall. A customized material can be chosen via User Define, and the parameter of the sound reflection ability of the wall can be set via Reflection Rate.
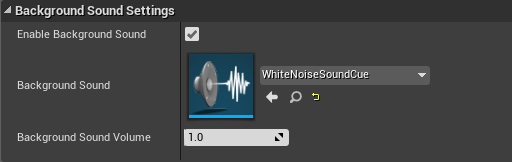
Enable Background Sound: This option turns on or off the background sound when the listener enters the reverb room.
Background Sound: This option sets the background sound cue.
Background Volume: This option sets the strength of the Background Audio, it ranges from -40 dB to 96 dB.
VIVE 3DSP Occlusion Effect
The occlusion effect is adopted to simulate a phenomena when a sound wave encounters an obstacle. The resulting sound is produced depending on the properties of the obstacles, like the material and thickness.
In some cases, the obstacle asymmetrically occludes the sound transmission between a sound source and a human head. For more realistic experiences, binaural occlusion is considered in VIVE 3DSP Audio SDK to produce different sound feelings for both ears. There are two types of occlusion methods: Geometric and Line Trace.
VIVE 3DSP Occlusion Effect can be applied to any Actor in the scene that contains an Audio Component. The following steps here build on the completed steps in Getting Started.
Configure Occlusion Plugin Settings
Select the Actor that contains the Audio Component that you want to have an occlusion effect In the World Outliner tab.
Select the Audio Component that you want to add an occlusion effect to in the Details tab.
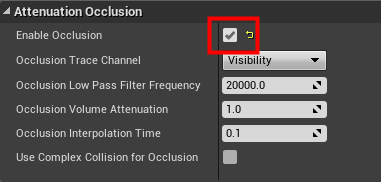
Select the Enable Occlusion option under Attenuation Occlusion.
Click + in Attenuation Plugin Settings > Occlusion Plugin Settings, and then click the drop-down arrow.
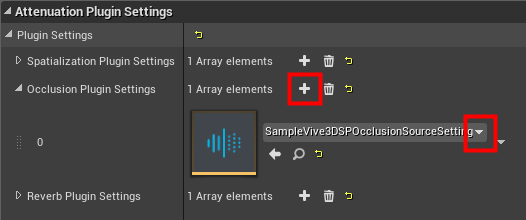
Click Vive3DSP Audio Source Occlusion Settings under Create New Asset and select Occlusion Settings asset from the list.
Give the new asset a name, then double-click it in the Content Browser tab.
VIVE 3DSP Occlusion Settings

Configure these settings:
Enable Vive 3DSP Occlusion: This option turns on or off the occlusion effect of the specific sound source.
Use Line Trace Occluder: This option turns on or off the usage of the VIVE 3DSP line trace occlusion method.
Trace Channel: This option sets the channel to use for the VIVE 3DSP line trace to calculate the occlusion effect.
Line Trace Number: This option sets the line trace number to use for the VIVE 3DSP occlusion method. The higher the quantity, the better the occlusion effect quality. It ranges from 1 to 30.
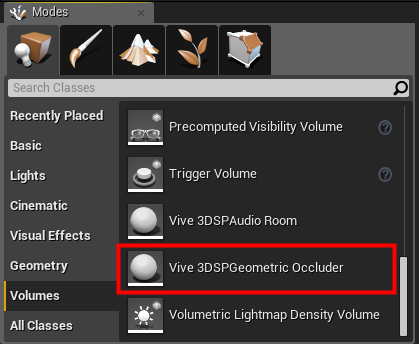
Create VIVE 3DSP Occluder
To achieve an occlusion effect, one of the VIVE 3DSP Occluders must be placed into the scene. The VIVE 3DSP Occluder passes their transform properties (position, rotation and dimensions) and the occlusion effect parameters to the VIVE 3DSP Occlusion plugin. There are two types of occluders: Geometric Occluder and Line Trace Occluder.
VIVE 3DSP Geometric Occluder
In the Modes tab, click Volumes, and then select Vive 3DSP Geometric Occluder.
Drag and drop the Vive 3DSP Geometric Occluder into the editor window.
Adjust the position and size of the Vive 3DSP Geometric Occluder.
Adjust the Vive 3DSP Geometric Occluder settings in the Details panel.
VIVE 3DSP Geometric Occluder Settings
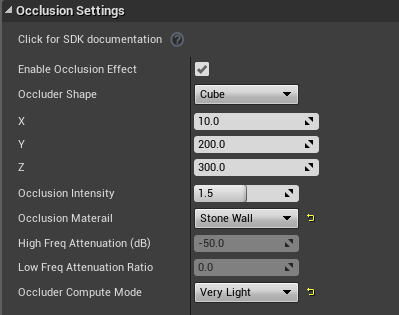
Enable Occlusion Effect: This option turns on or off the occlusion effect on the attached object.
Occluder Shape: This option sets the geometric occluder shape, Cube or Sphere.
Occluder Size: This option sets the size of the occluder (length, width, and height for cube; radius for sphere).
Occlusion Intensity: This option presents the strength of the occlusion effect. The higher the value, the more occlusion effect is applied.
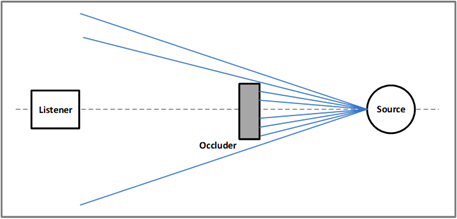
Occlusion Computation Mode: This is designed specifically for box-type geometric occlusion. It offers an option to select different computing modes to balance the coverage resolution and computation load.
Very Light: In this mode, it requires the least amount of calculation for geometric occlusion. There is only one ray emitted from the source to the listener, then evaluates whether the ray collided with the occlusion object or not.
Simple: There are 6 different rays emitted from the source to the listener in this mode. The occlusion ratio is evaluated by the number of rays that collide with the occlusion object.
Normal: There are 11 different rays emitted from the source to the listener in this mode. The occlusion ratio is evaluated by the number of rays that collide with the occlusion object.
Detailed: This is the most accurate mode for occlusion coverage calculation. It also takes subtle movements of the occlusion object into consideration when determining the extent of occlusion.
Occlusion Material: The material of an occluder can be changed here. There are some material presets in VIVE 3DSP. A customized material can be created via User Define by setting the High Freq. Attenuation (dB) and Low Freq. Attenuation Ratio.
Occlusion Effect Engine: There are two types of occlusion engines that can be selected:
Frequency Dependent: The different material corresponds to the different sound frequency responses during sound transmission. The sound decay caused by objects is different based on frequencies. The real-world material response is modelled in this application.
Frequency Free: The sound decay influence of an obstacle is simulated by the volume decay only and the computing cost is minimal.
VIVE 3DSP Line Trace Occluder
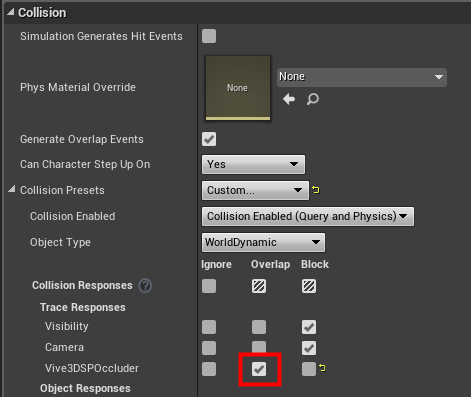
The VIVE 3DSP Line Trace Occlusion method uses the Line Trace by Channel in Unreal Engine, where the hit information will return only if the object is set to specifically respond to a specified Trace Channel. Therefore, the object with the VIVE 3DSP Line Trace Occluder effect must have its Collision Settings to respond to the specified Trace Channel assigned in the VIVE 3DSP Occlusion Settings.
In the actor you want to have an occluder effect, click +**Add Component**, and then select Vive3DSPLineTraceOccluder.
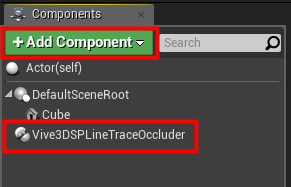
In the Details panel, adjust the Vive 3DSP Geometric Occluder settings.
Note
Optional steps:
Add a new trace channel in Edit > Project Settings > Collision > New Trace Channel…
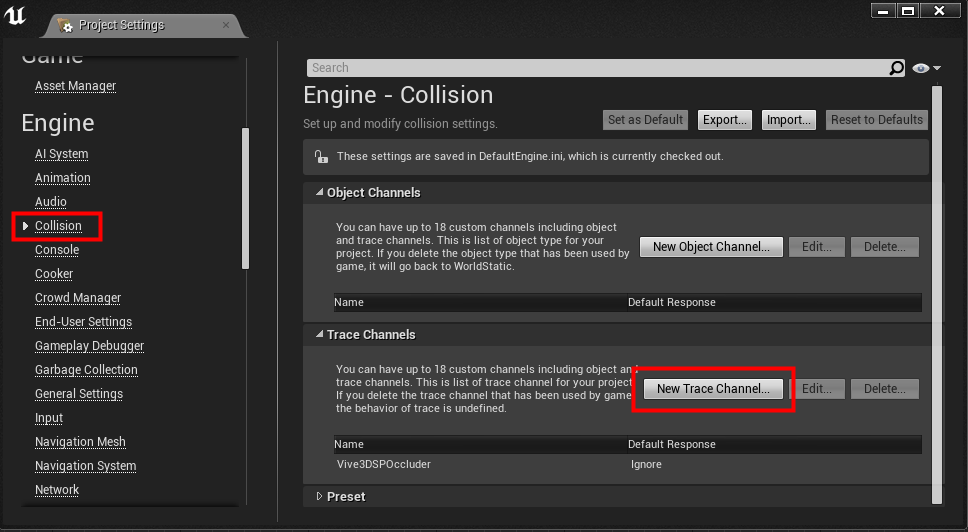
Adjust the collision response (in the Collision Settings) of the object so it can respond to the VIVE 3DSP line trace channel set in the VIVE 3DSP Occlusion Settings.
VIVE 3DSP Line Trace Occluder Settings
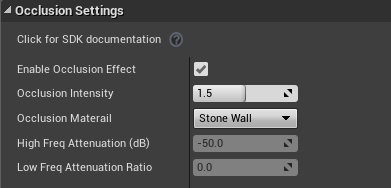
Enable Occlusion Effect: This option turns on or off the occlusion effect on the attached object.
Occlusion Intensity: This option presents the strength of the occlusion effect. The higher the value, the more occlusion effect is applied.
Occlusion Material: The material of an occluder can be changed here. There are some material presets in VIVE 3DSP. A customized material can be created via User Define by setting the High Freq. Attenuation (dB) and Low Freq. Attenuation Ratio.
Control VIVE 3DSP Parameters Using Blueprints
All the VIVE 3DSP Audio Plugin parameters can be controlled in real time using Blueprints.
Open the Blueprint Editor and go to the Event Graph tab.
Right-click anywhere in the blueprint editor window to bring up a window with possible actions.
Clear the Context Sensitive option.
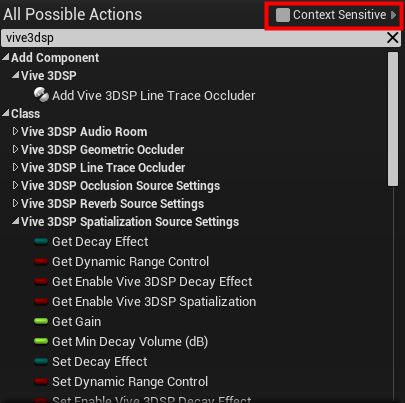
Enter “vive3dsp” to filter the available actions.
Note
Modified spatialization, reverb, and occlusion source settings in run time will affect other sounds that are using the same settings, and will be saved even when the play mode is stopped. Therefore, it is recommended to initialize the spatialization, reverb, and occlusion source settings at BeginPlay if changing parameters in run time.