Getting Started
Learn how to import Wave Unity XR Plugin and do basic testing for your environment.
Read through the Installation and Configuration sections below before you start building your project.
Prerequisites
We assume that you have an understanding of what virtual reality is and the terms it uses. If not, check the Unity glossary to better understand the terms related to virtual reality.
Before using the Wave XR Plugin, we highly recommend that you to read Unity’s XR document , as you need to be familiar with it. We may also redirect you to a Unity documentation page when it is related to a specific topic.
Also consider using the VIU Unity plugin that can manage Wave XR plugin installation for you automatically from the VIU Settings (see section at the bottom)
If you have an old version of the Wave SDK in your project, please remove it entirely. For more information, see Migrate From Wave SDK .
Installation
The Wave XR Plugin provides basic XR features that follow the XR specifications established by Unity. If your project is designed to use Unity APIs or packages, you can incoporate Wave XR Plugin into you VR project.
To install Wave XR Plugin:
- Follow the Steps to install the Wave XR Plugin and the other Wave Packages in Unity.
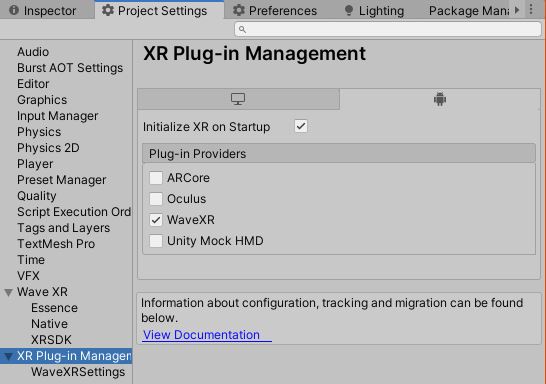
Follow Configuring your Unity Project for XR. In Project Settings > Plug-in Providers, make sure only WaveXR is selected under the Android Tab. Check that Initial XR on Startup is also selected.
If you don’t want to use SinglePass for your project, switch Render Mode to MultiPass in WaveXRSettings. For more information, check WaveXRSettings.
You can now start developing XR content that can run on VIVE Wave devices. We have provided some samples for you to test your environment.
The other Wave Packages are as below:
There are two more Wave packages in addition to Wave XR Plugin:
- VIVE Wave XR Plugin - Native
- VIVE Wave XR Plugin - Essence
These packages are to access APIs and features exclusive to the VIVE Wave Platform. For more information, check Wave Packages.
Configuration
Before building your project, please configure it following the instructions below.
Build Settings
- Switch to the Android platform. You must have the Android SDK installed to switch to Android platform. To install Android SDK, install Android Studio and use the built-in SDK Manager to choose the Android SDK Components that you need for your project (Check our version list to see which targetSdkVersion(s) to install). You will also have to specify the Android SDK path in the Edit/Preferences/External Tools menu.
Player Settings
After installing Wave XR Plugin, WaveXRPlayerSettingsConfigDialog will automatically open if you have switched to Android platform in build settings.
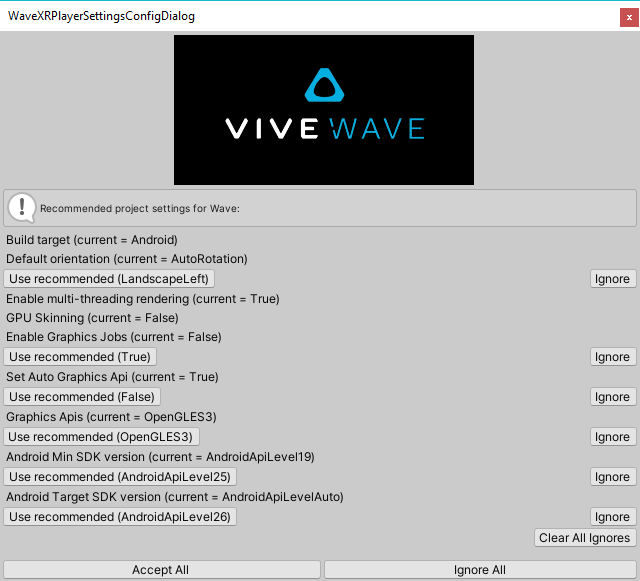
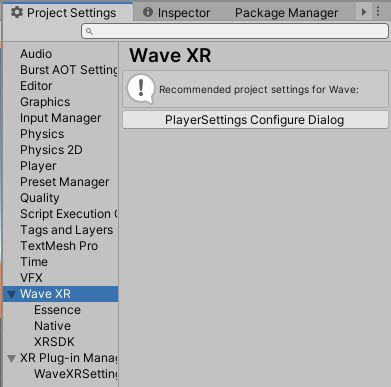
If WaveXRPlayerSettingsConfigDialog did not open, open it through Project Settings > Wave XR.
Read the descriptions for each term, and then click Accept All to apply our recommended Player Settings.
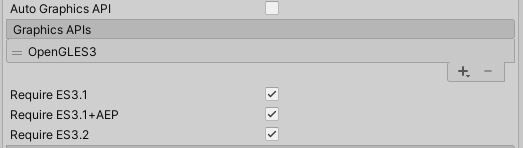
For SinglePass to work, your Wave XR app needs to run using OpenGLES 3.2. If you already clicked Accept All in WaveXRPlayerSettingsConfigDialog, the correct settings should be applied already. Otherwise, set it by:
Open Player Settings
Uncheck Auto Graphics API
In Graphics APIs, select only OpenGLES3.
Check Require ES3.1, Require ES3.1+AEP and Require ES3.2.
- XR Plug-in Management Settings
Before building, make sure WaveXR is the only Plug-in Provider selected.
Building a simple scene
After importing all the required packages and making necessary configuration, you can start building a simple scene to run on your Wave Device.
To do so, you can refer to the Unity documentation Configuring your Unity Project for XR to learn how to setup a new scene or modify an existing one for XR.
You can also choose to use the Wave Rig provided by us for a simple setup process.
Using Vive Input Utility (VIU) to develop across platforms including VIVE Wave
Note
Please use VIU version 1.12.0 or newer for Wave XR Plugin support.
The VIU Unity plugin (avaliable both in the Asset Store and Package Manager) is a toolkit for creating VR applications across platforms including PC and Android (AIO) devices from VIVE, Oculus, Windows MR and other platforms supported by Unity.
Within the VIU Settings, you can install the Wave XR Plugin, change XR Plug-in Management Settings, switch platforms and setup Android Configuration Settings all in one place.
In addition, this toolkit includes cross-platform APIs and prefabs for input control, model rendering, grab interactions, teleporting, ray casting, support for standard Unity UI and events, as well as a fully functional cross platform simulator (keyboard/mouse). For more information, please visit the VIU github repository.