VIVE 3DSP Audio SDK Unity Plugin
Contents |
System Requirements
Unity version 2017.1 or higher
Windows® 7 SP1, Windows® 8 or later, Windows® 10
Android 8.1 or later
Intel® Core™ i5-4590 or AMD FXTM 8350 equivalent or better
NVIDIA® GeForce® GTX 1060 or AMD™ Radeon™ RX 480, equivalent or better graphics card
VIVE 3DSP Audio SDK Unity Plugin Guide
Import Latest Package into New Project
Download the latest version of VIVE 3DSP Audio Plugin in website.
Create a new 3D project in Unity.
Click Assets > Import > Custom Package.
Select the latest version of Vive3DSP .unitypackage file and click Import.
Upgrade to Latest Package
Close Unity project, if open.
In the Unity project, go to the Assets folder and delete the Vive3DSP folder.
Open the porject and import the latest version of VIVE 3DSP Audio Plugin (follow steps 3 and 4 from Import Latest Package into New Project section).
Set Spatializer Pluging
Select VIVE 3DSP Audio in Spatializer Plugin.
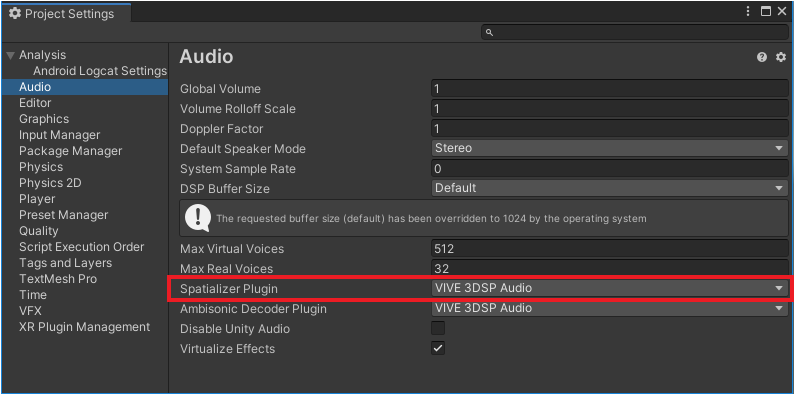
Click Edit > Project Settings > Audio.
Select VIVE 3DSP Audio in Spatializer Plugin.
Note
VIVE 3DSP supports 3rd order Ambisonics for spatializer.
Set Ambisonic Decoder Plugin
Select VIVE 3DSP Audio in Ambisonic Decoder Plugin.
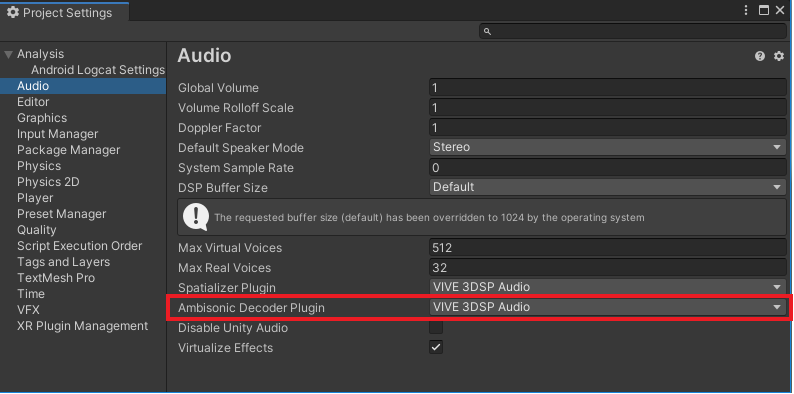
Click Edit > Project Settings > Audio.
Select VIVE 3DSP Audio in Ambisonic Decoder Plugin.
Note
VIVE 3DSP supports 3rd order Ambisonic for decoder.
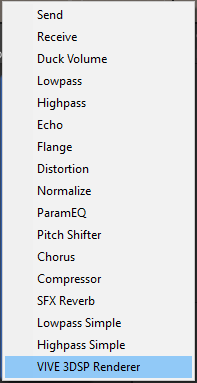
Audio Mixer Settings
Add an audio mixer
Click Window > Audio > Audio Mixer.
Click + to add a new audio mixer.
In Audio Mixer tab, click Add…, and then select VIVE 3DSP Renderer.

Audio Source Settings
Set an object as the audio source
Do any of the following:
Attach the VIVE 3DSP Audio Source component to a Unity audio source object. Click Add Component > VIVE > 3DSP_AudioSource.
Attach the VIVE 3DSP Audio Source component to an object that contains a Unity Audio Source component.
Add an Audio Clip to the Unity Audio Source.
Set the audio mixer that include VIVE 3DSP Renderer as the Unity Audio Source output.
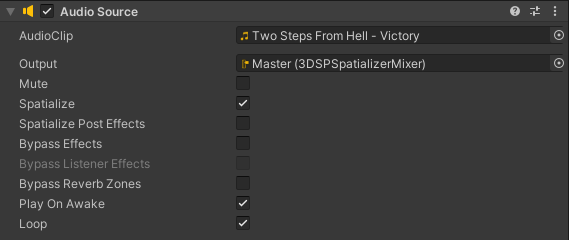
Note
Don’t select Bypass Effects and Bypass Listener Effects in the Unity Audio Source.
There are a lot of Unity default features in the Audio Source object. The VIVE 3DSP Audio Source component offers more features for the spatializer effect:
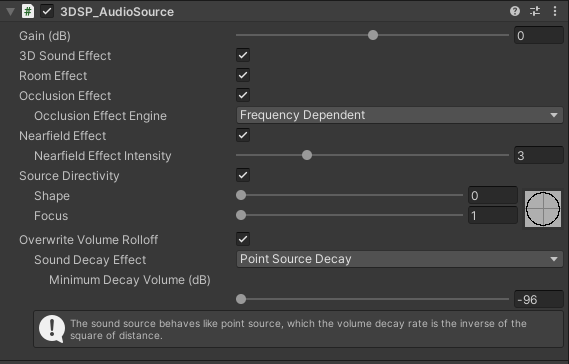
Gain (dB): This option sets the audio clip volume level (in dB).
3D Sound Effect: This option turns on or off the 3D Sound effect, which includes the directional sound feeling and sound decay properties.
Room Effect: The option turns on or off the room audio application.
Occlusion Effect: This option turns on or off the sound occlusion application.
Occlusion Effect Engine: There are two types of occlusion engines that can be selected.
Frequency Dependent: The different material corresponds to the different sound frequency responses during sound transmission. The sound decay caused by objects is different based on frequencies. The real-world material response is modelled in this application.
Frequency Free: The sound decay influence of an obstacle is simulated by the volume decay only and the computing cost is minimal.
Nearfield Effect: This option turns on or off the nearfield effect-which performs the sound response-when the sound source is near to listener. The nearfield effect is only active when the distance between source and listener is less than one meter.
Nearfield Effect Intensity: This option represents the strength of the nearfield effect. The higher the value, the stronger the nearfield effect will be.
Note
DRC is enabled by default to help prevent audio signal clipping.
Source Directivity: This option turns on or off the source directivity effect which simulates the sound directional and response when pattern changed.
Shape: This option presents the shape of source directivity pattern.
Focus: This option presents the sharpness of source directivity pattern.
Overwrite Volume Rolloff: If this feature is selected, the Unity built-in volume roll off effect will be disabled, and the VIVE 3DSP Sound Decay Effect will be used instead. Several types of Sound Decay Effect can be selected:
Point Source Decay: This is the sound decay effect that is based on inverse-square law. It behaves as the point source where the sound energy decreased ratio is based on the propagation area (the square of the propagation distance).
Line Source Decay: This is the sound decay effect that is based on inverse law. It behaves as the line source where the sound energy decreased ratio is based on the propagation distance.
Linear Decay: It is the customized sound decay effect. The volume decay is linearly proportional to the distance between the source and listener. These parameters can be adjusted.
Minimum Distance (M): When the distance is lower than the minimum distance, the volume decay rate is 1.0.
Maximum Distance (M): The volume decay rate will be the Minimum Decay Volume (dB) if the distance is longer than the Maximum Distance.
No Decay: No sound decay effect will be applied in this audio source.
Note
When Overwrite Volume Roll-off is selected, the default Unity distance curve will be set to a constant, 1.0.
Minimum Decay Volume (dB) can be set in this application.
Audio Room Settings
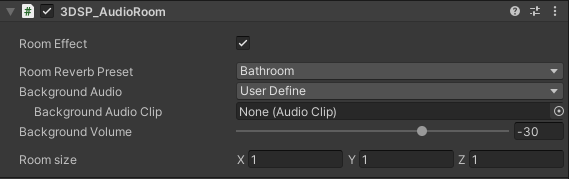
In VIVE 3DSP Audio Room, the reverberations can be represented via specific room sound effects. All audio sources inside a VIVE 3DSP Audio Room object are affected by the room properties such as size, materials, etc.
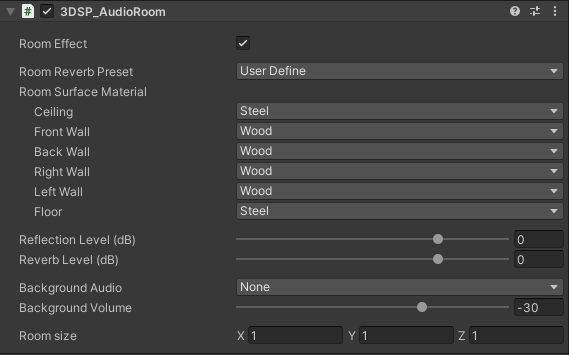
Specifically, several often-used room presets are provided in VIVE 3DSP Audio Room. Moreover, if User Define is selected, a list of materials and sound properties can be customized for the walls. This component can be selected via Add Component > VIVE > 3DSP_AudioRoom.
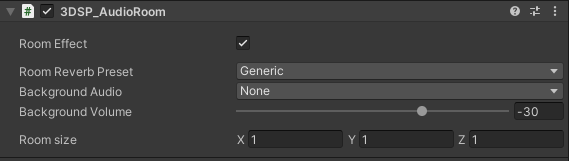
Room Effect: This option can be turned on to apply the room reverberation effect.
Room Surface Material: This option shows the material of the walls. It will change the ingredients of the reflected sound. There are pre-defined material presets for each wall. A customized material can be chosen via User Define, and the parameter of the sound reflection ability of the wall can be set via Reflection Rate.
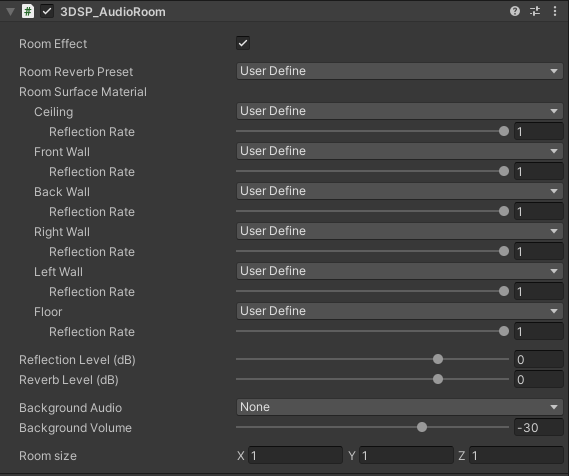
Reflection Level: This option sets the strength of the early reflections, it ranges from -30 dB to 10 dB.
Reverb Level: This option sets the strength of the late reverberations, it ranges from -30 dB to 10 dB.
Background Audio: The background audio presents the sound effect of the ambient sounds in the environment. There are several default types in the background audio option. The preferred audio file can be chosen in User Define.
Note
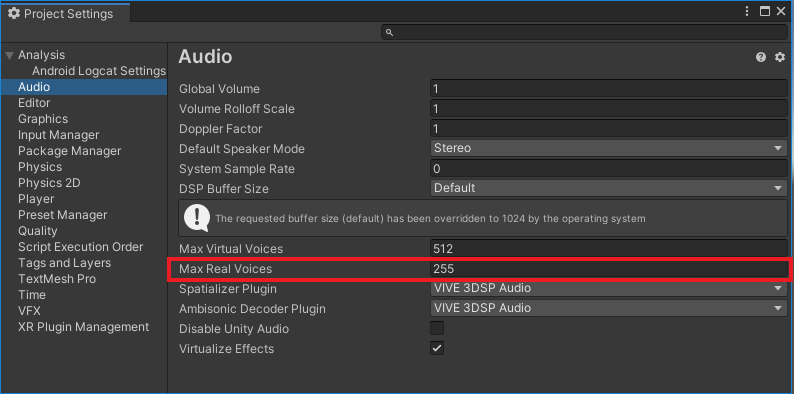
The background audio is counted as one audio source in Unity. The limitation of the quantity of audio sources in Unity is adjustable in AudioManager settings. The maximum is 255 (setting in Max Real Voices).
Background Volume: This option sets the strength of the Background Audio, it ranges from -40 dB to 96 dB.
Room Size: This option means the dimension of the room in meters. The factor, Scale in “Transform” of the attached object, is considered here.
Audio Occlusion Settings
To have the occlusion effect, it is necessary to set the environment in both the VIVE 3DSP Audio Source and VIVE 3DSP Audio Listener. In audio source objects, the VIVE 3DSP Audio Occlusion component needs to be added to establish the sound occlusion effects.
The VIVE 3DSP Occlusion component should be attached along with the object to enable the occlusion effect. This component can be selected via Add Component > VIVE > 3DSP_AudioOcclusion.

Occlusion Effect: This option turns on or off the occlusion effect on the attached object.
Occlusion Material: The material of an occluder can be changed here. There are some material presets in VIVE 3DSP. A customized material can be created via User Define by setting the High Freq. Attenuation (dB) and Low Freq. Attenuation Ratio.

Occlusion Intensity: This option presents the strength of the occlusion effect. The higher the value, the more occlusion effect is applied.
Occlusion Angle: This option presents the cover range of the occlusion effect. The higher the value, the more occlusion cover range is applied.
Occlusion Geometry: The different shapes of the occlusion object can be set here. For calculating the occlusion effect, the geometrical information of the occluder is necessary. The values for Occlusion Center, Size, and Radius need to be entered.
Occlusion Compute Mode: This is designed specifically for box-type geometric occlusion. It offers an option to select different computing modes to balance the coverage resolution and computation load.
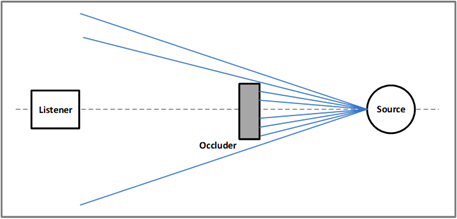
Very Light: In this mode, it requires the least amount of calculation for geometric occlusion. There is only one ray emitted from the source to the listener, then evaluates whether the ray collided with the occlusion object or not.
Simple: There are 6 different rays emitted from the source to the listener in this mode. The occlusion ratio is evaluated by the number of rays that collide with the occlusion object.
Normal: There are 11 different rays emitted from the source to the listener in this mode. The occlusion ratio is evaluated by the number of rays that collide with the occlusion object.
Detailed: This is the most accurate mode for occlusion coverage calculation. It also takes subtle movements of the occlusion object into consideration when determining the extent of occlusion.
Occlusion Center: This option means the center coordinates relative to the attached object.
Occlusion size: This option means the dimension of the occluded region in meters. The factor, Scale in “Transform” of the attached object, is considered here.
Note
The Occlusion component has its own collider calculator. The Unity collider component does not need to be added.
Audio Listener Settings
The VIVE 3DSP Audio Listener component should be attached along with the Unity Audio Listener to enable some 3D sound effects. This component can be selected via Add Component > VIVE > 3DSP_AudioListener.
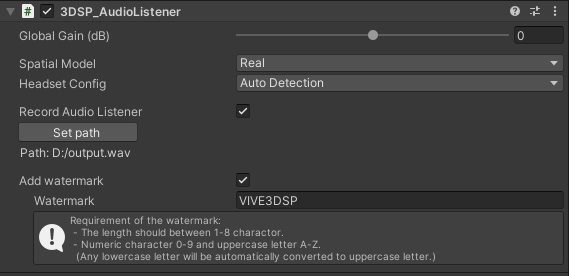
Global Gain: This option sets the overall volume changes of the audio output from VIVE 3DSP Audio Listener. It ranges from -24 dB to 24 dB.
Spatial Model: The option controls the spatializer model.
Real: The option performs the sound response that is measured at the different direction from real world.
Lossless: The option performs the sound response that represents the characters of spatializer without any distortion.
Headset Config: The option controls the targeted headset model. For the best audio experience, sound optimization has been done for most headset models.
Generic: Select this option if using non-VIVE VR devices and headphones.
Auto Detection: Audio response is optimized for VIVE VR devices. When enabled, the system will automatically detect the type of VIVE device and provide the optimized audio experience for that device. The feature supports the following VIVE devices: VIVE Pro, VIVE Pro 2, VIVE Focus 3, and VIVE XR Elite.
Record Audio Listener: This option is selected to record what the listener is hearing in the scene and exports it as an audio file. Set path is applied to set the file location. If the Record Audio Listener option is turned off during Play Mode or the Play Mode is stopped, an audio file will be exported in the WAV audio format.
Add Watermark: This option lets you add a watermark in the audio system of the application for intellectual property rights and for identification purposes. You can find the watermark decoder in the VIVE 3DSP SDK package. For more details, refer to Decoding watermarks.
a. Watermark: The watermark must be eight characters or less, and can only contain numbers (0–9) and UPPERCASE letters (A–Z). (Any lowercase letter will be automatically converted to uppercase letter.)
Audio Ambisonics Settings
Put the AmbiX format audio file into your Unity Assets folder.
Note
The ambisonic file should be in ACN/SN3D format and the channel count should be 4, 9 or 16.
Note
Currently, Unity only supports Ambisonic files in 1st order. However, in 3DSP, the application with up to 16 channels is still available. Therefore, if the following error message is encountered, please safely ignore it as the Ambisonics decode feature will still function correctly.

Do any of the following:
Attach the VIVE 3DSP Audio Ambisonics component to a Unity audio source object. Click Add Component > VIVE > 3DSP_AudioAmbisonics.
Attach the VIVE 3DSP Audio Ambisonics component to an object that contains a Unity Audio Source component.
Note
Only one 3DSP_AudioAmbisonics component is allowed in a Unity project.
Add Ambisonics audio files to Ambisonics Source List by clicking on the Find button and selecting an Ambisonics file.
Note
To add multiple Ambisonics files, click the “+” button. To remove the last Ambisonics file, click the “-” button.
More features for Ambisonic decoder are offered in VIVE 3DSP Audio Ambisonics component. When the 3DSP Audio Ambisonics component is added, the Unity audio source component will become not editable. Some settings will be managed by the VIVE 3DSP Audio Ambisonics, and these settings will overwrite those on the Unity audio source component.

Mute: To mute / unmute the audio source. This option overwrites the Mute on Unity audio source.
Play On Awake: If set to true, the audio source will automatically start playing on awake. This option overwrites the Play On Awake on Unity audio source.
Loop: Checks if the audio clip is looping. This option overwrites the Loop on Unity audio source.
Gain (dB): This option sets the Ambisonics clip volume level (in dB).
Target Device Sample Rate: To set the target device sample rate, specify the device sample rate if known. Select Not Assigned if unknown.
Note
If Not Assigned is selected, the audio clips will be encoded at all supported sample rates: 44.1k, 48k, 96k, and 192k Hz. This may result in a larger APK size. The encoded audio clips are located in the directory: Assets/StreamingAssets/Vive3DSP.
Ambisonics Source List: To add Ambisonics audio clips here, use the “+” and “-“ buttons to increase or decrease the number of clips as needed.
Note
The Ambisonics Source List can only be edited in Edit Mode.
Enable: Checks to set the enabled clip ID. The following function is also used to change the ID: Vive3DSPAudioAmbisonics.SetSrcId(int id)
Decoding watermarks
The VIVE 3DSP Watermark Decode Tool (appWmDecToolAPP.exe) lets you check if there is a watermark in the audio file of the application. You’ll need to prepare the audio file of the application first to be able to decode the watermark.
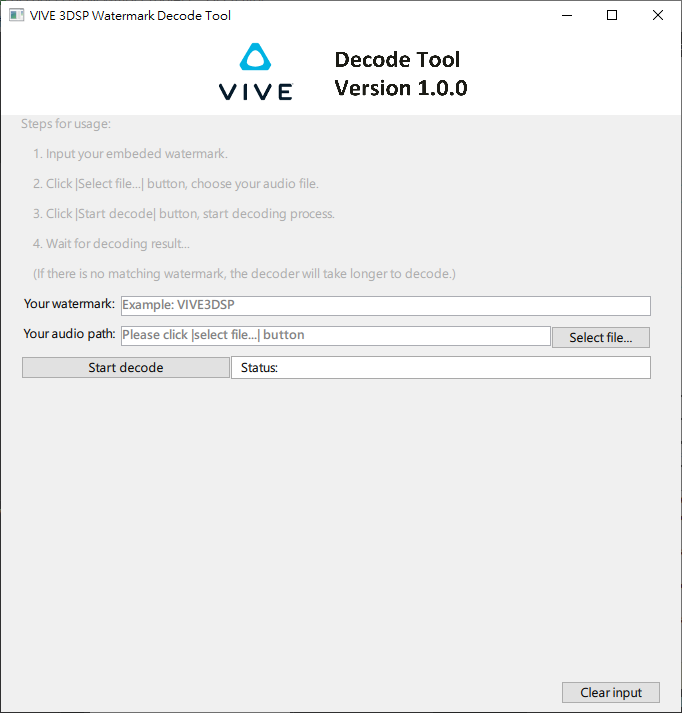
Decode the watermark
In Your watermark, enter the watermark that you used for the audio of the application.
In Your audio path, select the audio file of application.
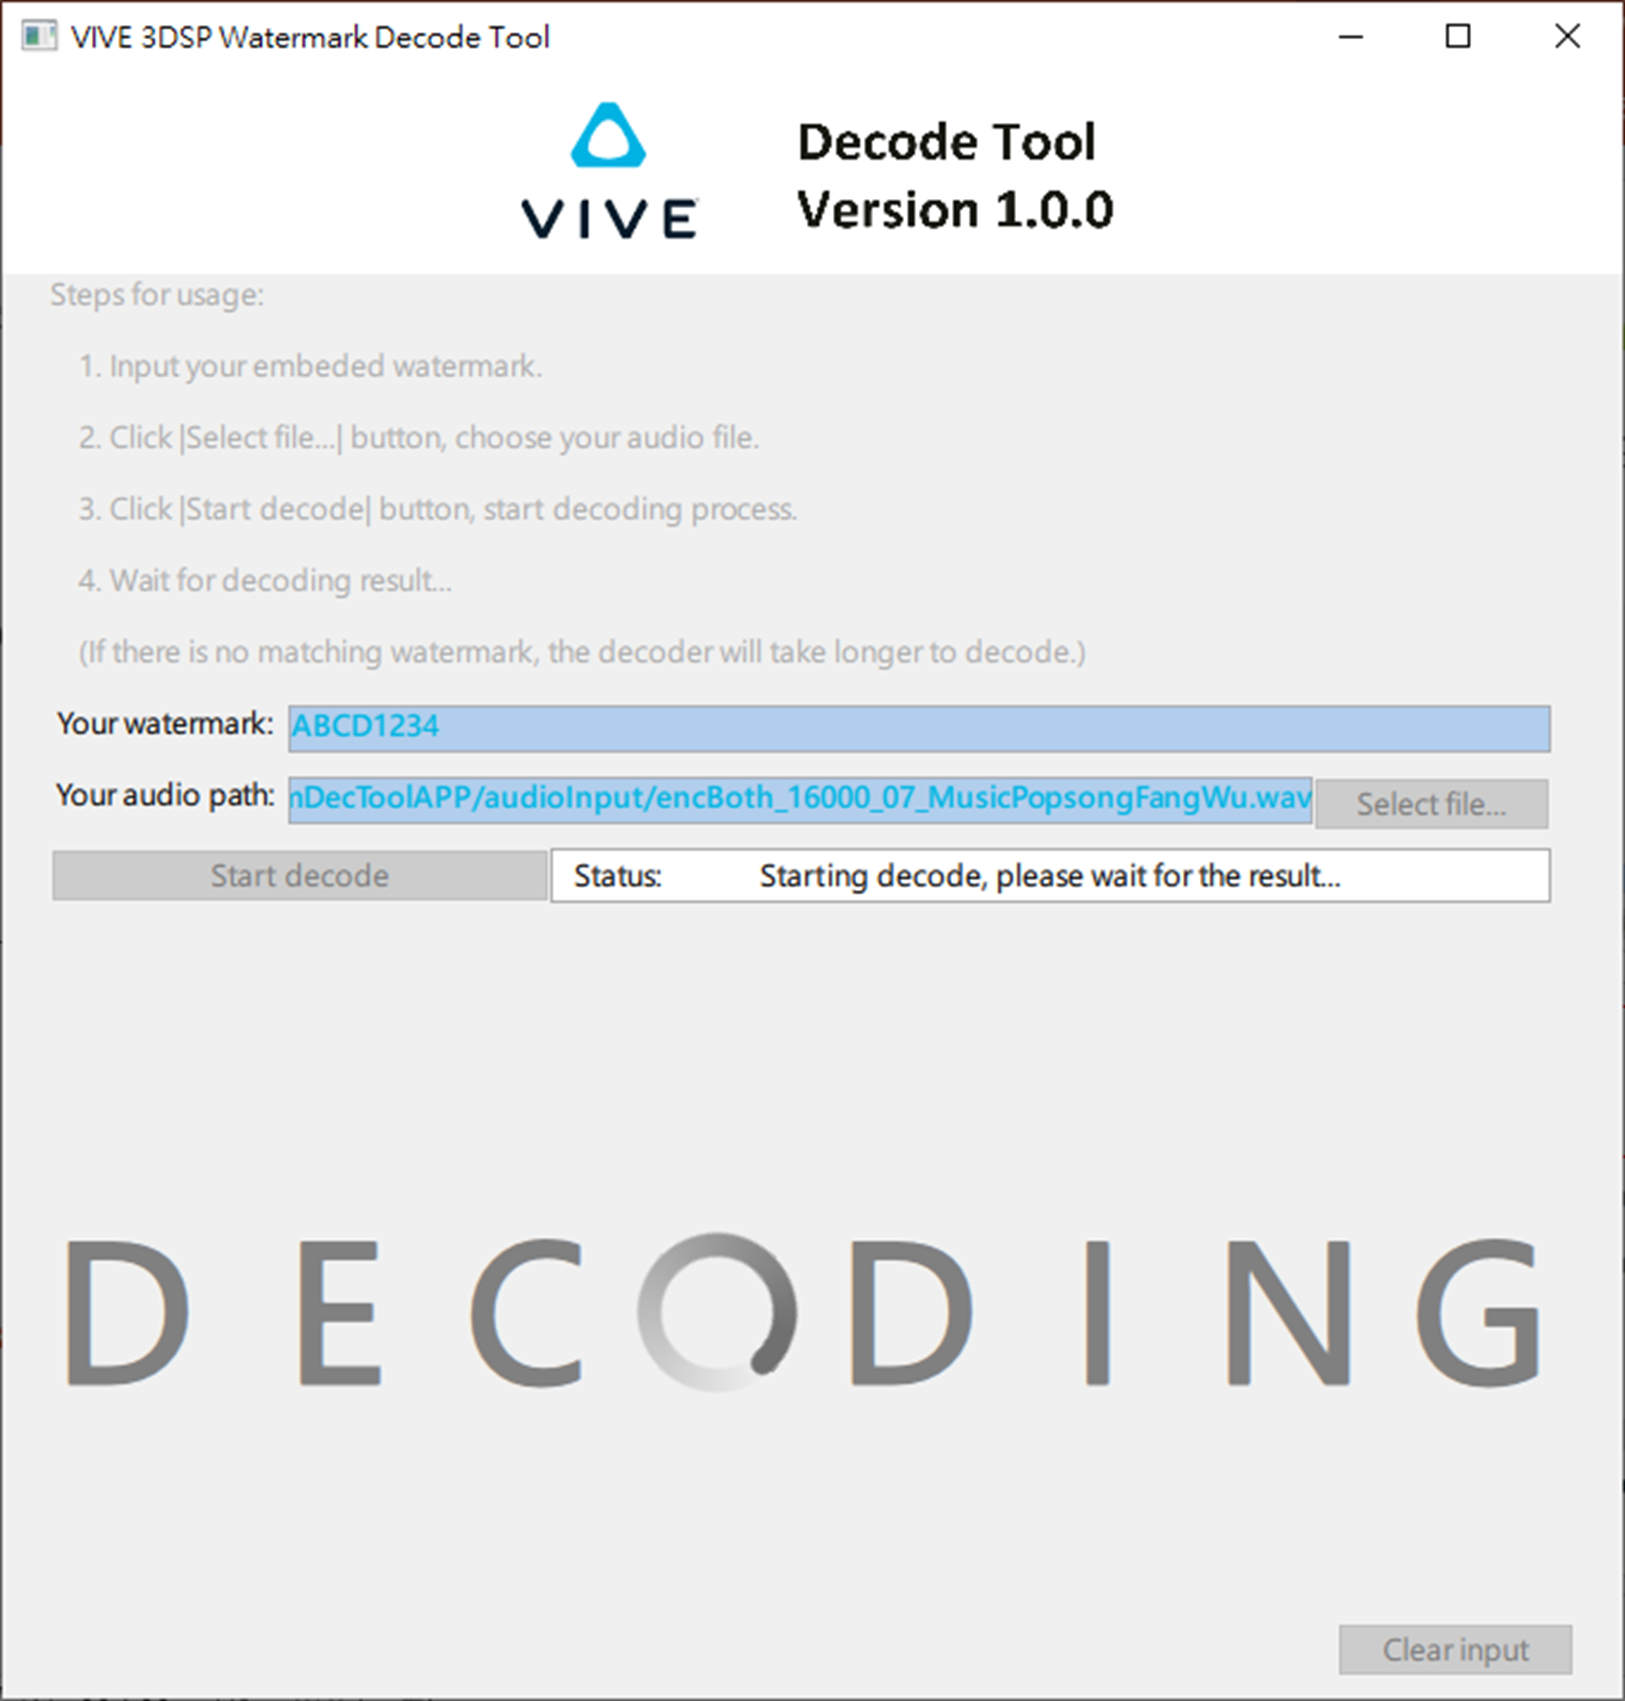
Click Start decode. The status of the decoding process will then be shown on the window. The decoding process may take several minutes.
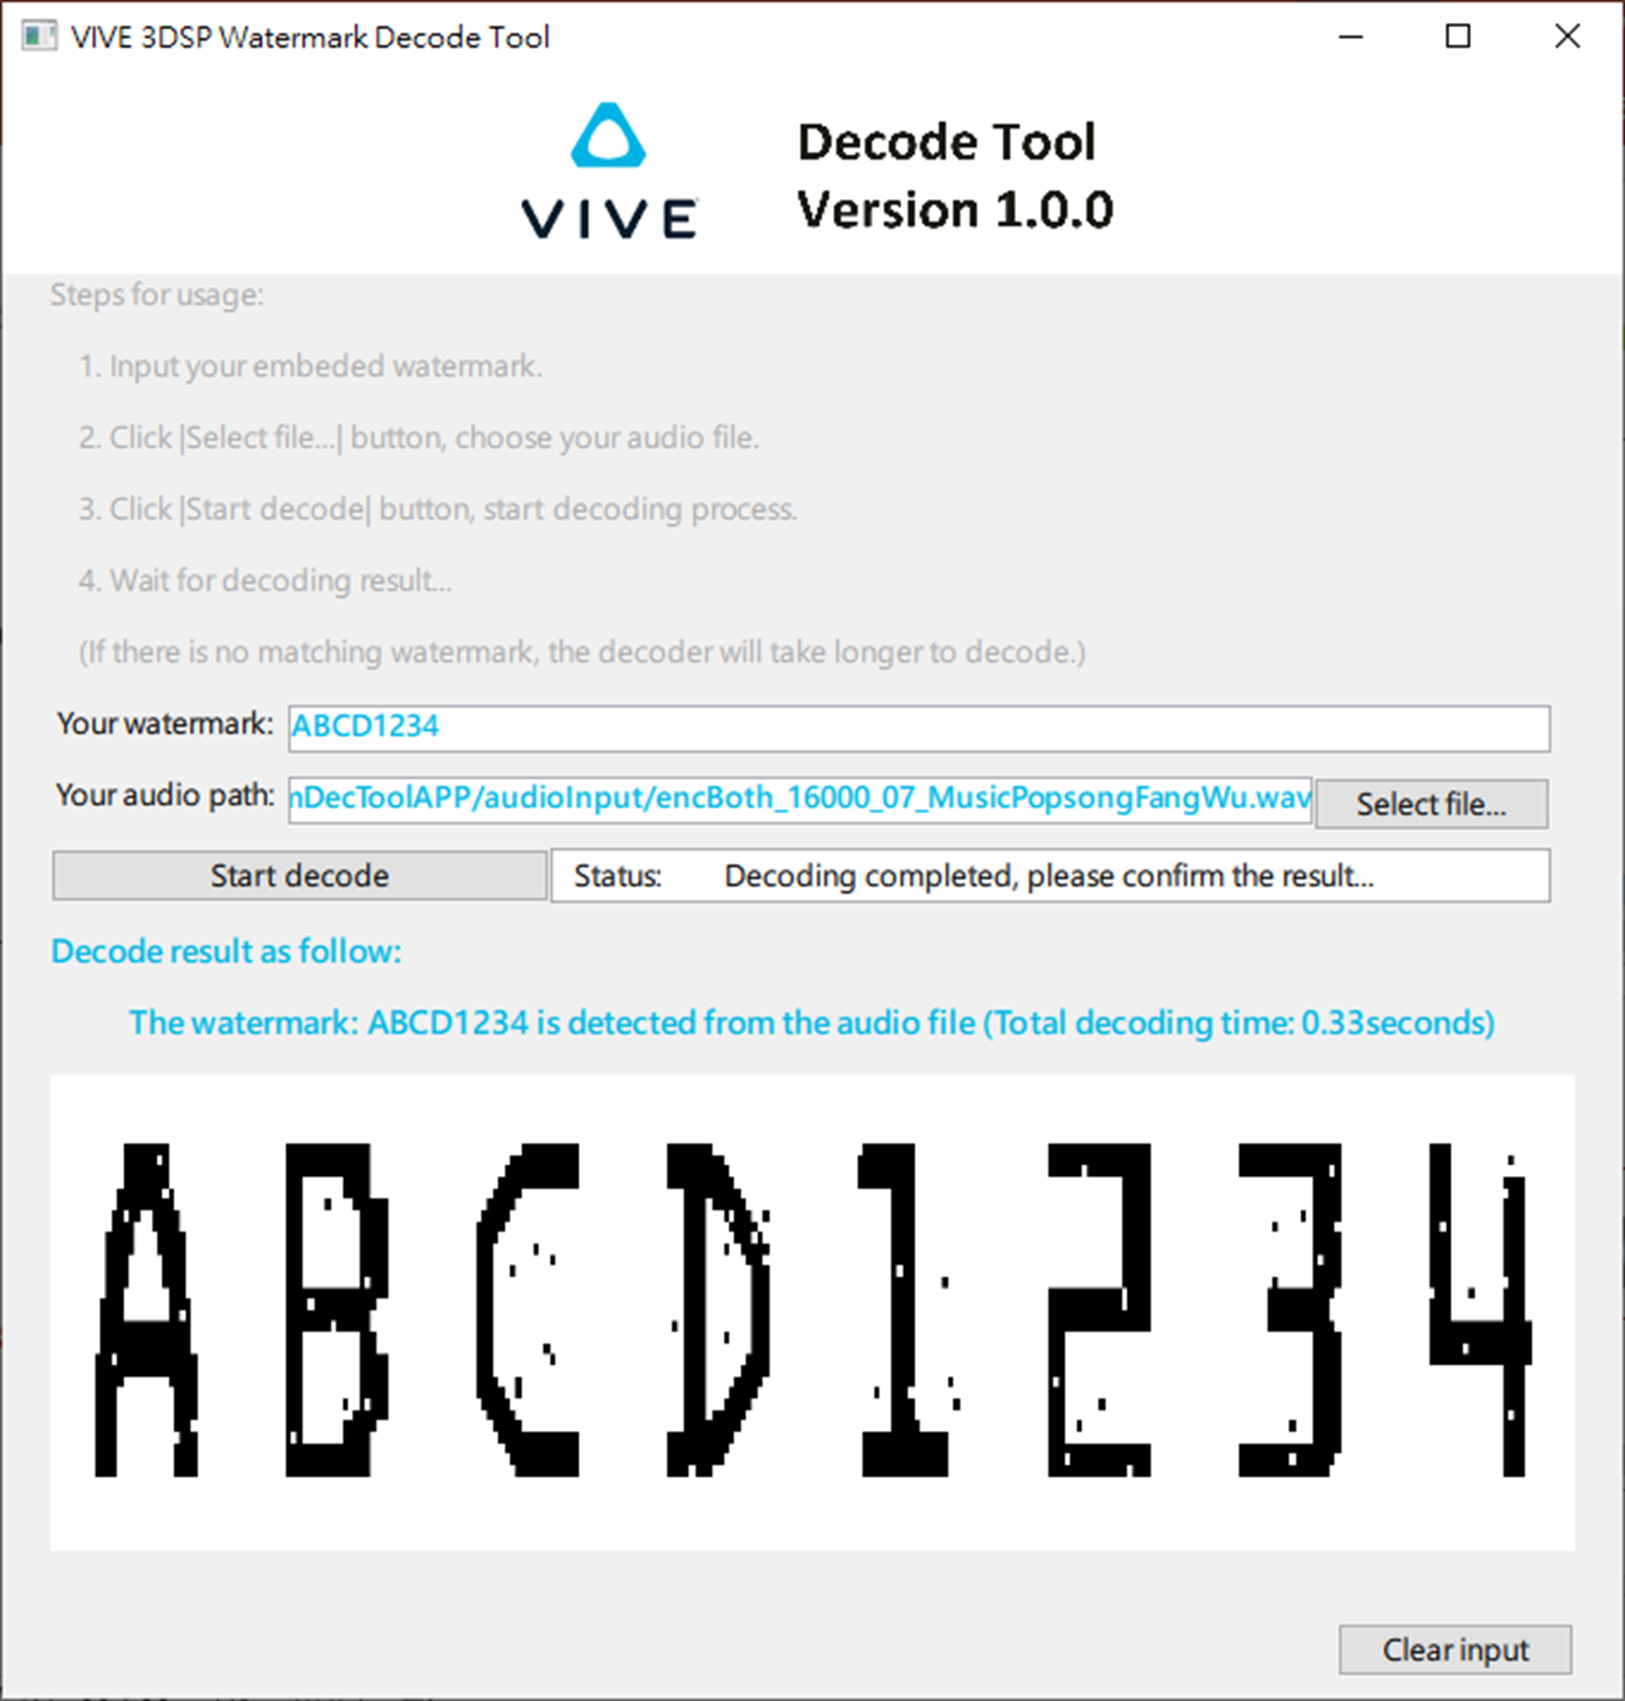
If the watermark entered is found in the audio file, it will be displayed on the window.
Hi-Res Audio Settings
VIVE 3DSP supports Hi-Res audio file for the audio source. This feature can be set by:
Set System Sample Rate to 96000 (maximum sample rate of Unity) by clicking Edit > Project Settings > Audio.

Modify the audio clip format by changing Compression Format to PCM in the Inspector window.
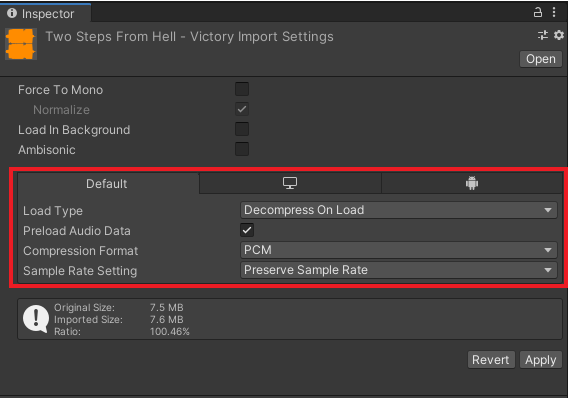
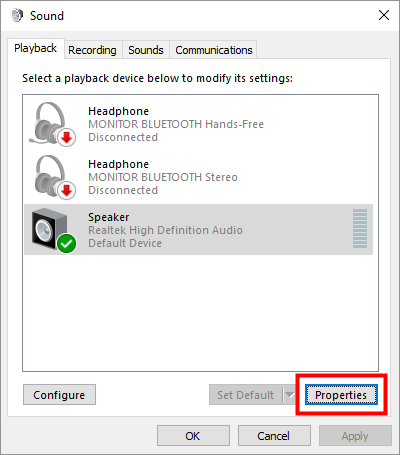
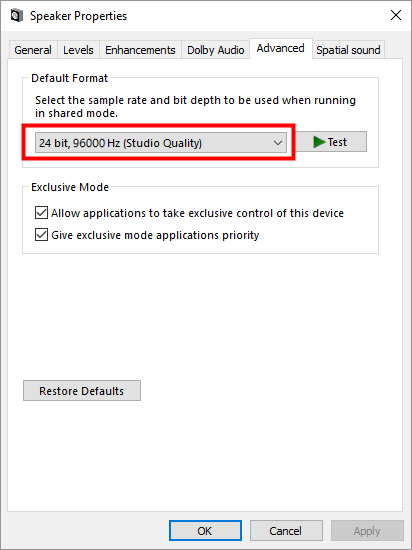
Modify the operating system’s audio settings. Change the sample rate to 96000 Hz in the system sound advanced settings.
Troubleshooting
Memory consumption keeps increasing in Unity Editor
There is an issue in Unity editor in the Unity version 2018 series. If the game object with a Unity Audio Source in a scene has been chosen, and the scene has been shown in the Unity Editor, the memory usage of Unity will sometimes keep increasing. This happens because if the sphere object is shown in the Unity scene, it keeps generating dummy meshes. This issue can be fixed by restarting Unity to delete the dummy meshes. Unity will crash or audio clippings will likely occur if the memory usage is too high.
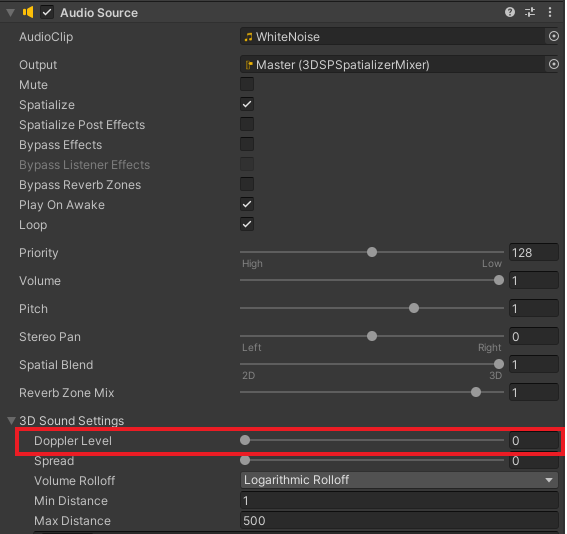
Unity Built-in Doppler Effect might cause audio distortion
Unity provides Doppler Effect and this can be found in the audio source object. However, the audio stream might be distorted by this built-in effect if the audio source object is moving very fast. For example, a quarter of the speed of sound, the audio stream could occasionally be rugged, therefore audio clipping occurs.
Appendix
Material Preset List
Number |
Material |
1 |
Concrete |
2 |
PorousConcrete |
3 |
Marble |
4 |
Brick |
5 |
Glass |
6 |
Wood |
7 |
Gypsum |
8 |
Curtain |
9 |
Plywood |
10 |
Steel |
11 |
StoneWall |
12 |
Plaster Absorber_Concrete |
13 |
Plaster Absorber_Brick |
14 |
Plaster Absorber_Wood |
15 |
Plaster Absorber_Gypsum |
16 |
Timberboard_Concrete |
17 |
Timberboard_Brick |
18 |
Timberboard_Wood |
19 |
Timberboard_Gypsum |
20 |
Ceramic Tile_Concrete |
21 |
Ceramic Tile_Brick |
22 |
Ceramic Tile_Wood |
23 |
Ceramic Tile_Gypsum |
24 |
Corkboard_Concrete |
25 |
Corkboard_Brick |
26 |
Corkboard_Wood |
27 |
Corkboard_Gypsum |
28 |
Soft Curtain_Concrete |
29 |
Soft Curtain_Brick |
30 |
Soft Curtain_Wood |
31 |
Soft Curtain_Gypsum |
32 |
Curtain_Concrete |
33 |
Curtain_Brick |
34 |
Curtain_Wood |
35 |
Curtain_Gypsum |
36 |
Cotton_Concrete |
37 |
Cotton_Brick |
38 |
Cotton_Wood |
39 |
Cotton_Gypsum |
40 |
Plaster_Concrete |
41 |
Plaster_Brick |
42 |
Plaster_Wood |
43 |
Plaster_Gypsum |
44 |
Plywood_Concrete |
45 |
Plywood_Brick |
46 |
Plywood_Wood |
47 |
Plywood_Gypsum |
48 |
Glazed Tile_Concrete |
49 |
Glazed Tile_Brick |
50 |
Glazed Tile_Wood |
51 |
Glazed Tile_Gypsum |
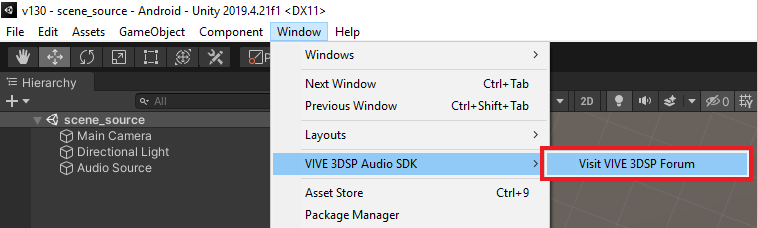
VIVE 3DSP Audio SDK Forum Shortcut
If you have suggestions or questions, you can go to the VIVE Audio SDK forum. It can be accessed by clicking Window > VIVE 3DSP Audio SDK > Visit VIVE 3DSP Forum.