WaveVR_Render
Contents |
WaveVR_Render Manual
WaveVR_Render integrates the render flow of Unity and Wave Native SDK and provides a variety of tools for you.
Cameras Introduction
Cameras
WaveVR_Render needs many cameras for different rendering purposes. All of them need to have one WaveVR_Camera component in its GameObject. WaveVR_Render will generate these cameras or you can create them yourself. Look for these cameras in Expand the Cameras.
Render timing
In the WaveVR Unity plugin, the render timing does not follow the Unity’s Camera depth order. The eye cameras will render within a custom renderloop coroutine. The render timing will be triggered after WaitForEndOfFrame. See the Unity’s description ExecutionOrder for the timing information.
The other camera which is not controlled by WaveVR_Render will render at Unity’s camera order and timing. After all other non-WaveVR’s cameras rendered, the WaveVR_Render cameras will start to render.
Render result
When WaveVR_Render renders in multipass mode, the left eye will render first, and then the right eye. The camera of each eye will render the contents within its FOV into each eye’s RenderTexture. In one frame, a total of two RenderTexture will be rendered.
In the singlepass mode, both eyes will render at once. All contents will be rendered into one RenderTexture in one frame. The RenderTexture is not doublewidth texture but a 2-dimension texture 2D array. See more details in Unity’s description.
In runtime, all the RenderTextures will be submitted to the native SDK for lens distortion correction, time-warp effect and show on the HMD display.
Main Camera
You will get a null result when you try to get Camera.main. The Unity’s main camera needs to be enabled when you access it, but in WaveVR there is no enabled camera.
WaveVR does not have a main camera. Even if you set a camera’s tag “MainCamera” to any WaveVR_Render controlled camera, it will not work. As mentioned above, before render timing starts, the WaveVR_Render will disable its cameras until our render timing which we mentioned above. No WaveVR_Renders’s cameras are enabled in Awake(), Start(), OnEnable(), Update() or LateUpdate(), and etc. Therefore there is no main camera.
If you need a main camera, create one and put it under head. However, a camera not controlled by WaveVR_Render will not generate any result to the display of the HMD. Also, the enabled camera may waste power and performance. If you still need a main camera. Set Culling Mask value to “nothing”, Field of View value to a narrow angle, and Viewport to a smaller size. These approach could help reduce the waste.
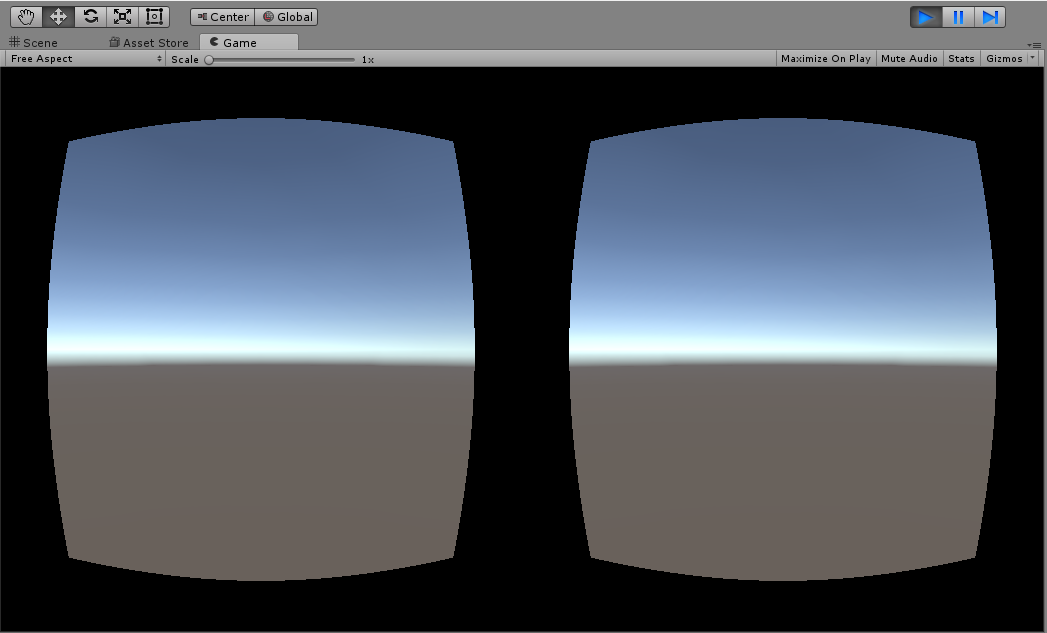
Preview
In editor play mode, the distortion camera is used for the multipass. It helps show two RenderTextures on the GameView. The singlepass result utilizes Unity’s ability to show on the GameView. However, in the editor play mode, preview in both singlepass or multipass will not have correct FOV settings. You still need to check the real result in an HMD device.
Camera usage
After the “expanding” action is taken, the cameras below will be generated. Most of these camera’s parameters will be modified once WaveVR_Render creates these cameras. Once the cameras have been created, you can modify these camera’s parameters in Editor inspector. Most of them will keep changes even when another “expanding” event is triggered.
centerWVRCamera
The center eye can used to preview in the GameView of the editor. It will be enabled in editor and be disabled in runtime. You can manually add the WaveVR_Camera to your original camera, and then assign it to the WaveVR_Render’s CenterWvrCamera field.
If the WaveVR_Render did not have a CenterWvrCamera when expanding, it will generate one. If there is an attached camera in WaveVR_Render’s GameObject, the generated CenterWvrCamera will copy settings from the attached camera. If there is no attached camera, WaveVR_Render will still generate one.
The camera parameters of Eye Center will be copied to other stereo cameras when expanding those stereo cameras, for example, Clear Flags, Background, Culling Mask, Clipping Planes, Occlusion Culling, and Allow MSAA. The copy action will only perform when WaveVR_Render create new cameras. If the cameras are specified by you, we won’t modify them in runtime.
The transform.localPosition of the center camera is the center position of the two eyes, and the position will be set when expanding. This position may not be always Vector3.zero because its value depends on the HMD device design. If you need the gaze feature, you should use the center eye to complete your design instead of the camera within the head.
lefteye and righteye
The transform.localPosition of the lefteye or rightey camera will be set every time when “expanding”. The position value is related to the IPD and HMD device settings. It will be set according to IPD in the runtime.
botheyes
The camera’s will be set every time when “expanding”. The position value is like the center camera. The IPD will take effect when rendering.
single pass (Experimental)
SinglePass can help reduce draw call and dynamic occlusion cost. It can help improve the performance. If your project has performance bottle-neck on the CPU side, you can try it.
To enable singlepass feature, go to PlayerSetting, and do the following steps:
Enable VR support
Add ‘MockHMD - Vive’ or ‘Split screen stereo’
Choose the
SinglePassstereo rendering method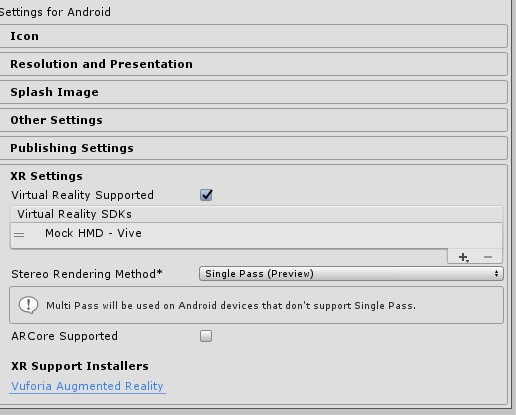
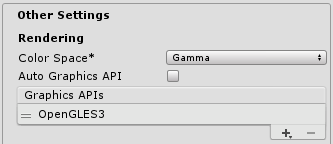
Uncheck the Auto Graphic API
Choose OpenGLES3 only in the Graphic APIs list
Before you enable it, see Unity’s singlepass document for basic understanding.
If you want to use the singlepass feature, you should check the compatibility of your graphic design. Not all customer shaders or effects can be used in the singlepass. If you encounter a problem when using WaveVR’s singlepass, you should check if the problem also occurs in a pure Unity VR environment.
We have tested the singlepass feature from Unity 5.6 to Unity 2019.3. Support for later Unity versions may be released in later WaveVR versions.
Post-process in SinglePass mode is not supported by WaveVR. Currently, Unity’s post-process is highly integrated with Unity’s native VR support, but WaveVR had not had the support yet.
If you use the latest Unity’s post-process stack , it will cost your GPU and CPU computing power, but will not get effect to the result. For example, in the OnRenderImage() of MonoBehaviour , a RenderTexture without rendered content will be retrieved. WaveVR did not render on the RenderTexture retrived from OnRenderImage(), and the real content was rendered into another RenderTexture which is manipulated by WaveVR’s SinglePass rendering flow. However post-process stack will need the rendered content in OnRenderImage(). That is why post-process stack is not workable in WaveVR.
Use Prefab
You can use the WaveVR prefab in Assets/WaveVR/Prefabs to replace your original camera.
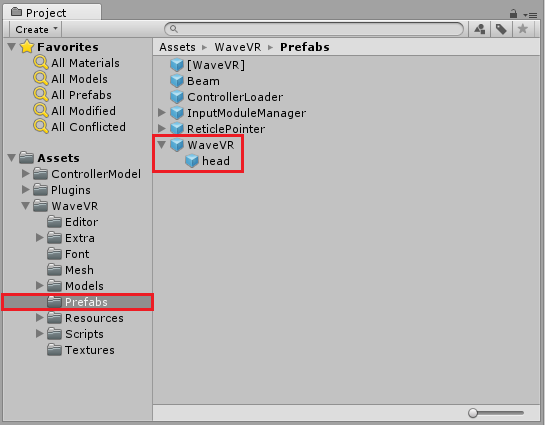
The prefab has a game object named head. It includes three components:
CameraIt is an attached camera, which represents your original camera in a scene. We do not actually need this camera, but it helps to show a basic game view for you.
When playing or after expanding, this camera will be disabled, and leave all the parameters untouched by WaveVR_Render. This camera’s parameters will copy to a center camera and both eyes’ camera. You can decide to allow MSAA, occlusion, culling mask, clear flag, clipping planes, and background here.
WaveVR_RenderThis is the main script for the render lifecycle. It will create both eyes and an ear. In play mode, it controls both eyes to render and submit the binocular vision to display. The details will be provided later.
Binocular vision
WaveVR_PoseTrackerThe type is set to WVR_DeviceType_HMD. It will receive the HMD’s pose event and change the game object’s transform. You should not try to modify the transform because this script will override it in every frame.
Expand the Cameras
In play mode, the main cameras will be expanded in runtime. If you ever pressed “Expand” button to do “exapnding” action for creating cameras in Inspector, we will still invoke the “expanding” action again in the runtime. During the second time expanding, no new camera will be created, and only necessary parameters will be modified.
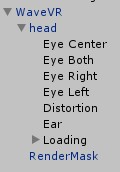
The following components and game objects are created and added to the head game object.

Expanded cameras
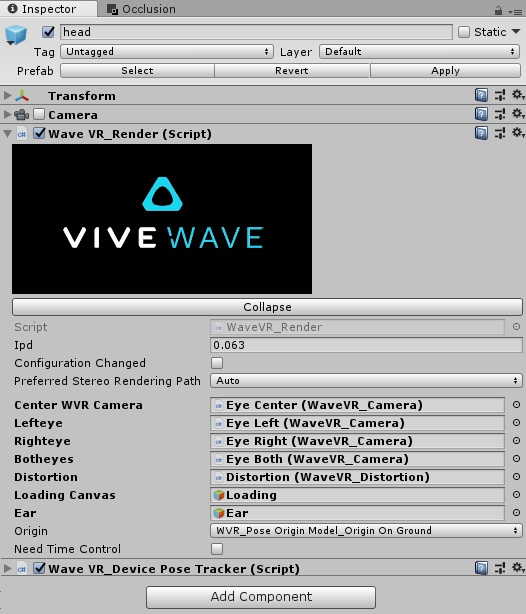
Inspector of expanded head
You can also expand the cameras by clicking the expand button. After “expanding” action is taken, the created game objects can be modified.
Expand Button
In the hierarchy, a WaveVR game object takes a position like a body or a playground origin. You can place your head in a scene by moving WaveVR. Do not change the transform of the head because it will be overwritten with the HMD pose.
These are the game objects added as children of the head after expanding:
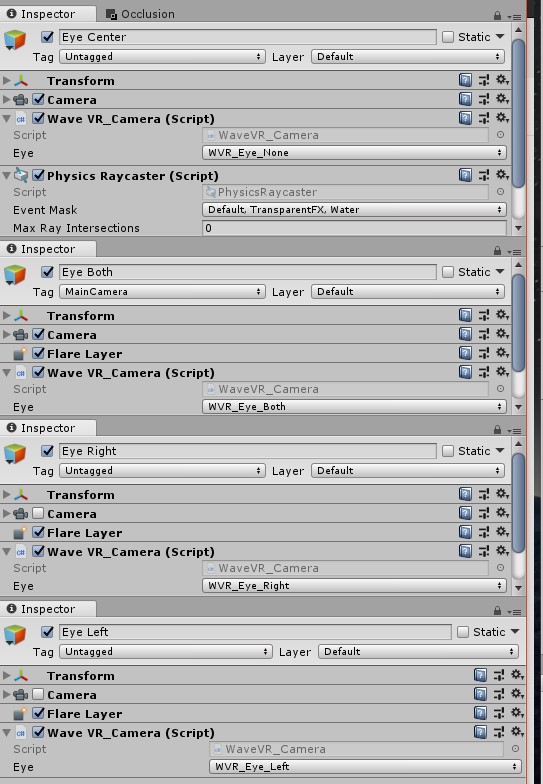
- Eye Center
- Eye Both
- Eye Right
- Eye Left
- Distortion
- Ear
- Loading
Both eyes which are represented by “Eye Right and Left” will be based on the IPD to adjust their position to the left or right. Therefore, each eye will see from a different place. The “Eye Both” will be in the center position of the two eyes, and just set different matrices into the shader for each eye when rendering. Every eye’s camera position will be set in runtime according to the device. Thus you do not have to modify the eye transform yourself. In editor, there is a preset position to the transform.
If the GameObject of WaveVR_Render has a Camera component, its parameters will be copied to Eye Center, and then the Camera component with WaveVR_Render be disabled.
Each eye has a camera. Its near and far clip planes’ values will be set according to the values of the Eye Center’s camera. Its projection and field of view are controlled by a projection matrix that is taken from the SDK. The plug-in will set a target texture when rendering and the default viewport should be full texture. The other values you can set to the camera are: clear flag, background, culling mask, clipping plane, allow MSAA, occlusion. All these values were copied from the main camera when creating this camera during “expanding” action. After the first set, WaveVR will not modify them again. The Unity’s Dynamic Resolution feature is not supported and only the Forward rendering path is supported.
Distortion distorts both well-rendered eye textures and presents them to the display. This only works in the Unity Editor Play Mode for preview. It will be disabled when a project has been built as an app. The WaveVR SDK, which only works on a target device, will be used instead.
Ear has an audio listener.
Loading is a mask for blocking another camera’s output on the screen before WaveVR’s graphic is initialized. Loading will be disabled as soon as the WaveVR’s graphic is initialized.
New WaveVR_Render features in Wave 3.0
In Wave 3.0, the unity plugin introduces an experimental feature: the support of Unity SinglePass stereo rendering. It utilizes the original Unity supported feature. Therefore you do not need to change too much to your project. The performance can be improved because the draw calls and dynamic occlusions are half the amount compared to the multipass. However the postprocessing can not work in singlepass. It can only work in the Unity’s native supported VR device. See Unity documentation for more detailed singlepass usage.
Some architectural changes have been made as well. All the changes are already in the WaveVR_Render prefab. You just need to import the new SDK. It is easy to have the new architecture if the prefab was used. You can also keep your original design.
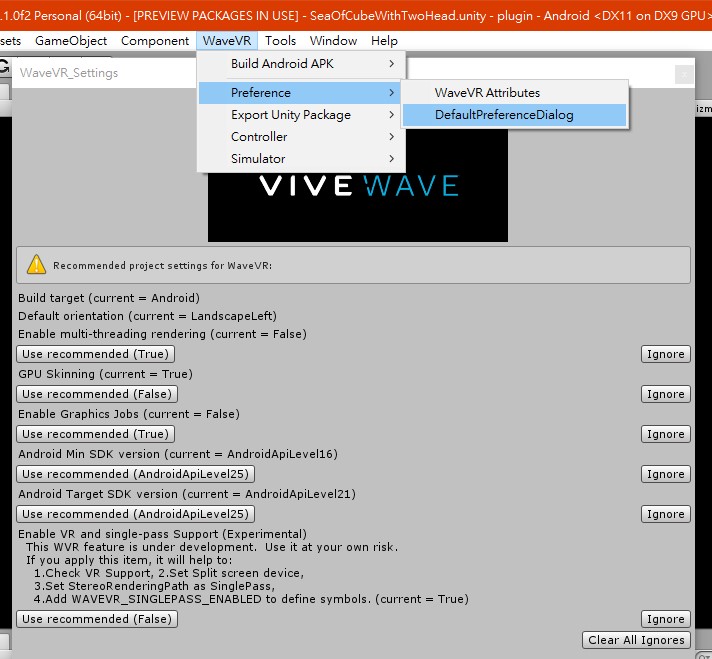
To apply the singlepass feature, all you need to do is click the use recommended on the VR support item of Preference (WaveVR_Settings). This dialog will pop up after you import the new SDK unitypackage or you can choose it in the WaveVR menu. See more details below.
The new WaveVR_Render is more powerful on the camera handle. You can take more control by using our designed delegates. Assigning a customized camera to WaveVR_Render is possible. Runtime assigning is also available. See more details below and in the source code.
However, it is possible to modify or remove these experimental features in future releases. Keep that in mind when applying these features.
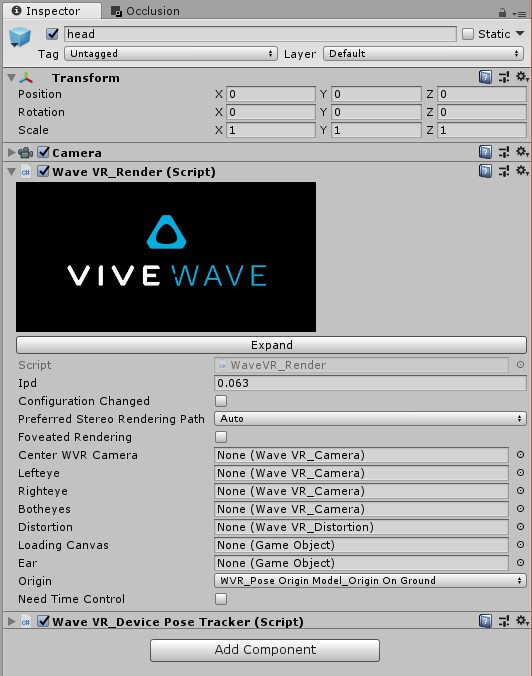
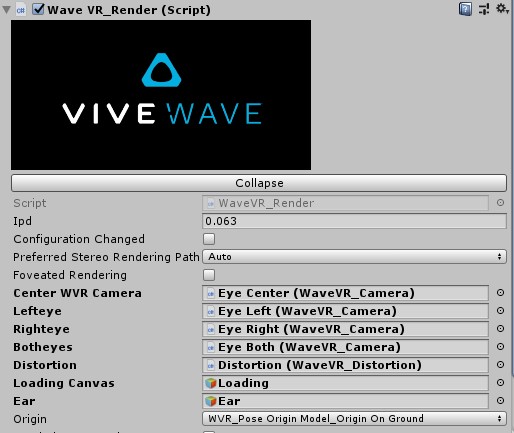
New Inspector GUI Layout
In the new layout, all possible variables are shown in inspector.
You can trigger an Expand by clicking on Configuration Changed in play mode. This help you to test your game logic of the “expanding” action. Other new features will be introduced later.
New eye camera
An attached camera with WaveVR_Render in the same GameObject is un-necessary now. The CenterWVRCamera is a copy of the attached camera if the attached camera exists. The attached camera will be disabled when playing.
All the cameras used by WaveVR_Render can be customized. You need to add the WaveVR_Camera component on a camera. See Camera Expand Callback for customization details.
All the cameras will be expanded and created in runtime, and chosen to be enabled according to the actual stereo rendering path. The Botheyes targets to a single-pass rendering camera, and it is used only when singlepass qualifications have been met. The Lefteye and Righteye targets to the cameras which is used as multi-pass.
You can make customized these eyes variables to the center, left, right and both cameras by assigning them in inspector before playing. The setting will be serialized. Or you can customize through expand callback. A customized camera gameobject needs to have one or more WaveVR_Camera components in it.
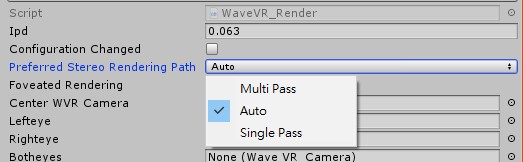
New stereo rendering path (experimental)
Choose a preferred stereo rendering path setting according to your scene. The actual rendering path will still depend on your project PlayerSettings and VR device. It will fallback to multipass if not qualified. Changing in runtime will have no effect. The default is Auto, which means ”Allow SinglePass when available”.
If you do not want singlepass rendering, you have to disable the Virtual Reality Supported from XRSettings of PlayerSettings. Only set Stereo Rendering Method to multi-pass may cause mistake.
Camera Expand Callback (experimental)
When cameras are expanded by WaveVR_Render, these delegates will be invoked. If you need to put some components in certain camera’s GameObject, you can choose a right moment to do so.
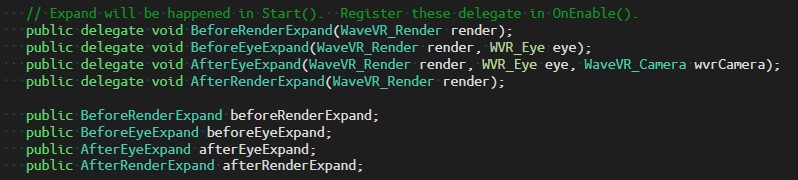
For example, you can set a customized camera for Eye_Both to
render.botheyesin BeforeEyeExpand callback, and modify it in AfterEyeExpand if necessary.
Preference
We will notify you by the Preference dialog if your project does not enable VRSupport and set the SinglePass stereo rendering method. Click “Use recommended” button to complete all settings. Afterward, you can check it in XRSettings (or in Other Settings for older Unity versions)
- WaveVR_RenderMask
See RenderMask.
- Foveated Rendering
See WaveVR_FoveatedRendering page.
RenderMask
Some areas in RenderTexture can not be seen in the HMD. You can skip the rendering on those ares to save power and increase performance. To skip it, use the RenderMask feature. See the red part in the following image. The red color is only used to indicate the Mask area. The normal RenderMask is in black.

RenderMask will render a mask on those areas before a camera renders everything. The mask will write to depth with the nearest distance. Afterward, the other content whose material does depth test will not be rendered by the GPU in masked areas.
This feature depends on the device. Each device will decide its mask areas. If the device give a RenderMask mesh in runtime, it means the device support the early Z test, and RenderMask will work. If the device does not give a mesh, then the RenderMask in Unity will be disabled.
To enable this feature, you need put the RenderMask prefab in to your scene. If you are using the WaveVR prefab, it already has one RenderMask inside. This prefab can work any where in your scenne hierarchy, and putting one in the scene is enough. In runtime, RenderMask will try to find an active WaveVR_Render itself. If one is not found, it will not work.
You do not need to input any shader, material, and mesh into the RenderMask component. These public fields will be filled in runtime.
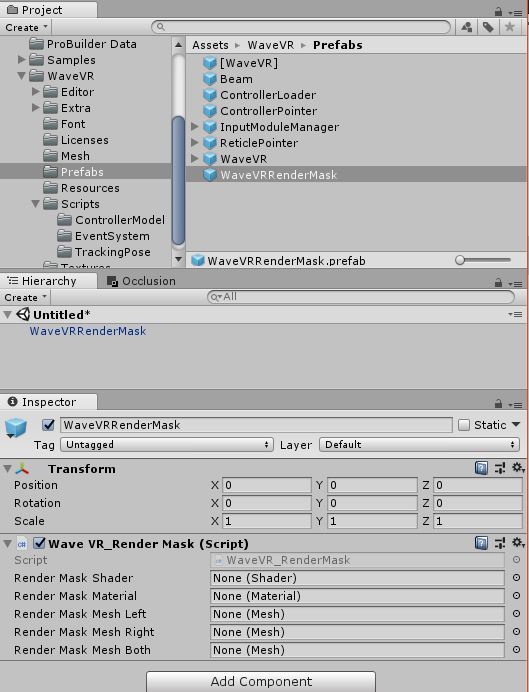
RenderMask Prefab
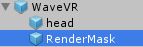
RenderMask in WaveVR prefab
Class WaveVR_Render
Classes
class RenderThreadSynchronizerA tool to force sync the render thread and game thread. Call
sync()to flush all render thread commands. For internal use only.
Public Types
enum StereoRenderingPath {
    MultiPass,
    SinglePass,
    Auto = SinglePass
}
Public Member Functions
delegate void RenderCallback(WaveVR_Render render)A generic type of WaveVR_Render delegate.
delegate void RenderCallbackWithEye(WaveVR_Render render, WVR_Eye eye)A generic type of WaveVR_Render delegate.
delegate void RenderCallbackWithEyeAndCamera(WaveVR_Render render, WVR_Eye eye, WaveVR_Camera wvrCamera)A generic type of WaveVR_Render delegate.
T GetComponentFromChildren<T>(string name)For internal use.
void OnIpdChanged(params object[] args)For internal use. Receive the event callback of IpdChange.
int SetQualityLevel(int level, bool applyExpensiveChanges=true)If you need to change the quality level at runtime, invoke this function. It will change the quality then reload the scene to take effect. Please do not use the UnityEngine’s
QualitySettings.SetQualityLevel().
Static Public Member Functions
static void InitializeGraphic(RenderThreadSynchronizer synchronizer=null)Call to native API WVR_RenderInit in RenderThread. For internal use only.
static bool IsVRSinglePassBuildTimeSupported()The StereoRenderinPath in XRSettings is an editor-only script, and there is no way to get the value in runtime. WaveVR_RenderEditor will check to see if the stereo rendering path dose actually is set to SinglePass and it will also make a c#’s “define” symbol, WAVEVR_SINGLEPASS_ENABLED in PlayerSettings when you build your application. Therefore
IsVRSinglePassBuildTimeSupported()can have the result created by the preprocessor. You can useIsVRSinglePassBuildTimeSupported()to check if your application enables the SinglePass stereo rendering path in the XRSettings in runtime.static void signalSurfaceState(string msg)In Android, the graphic initialization should be done after the surface is ready. This function will be invoked by Activity in Java when the surface is ready. For internal use only.
static void Expand(WaveVR_Render head)This will create eye cameras by copying data from the CenterCamera or the attached camera with head as well as camera initialization according to the role of each eyes.
The common setting includes the Projection Matrix, the Eye position in relation to the HMD position, and add the component, WaveVR_Camera, in the eye’s GameObject.
It will be invoked in
Start()or when developer click the button on WaveVR_Render’s Inspector. If the hierarchy is already expanded, the cameras will still do a necessary reset according to the new configuration. If a configuration, for example the IPD, is changed, theExpand()will be invoked again.If you want to override the settings, you can listen to these delegates: beforeRenderExpand, afterRenderExpand , beforeEyeExpand, afterEyeExpand
static void Collapse(WaveVR_Render head)This script is only for editor usage.
static Matrix4x4 MakeProjection(float l, float r, float t, float b, float n, float f)A helper function to make a projection matrix.
Public Attributes
float ipd = 0.063fShow the current IPD value.
bool configurationChanged = falseIf configurationChanged is set to true, it will trigger Expand() before eye rendering. After the change takes effect, it will set to false.
RenderCallback beforeRenderExpandThis callback will be invoked before WaveVR_Render is created or modified all cameras in Expand().
RenderCallbackWithEye beforeEyeExpandThis callback will be invoked before one eye’s camera is created or modified in Expand().
RenderCallbackWithEyeAndCamera afterEyeExpandThis callback will be invoked after one eye’s camera is created or modified in Expand().
RenderCallback afterRenderExpandThis callback will be invoked after all cameras are created or modified in Expand().
RenderCallback onConfigurationChangedThis callback will be invoked after configuration changes have been applied.
RenderCallback onSDKGraphicReadyThis callback will be invoked after the SDK’s graphics are initialized. You can safely invoke the SDK’s graphic related API.
RenderCallback onFirstFrameThis callback will be invoked the first time the WaveVR_Render renders a frame.
RenderCallbackWithEyeAndCamera beforeRenderEyeThis callback will be invoked before WaveVR_Render render one eye.
RenderCallbackWithEyeAndCamera afterRenderEyeThis callback will be invoked after WaveVR_Render render one eye.
WaveVR_Camera centerWVRCamera = nullThis is a shortcut to get the center camera’s WaveVR_Camera object.
WaveVR_Camera lefteye = nullThis is a shortcut to get the left eye camera’s WaveVR_Camera object.
WaveVR_Camera righteye = nullThis is a shortcut to get the right eye camera’s WaveVR_Camera object.
WaveVR_Camera botheyes = nullThis is a shortcut to get both eye camera’s WaveVR_Camera object.
WaveVR_Distortion distortion = nullThis is a shortcut to get the WaveVR_Distortion object. WaveVR_Distortion is used to show the offline rendered image to UnityEditor’s GameView. It will only be used in Editor.
GameObject loadingCanvas = nullFor internal use.
GameObject ear = nullThis is a shortcut to get the ear’s gameobject.
WVR_PoseOriginModel _origin = WVR_PoseOriginModel.WVR_PoseOriginModel_OriginOnGroundThe _origin is used to get the HMD pose. See more in origin
bool needTimeControl = falseSet this to true if you need the WaveVR_Render to help to stop the Game time when paused or when the input focus is lost due to a system overlay having popped up. See UnityEngine.Time.timeScale.
Static Public Attributes
static int globalOrigin = -1The global setting will affect all scenes’ WaveVR_Render’s origin. Set -1 to disable the global effect. See origin.
static int globalPreferredStereoRenderingPath = -1The global setting will affect all scenes’ WaveVR_Render’s preferredStereoRenderingPath. Set -1 to disable it. See New stereo rendering path for more information.
Properties
static WaveVR_Render Instance [get]This is used to get the currently active instance of WaveVR_Render.
bool IsGraphicReady [get]This is used to check if the graphics of the native SDK have been initialized.
float sceneWidth [get]The width in pixel is used by the render texture of one eye. It will not be double in singlepass.
float sceneHeight [get]The height in pixel is used by the render texture of one eye.
float [] projRawL [get]The raw projection of the left eye is in the form of 4 floats: left, right, top and bottom. These values are in tangent value with the near plane distance assumed as 1. The left and bottom should be negative.
float [] projRawR [get]The raw projection of the right eye is in the form of 4 floats: left, right, top and bottom. These values are in tangent value with the near plane distance assumed as 1. The left and bottom should be negative.
WaveVR_Utils.RigidTransform [] eyes [get]This property stores both the eyes’ local position and rotation releated to head. The values of this property are retrived from a native API as a matrix, and transform to Vector3 and Quaternion. The Quaternion of rotation value is always “identity” in this case.
eyeswill be updated when the IPD changes.StereoRenderingPath acturalStereoRenderingPath [get]This property will return an actually working enum type stereo rendering path. See also IsSinglePass <#wvr-render-prop-issinglepass>.
bool IsSinglePass [get]This property will return true only if all the conditions are met for SinglePass.
bool isExpanded [get]This is the camera expanding status. It can be also used to initialize internal variables.
Camera centerCamera [get]This is a shortcut to get the camera component of centerCamera.
TextureManager textureManager [get]This is The texture queue container. It is only used by WaveVR_Render internally.
ColorSpace QSColorSpace [get]The current ColorSpace which get from UnityEngine.QualitySettings. Only used by WaveVR_Render internal.
WVR_PoseOriginModel origin [get, set]This variable decides how the HMD pose work in the current scene with WaveVR_Render. You can change it in runtime, and it will trigger a configuration change event to take effect. See more in WVR_GetSyncPose or in:
- enum
WVR_PoseOriginModel¶The style of tracking origin.
Identifies which style of tracking origin the application wants to use for the poses it is requesting
Values:
WVR_PoseOriginModel_OriginOnHead= 0¶The origin of 6 DoF pose is on head.
WVR_PoseOriginModel_OriginOnGround= 1¶The origin of 6 DoF pose is on ground.
WVR_PoseOriginModel_OriginOnTrackingObserver= 2¶The raw pose from tracking system.
WVR_PoseOriginModel_OriginOnHead_3DoF= 3¶The origin of 3 DoF pose is on head.