Unreal Scene Perception And Anchor
Introduction
Scene Perception is feature which facilitates Mixed Reality development by bringing in spatial information from the users’ surroundings into the virtual environment.
For a comprehensive understanding of the conceptual aspects related to our MR API, refer to the Tutorial for MR Contents page.
Note
The Scene Perception feature is current in Beta
In Unreal, the scene relative functions are provided by Blueprint and C++ header. Based on your design, you can choose one method of them to make your project. In our practice, it is much easier to handle the data of planes, objects, scene mesh, and anchors in C++. However, blueprint may be more familiar to most of people. Thus, we are going to share the usage here by only blueprint.
In the next section, we will introduce the blueprints and the basic workflow. We will also show some tools and tips for you.
After your survey this introduction for scene and anchor, you can also take a look of our practice in the sample levels:
- Content/VRTestApp/ScenePerceptionTest/
- Content/VRTestApp/AnchorTest/
In these level’s handle actors, they create the meshes of planes, objects and scene meshes, and manager the tracking state of them.
Contents |
Requirement
Uses Feature
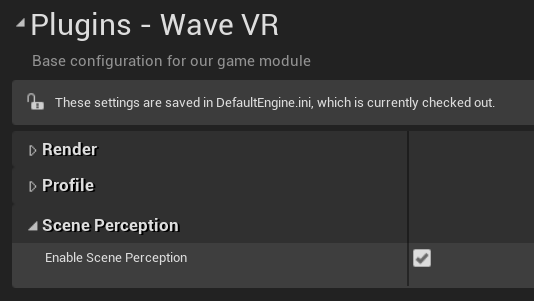
If you want to use any Scene feature here, you need declare a <uses-feature> in AndroidManifest.xml. In Settings -> Plugins -> Wave VR page, check the Enable Scene Perception will help you declare it.
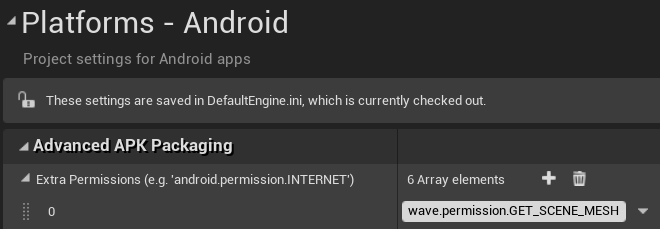
If you want to get the meshes of SceneMesh, you also need declare and require the permission “wave.permission.GET_SCENE_MESH”.
Permission
Declare Permission
To declare it AndroidManifest.xml, go to Settings -> Platforms -> Android, and add this permission string to the Extra Permissions array shown below.
Request Permission
In your content, this blueprint will use Permission Manager to help you request the permission.
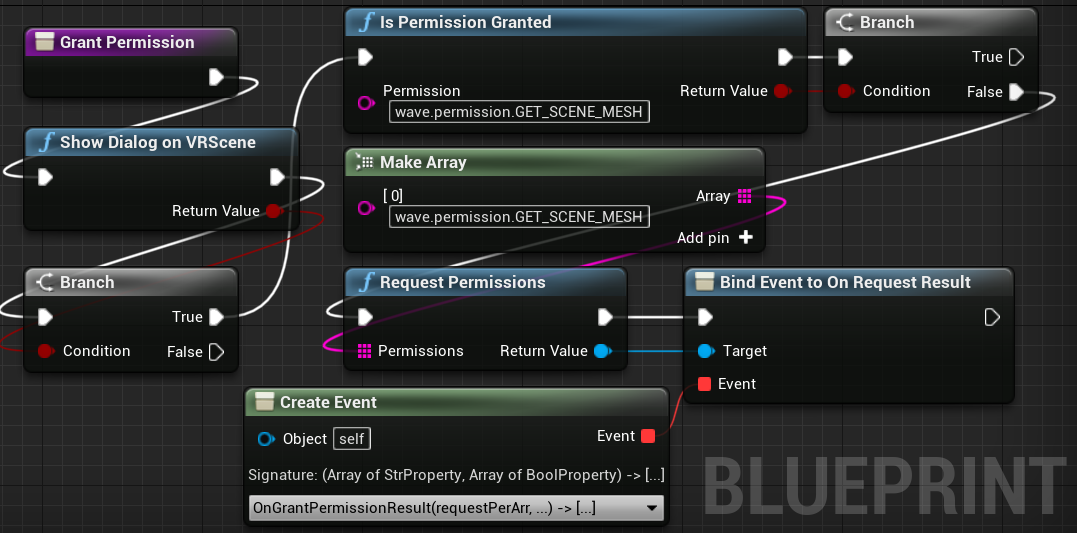
A dialog will pop up in VR, and the player can choose to grant the perimission for your content or not.
After that, you will recevie a call back event.

Save the result in a variable, and use it to check before you try to get the mesh of SceneMesh.
Blueprint Functions
The functions here will list by order of usage. You can read it is a tutorial.
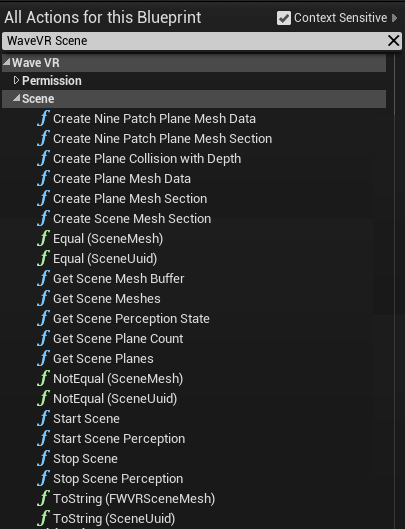
Scene
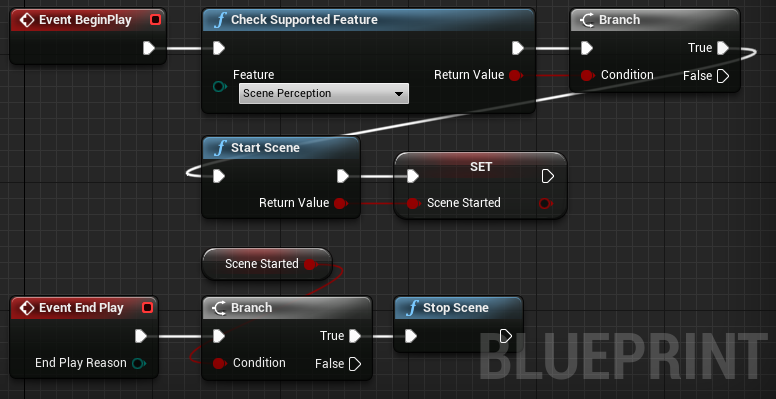
Scene Start And Stop
Scene feature must be enabled for all scene and anchor function. Before you call Start Scene, you can use Check Supported Feature to check if the Scene Perception feature is supported. You can call Start Scene in begin play and Stop Scene in end play.
Scene Perception
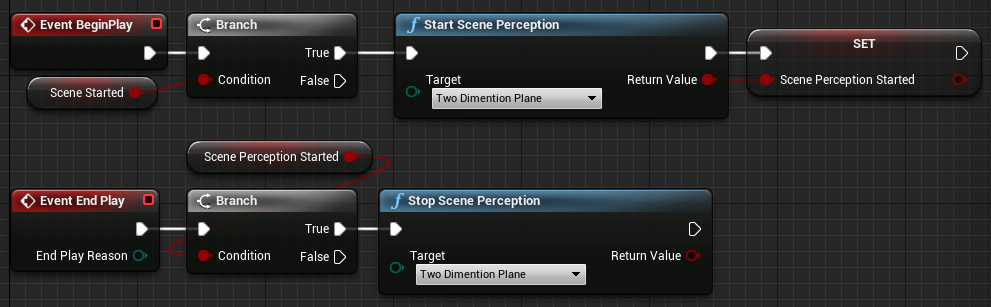
You need start Scene Perception feature before you use Scene Plane, Scene Object, or Scene Mesh feature. You can call Start Scene Perception in begin play and Stop Scene Perception in end play.
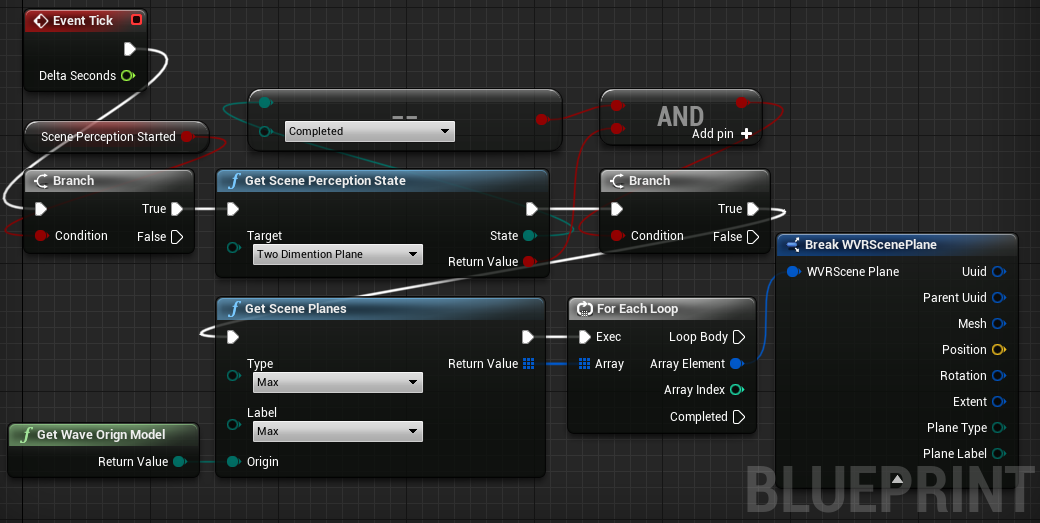
After your start the Scene Perception, you should call Get Scene Perception State to get the state, and check if the state is Completed. Once completed, use Get Scene Planes with type Max and label Max to get all scene planes. You can use the plane’s information to create the wall, the desk mesh according to your design.
Note
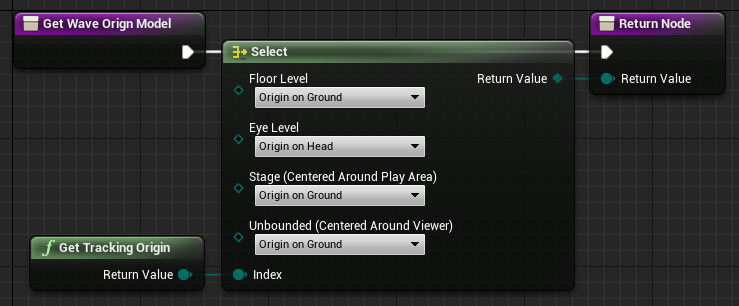
Get Wave Origin Model is used to turn the Unreal’s Tracking Origin to Wave’s.
The planes’ pose may update by tracking system. For example, if the re-center is triggered, the pose will change. You may keep update the latest plane’s pose.
From Tracking Space
The pose follows Unreal’s coordination, and is based on tracking space. For practice, you may need change it to world space or actor’s space. The From Tracking Space and Make Relative Transform blueprint can help you do the transform.
WVRScenePlane
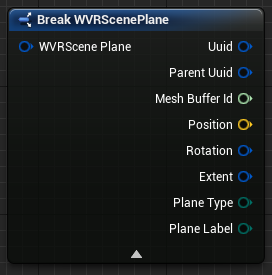
Struct Uuid and also Parent Uuid are used to identify the plane. The Mesh Buffer Id can be used to get the mesh buffer from Get Scene Mesh Buffer.
The Position and Rotation is the plane’s current pose. The normal of the front face of WaveVR’s scene plane is along with the Unreal’s forward direction, which is the +X direction, when no rotation.
The Extent is the size of plane. It is a struct Vector2. Its x presents the plane’s horizontal width, and its y presents the plane’s vertical height. The size is not applied with the Rotation.
Get Scene Mesh Buffer
You can get the mesh’s Vertex Buffer and Index Buffer by Get Scene Mesh Buffer.
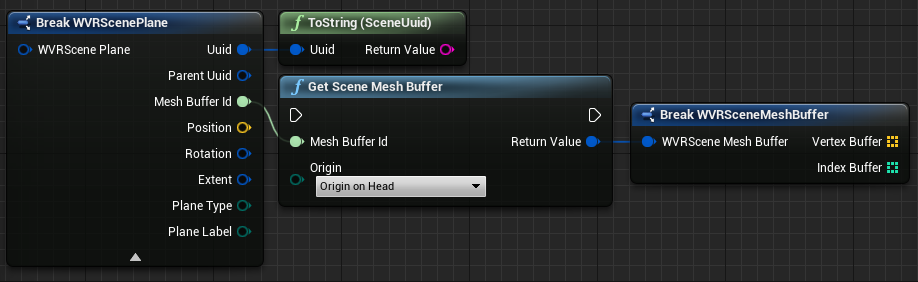
However, in practice, the Extent and pose are much useful than mesh buffer. In our sample, we create meshes by Extent.
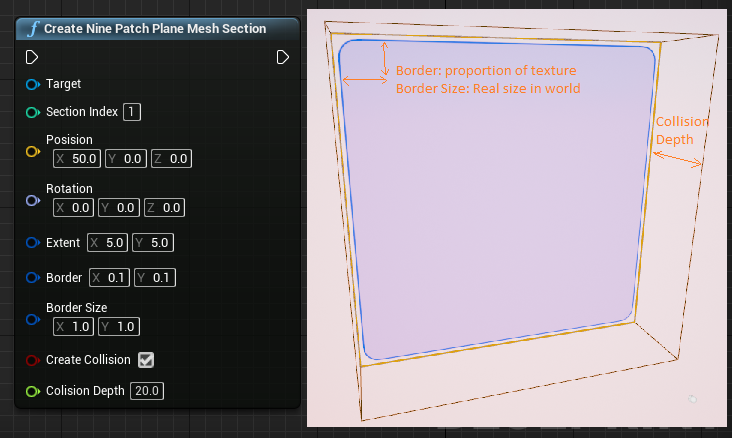
Create Nine Patch Plane Mesh Section
The Create Nine Patch Plane Mesh Section tool can help you create plane mesh with fixed scale border.

The WaveVRSceneProcedualMeshComponent can create the mesh component which allow to create a Collision with specified size.
The picture below shows the plane’s front face and coordination.
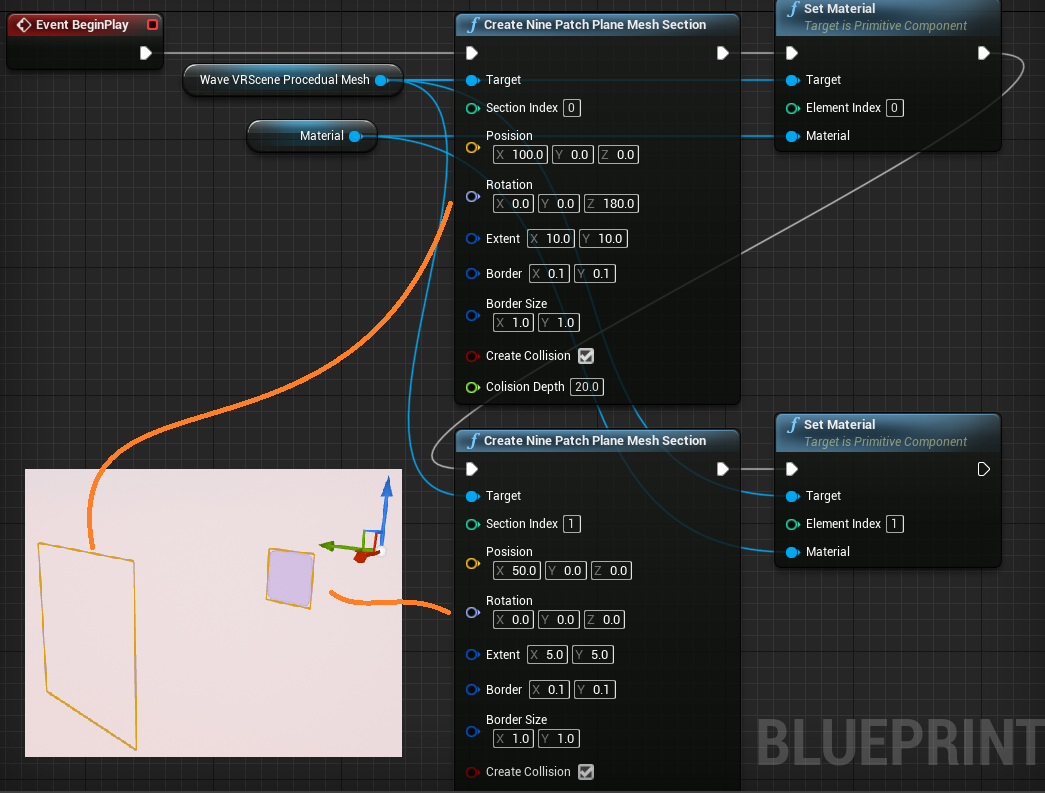
And this picture shows the plane’s Collision box created by Collision Depth paramter.
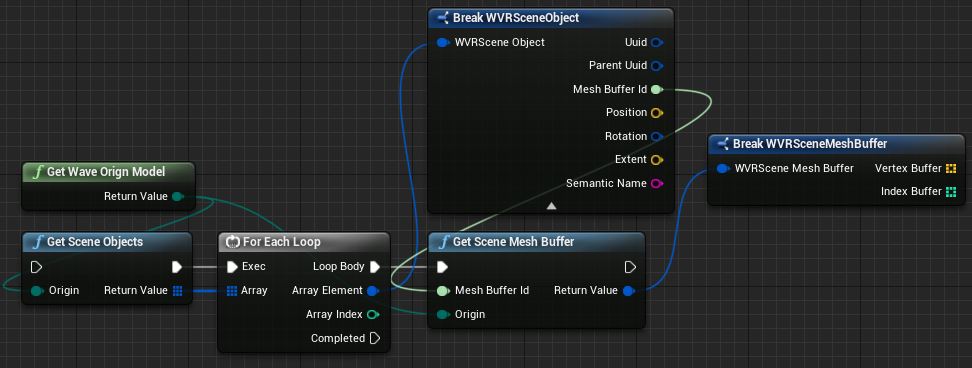
WVRSceneObject
Use GetSceneObjects to the the WVRSceneObject array.
Each WVRSceneObject represents a 3D object detected by Scene Perception system.
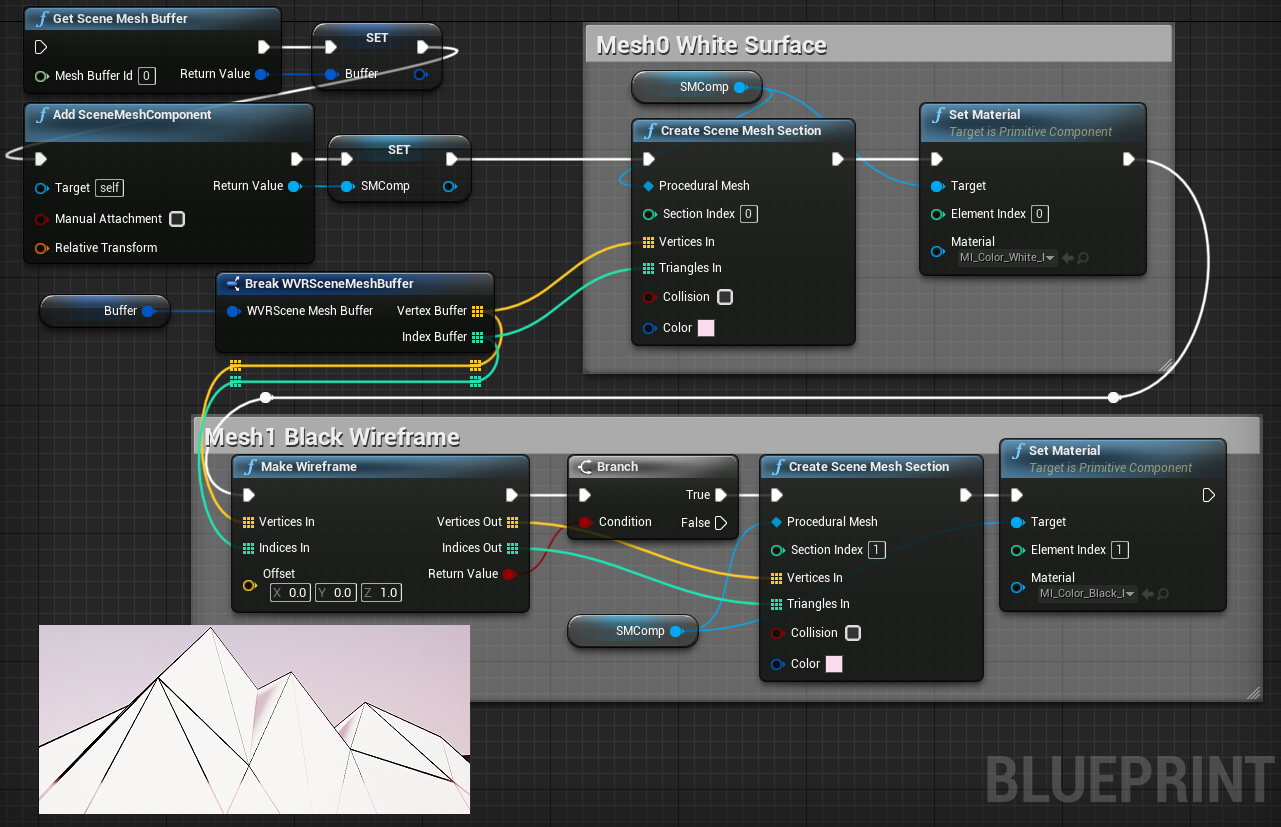
Use GetSceneMeshBuffer to get the mesh data of the object. The mesh data is stored in the Vertex Buffer and Index Buffer. You can use these data to create a mesh component.
Make Wireframe
We ever try to use Unreal’s material wireframe feature on mobile device. But it is unable to show a correct wireframe like on PC. Therefore, we made the Make Wireframe blueprint function to help create wireframe mesh.
Spatial Anchor
A spatial anchor is mapping to real world item. You can track the real-world item by the anchor. In practice, we create an anchor with passthrough image opened. When the Passthrough is enabled, you can see the real-world item, and use controller to get real-world item’s pose in VR’s tracking space to map real-world pose with virtual-world pose. The following blueprints will help you update each anchor’s tracking state.
Note
All Spatial Anchor functions must have the Scene be started.
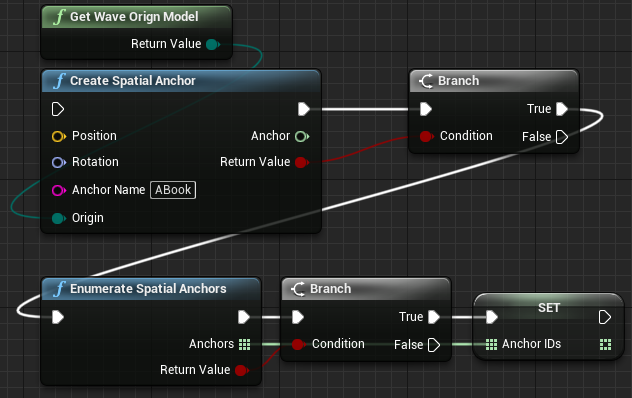
Create Spatial Anchor
Input the pose of anchor in tracking space. Use Create Spatial Anchor blueprint will return an anchor ID, which is a 64byte integer. After you create a spatial anchor, use it to retrieve the tracking state. The anchor will be saved in the system. Anchors will be only owned by your application.
Anchor’s name should be unique. In our sample, we will use date and time to create a name.
To Tracking Space
In the sample below, it demonstrates the way to get controller’s pose in world space, and convert it to tracking space by To Tracking Space blueprint.
Enumerate Spatial Anchors
You can use Enumerate Spatial Anchors to get all anchors your application set. Please do it at begin play or after you create a new anchor. You don’t need update it every tick because only you will create or destroy the anchors. In practice we save these IDs. And use saved IDs to get the anchors’ state.
When anchors are imported, created or ready to get. System will send you an event. When receive it, you could check if there is any new anchor.
To get the system event, you need add a WaveVREventCommon Actor Component in your Actor.
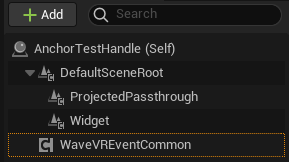
Then use its On All Event Bp in Event Graph:
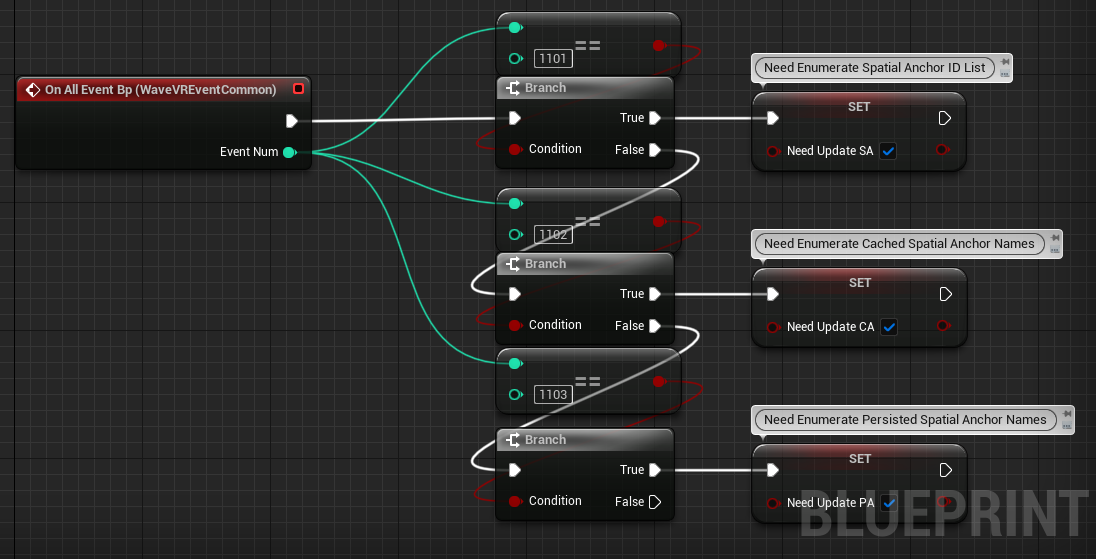
Get Spatial Anchor State
You can use Get Spatial Anchor State to get the tracking state and the updated pose. You can update it rapidly. After you get anchor’s new pose, you can use From Tracking Space to turn it into world space.
Cached Spatial Anchor
Cached Spatial Anchors are a type of anchor that retains its information even after the application is closed. However, they are dependent on the VR tracking map. If the map is lost or reset, the cached anchor will be cleared. This makes them ideal for short-term persistence across multiple sessions without the need for exporting or importing data.
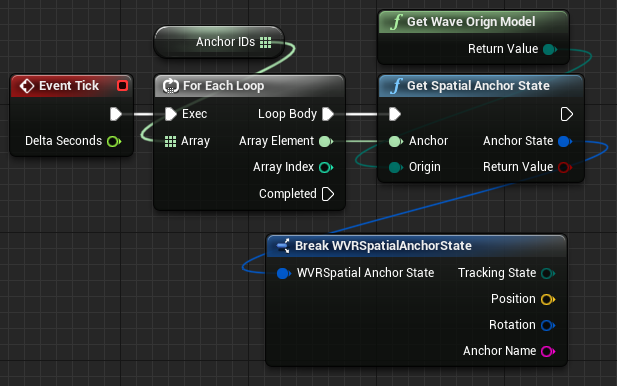
Uncaching a Spatial Anchor allows you to remove a previously cached anchor from the runtime. This is useful when you no longer need the anchor or want to free up some resources.
Make sure every anchor has a unique name. The name is the key. In our sample, a spatial anchor will use date and time to create its name. And we add “Cached” to the name when we cache it.
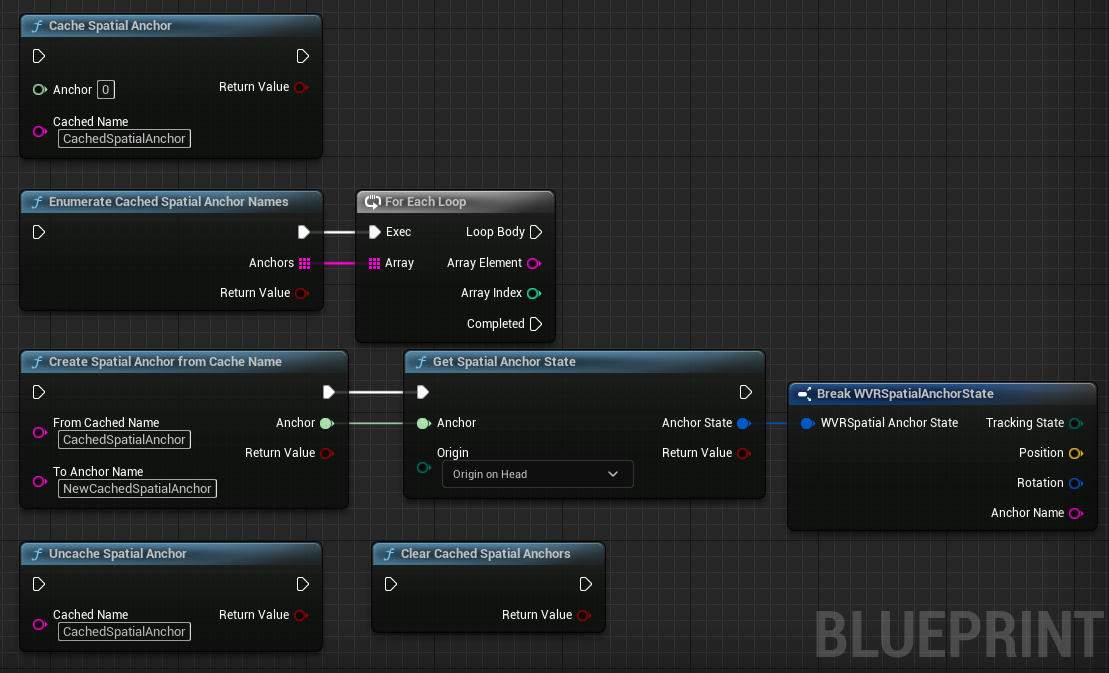
Persisted Spatial Anchor
Persisted Spatial Anchors offer long-term persistence. They are saved with feature points information around the object and environment, ensuring their existence even if the SLAM tracking map is reset. This makes them ideal for scenarios where anchors need to be shared across different devices or sessions.
Unpersisting a Spatial Anchor removes a previously persisted anchor from the runtime. This is useful when you want to permanently delete an anchor’s data.
Make sure every anchor has a unique name. The name is the key. In our sample, a spatial anchor will use date and time to create its name. And we add “Persisted” to the name when we cache it.
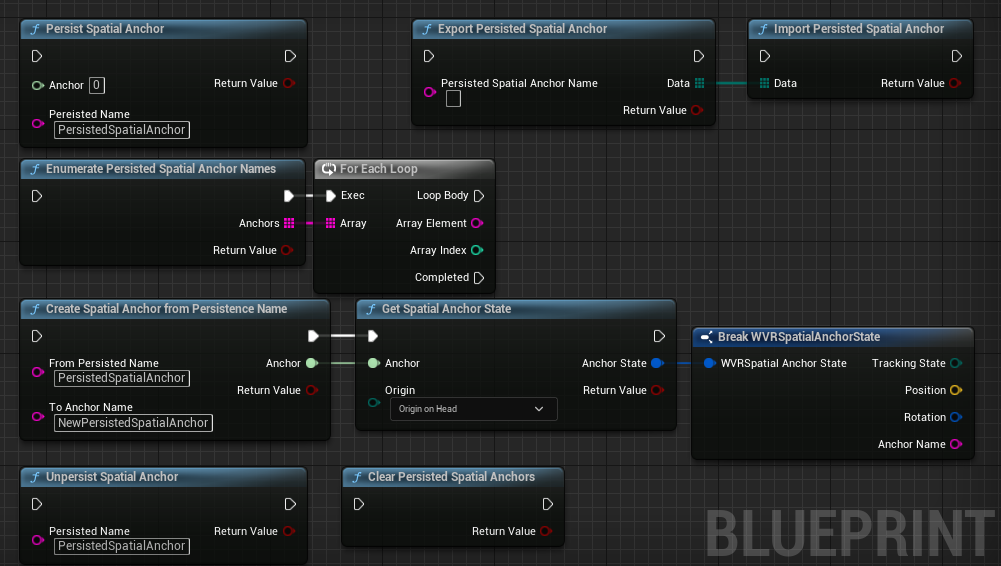
Export And Import Persisted Spatial Anchor
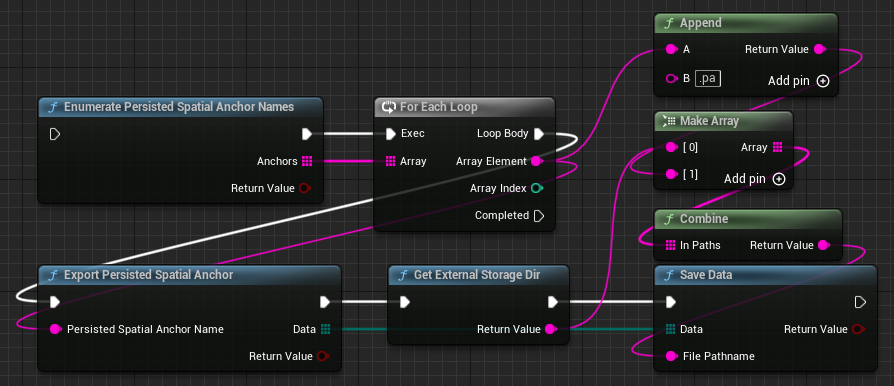
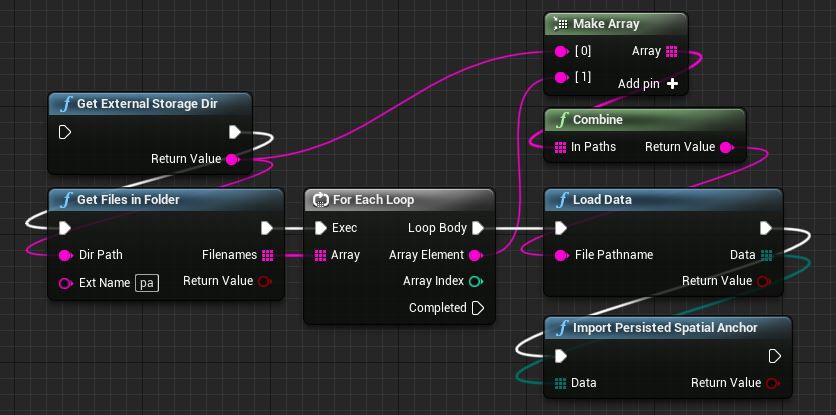
Persisted Anchors are allowed to Export and Import. You can keep exported data in the device or transfer the exported data to other device.
We make some tool for you to save it in the stoarge. Check how we use it:
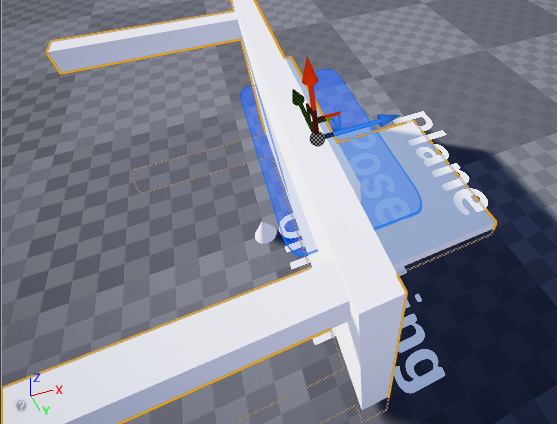
About Scene Plane
If you want to create a shape by the Scene Plane’s data, or load asset at Scene Plane’s position, here is the Scene Plane’s shape definition you should know:
The plane’s normal direction is along with plane’s forward direction. Plane’s height in extent is along with plane’s up direction. And the plane’s width is along with plane’s left/right direction.
By this definition, if a plane has no rotation and the camera also has no rotation, which means cameras is looking in world forward(+X) direction, we should only see the plane’s back. And the plane’s mesh should be invisible if no double side rendered.
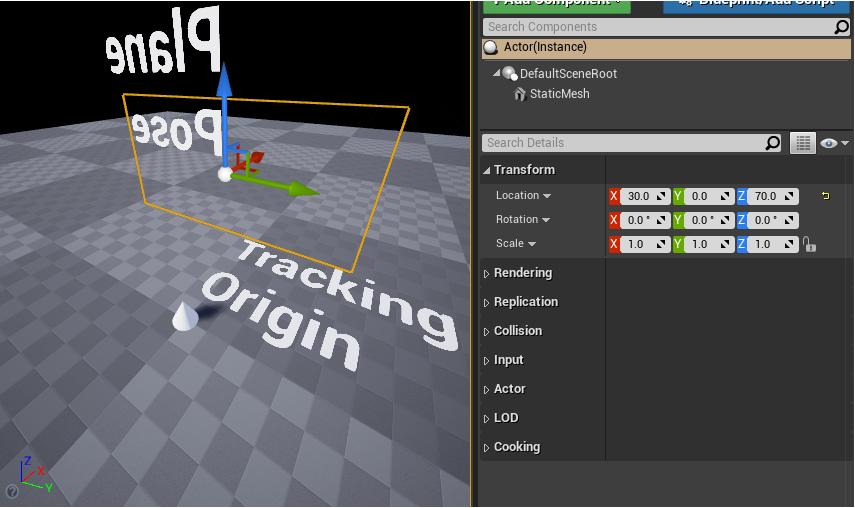
The plane in this sample has 0.5m in height of extent and 1m in width of extent.
If the plane’s forward(+X) direction is toward the camera, for example, a 180 degree rotated in Yaw angle. And it’s mesh should be visible in the view.
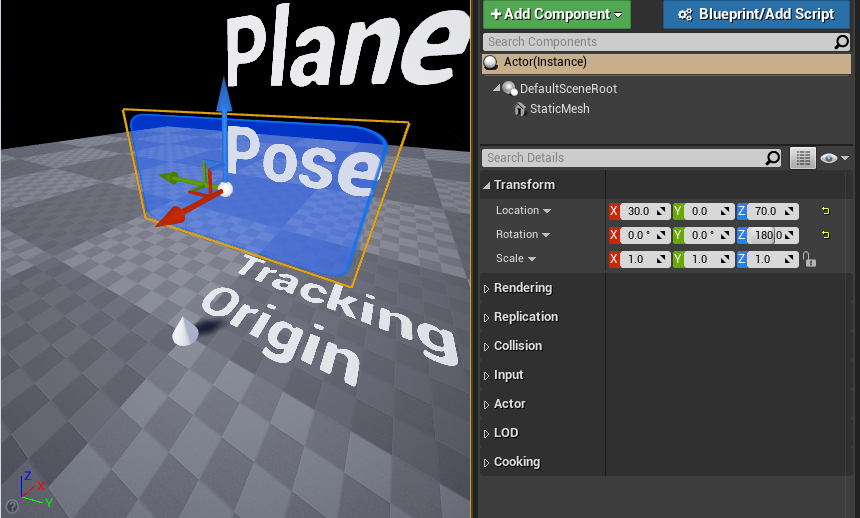
When a plane is facing up, it’s forward vector(+X) should point to world’s up.
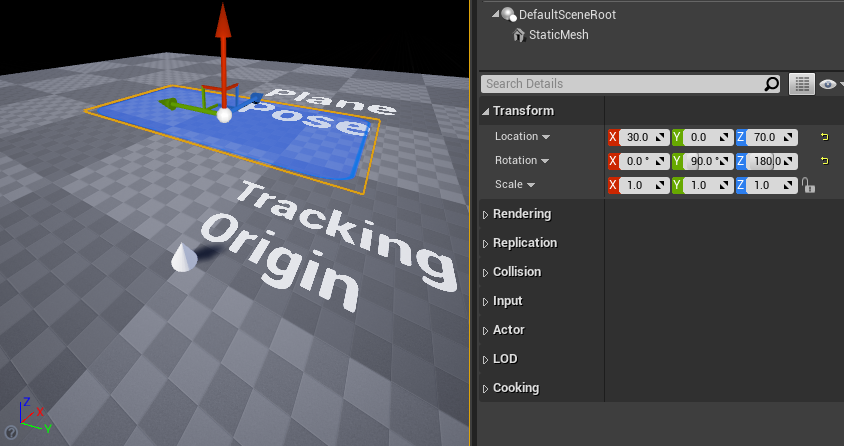
In our practice, a desk labeled plane should have its plane’s up along with user’s forward. User can reach the table from table’s -Z side.
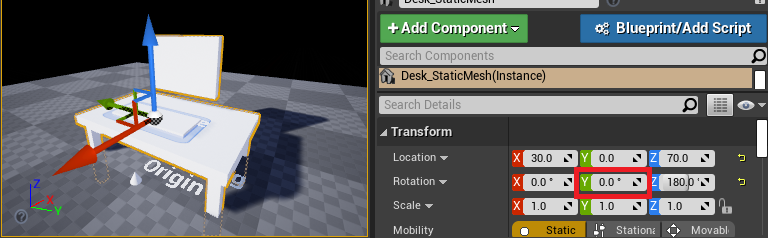
If you have a desk model like the picture below, where user will reach the model from its +X side, and you want to load it at the plane’s pose.
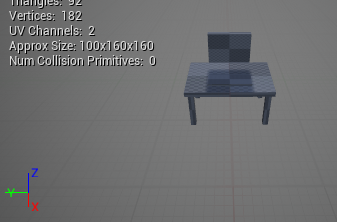
You should make a proper transform between the plane’s pose and model’s pose. Or the model may show incorrectly.
In this case, a proper transform is to rotate the Y value 90 degrees by plane’s rotation.
Points to take note of and Known Issues
- Create planes and objects in Launcher -> Boundary -> Room Setup (temporary name)
- Scene planes, Scene objects, and spatial anchors are tied to the active tracking map when they are created. Redoing the room setup process which changes the active tracking map will result in the loss of scene planes and spatial anchors that exist in the previous tracking map(s).
- If you are developing an MR content, you should also see Passthrough Underlay and Passthrough Quality, Performance, and Aligment.