DynamicFR
DynamicFR is an approach to help balance visual quality and performance. It utilize the HMD’s motion to adjust the parameters of Foveated-Rendering. While the HMD is moving or rotating fast, lower the quality of foveated-rendering. In the contrary, when the HMD keep still, keep the quality of foveated-rendering high.
Without moving HMD, low FPS is tolerable. For example, people can watch the animation with low FPS but won’t get a motion sick. And people also want high quality when they are watching something.
When player start to look around in the VR world, the FPS is matter. We want to keep the FPS as high as possible to help player feel comfortable in the VR world. If FPS is high enough, player will not be easily to have the motion sick symptom.
However the high FPS rate also limits the content’s graphic design. When FPS is high, means the GPU time is short. The GPU of mobile device may not be able to render delicate or complicated visual effect in a short time. Therefore developer may need change its design to keep the content in a high FPS rate.
With DynamicFR, a scene can be rendering in a low FPS to keep its quality, but when HMD is moving, the FPS will be increased immediately by changing the quality. Player will not notice the quality change if his/her head is in a high speed. When player find the target and stop head to look it clearly, the quality is already restored. The DynamicFR is designed to help developer make more challenge scene design.
In the following video, it demonstrate the relationship between HMD’s motion and the eyebuffer’s resolution. the eyebuffer’s resolution is controlled by Foveated Rendering. The size of central brighter area is following the FR’s clearFOV, and the resolution of peripheral darker area is following the FR’s quality. When HMD motion is high, you will see the clearFOV zoom in, and the peripheral’s quality become lower. And when HMD’s motion is slow down, the quality restored.
Demo video
How to work
DyanmicFR will calculate the HMD’s motion engergy, and the motion engergy is named as MotionScale. MotionScale is calculated by following facts:
- HMD’s Forward Velocity (positive)
- HMD’s Backward Velocity (positive)
- HMD’s Vertical and Lateral Velocity (vector magnitude)
- HMOD’s Angular Velocity (vector magnitude)
Each fact will be multiplied to a weight and sumed up as MotionScale. And we have these weights in positive values:
- Forward (VF) weight
- Backward (VB) weight
- Vertical and Lateral (VZ) weight
- Rotation (AV) weight
In the final, MotionScale will be multiplied with a total (FR) weight. It will effect the total DynamicFR’s effect level. If this total weight set to zero, means the DynamicFR are turned off.
DynamicFR will adjust the clearFOV parameters of Foveated Rendering in the range of FOV Narrow(Min) and FOV Wide(Max).
Note
In differnt engine, the parameters’ naming may be differnt.
How to use
DynamicFR is just a concept about how to use Foveated Rendering. And currently we only present it in the sample code. You can find the source code and sample scene in each engine’s package. And modify it according to your design.
Note
Before enable it, you should turn off AdaptiveQuality’s AutoFR feature.
Unity
Source Code
The source code is in VIVE Wave XR Plugin - Essence’s samples. To get it, you will need:
Install VIVE Wave XR Plugin - Essence package in PackageManager.
Import PureUnity’s sample In the PackageManager page of VIVE Wave XR Plugin.
Import Essence’s sample In the PackageManager page of VIVE Wave XR Plugin - Essence.
source code are in the folder
Assets/Samples/VIVE Wave XR Plugin - Essence/<version>/Essence/DynamicFR
Use DynamicFR
In your scene, create an empty gameobject in the hierarchy. Add the WaveXR_FoveatedRendering component. This is the normal way to enable the foveated rendering. Add the DynamicFR component, and it is all finsihed.
You can leave these weights still and it should work fine.
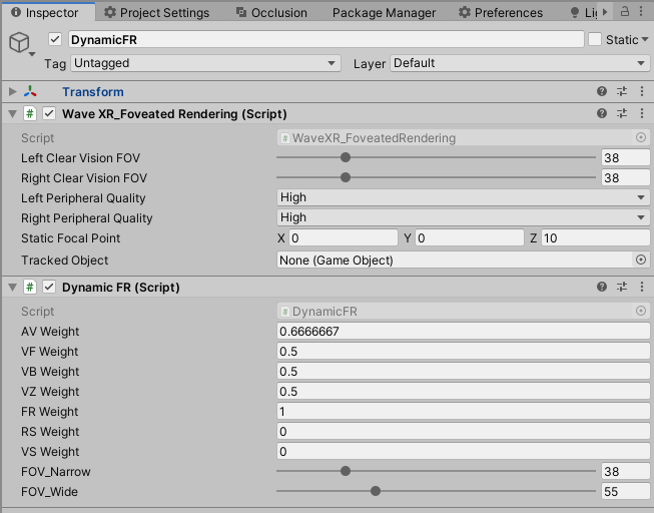
DynamicFR Component
Adjust the weights and clearFOV
Because the FoveatedRendering effect only exist on device, we made some graphs and a scrollable tweak UI to tune DynamicFR in the runtime. By these graph and UI, you can tune DynamicFR’s weights in your own content, and find the best settings.
You can copy these graph, UI and script into your scene.
At first, open the test scene, DynamicFR.

DynamicFR scene
Find and copy these purple marked parts from the hierarchy to your scene:
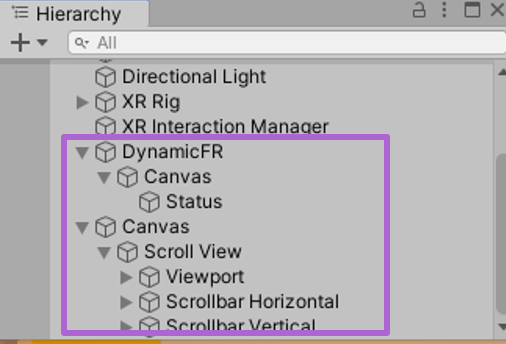
Adjust DynamicFR
In the DynamicFR gameobject’s hierarchy, you can find the script to show chart, and the script to adjust these weight through Unity’s UI.
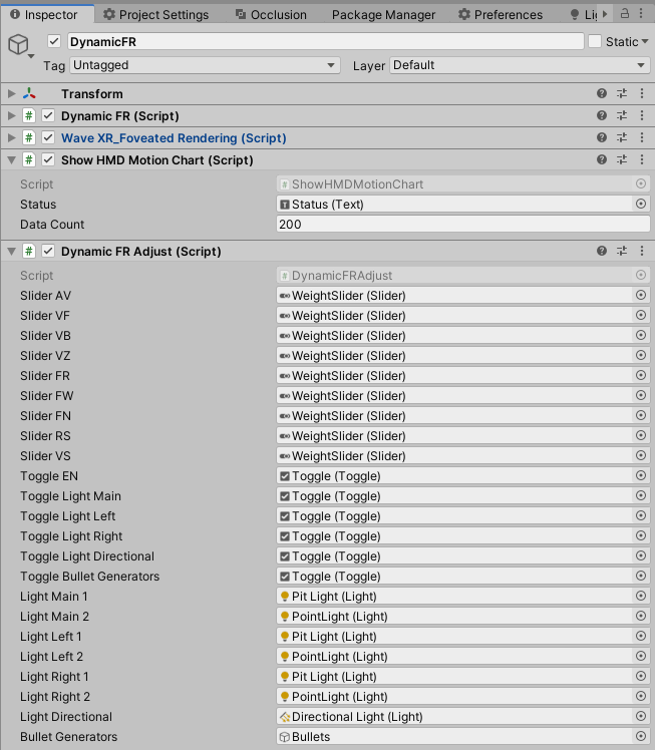
DynamicFRAdjust and ShowHMDMotionChart scripts’ inspector view.
And finally, you may need to modified the UI a liitle bit to fit your scene.
After you test it in your scene, you can fill the final weights and clearFOV settings back to the editor.
Unreal
Source Codes
Open Wave Unreal SDK’s sample project, and blueprints are put in this folder:
Content/VRTestApp/DynamicFR
Some blueprint function library codes used to generate graph are put in
Source/plugin/Private/VRTestAppBPFunctionLibrary.cpp
Use Dynamic FR
Find DynamicFR Actor, and drag it into the level.
DynamicFR Actor icon
In the following picture, it shows the details of DynamicFR Actor. In the default section, these variables can be used to adjust the DynamicFR. You can leave these weights and FOV ranges still and it should work fine.
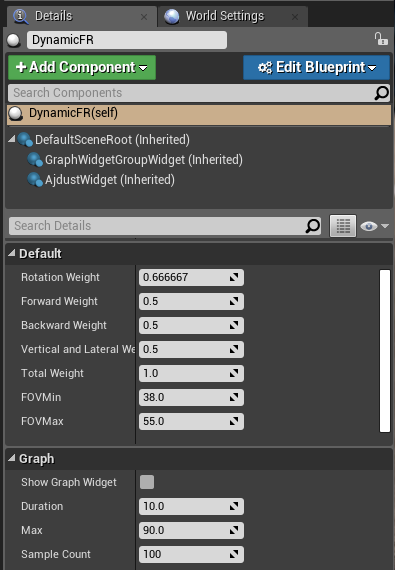
DynamicFR Actor details
Adjust the weights and FOV Range
Because the FoveatedRendering effect only exist on device, we made some graphs and a scrollable tweak UI to tune DynamicFR in the runtime. By these graph and UI, you can tune DynamicFR’s weights in your own content, and find the best settings.
We provide hidden widgets in the DynamicFR Actor. In the details of DynamicFR Actor, find Graph section, and check the Show Graph Widget check. When playing, the graph and tuning widget will appear.
In the following picture, shows the how it look like in our sample level.
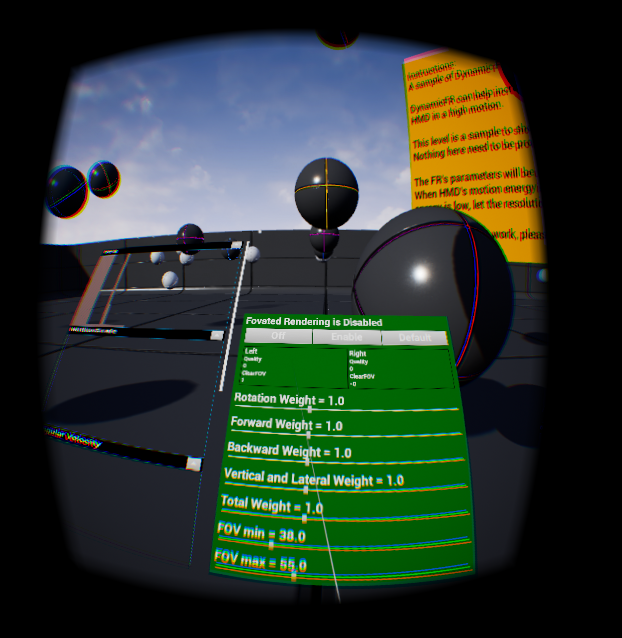
DynamicFR sample level
In the left, many graphes show a 10 second history of the FPS, and HMD’s motion. From these graphes, you can see if the FPS is acturally improved when you moving.
In the following picture, shows the DynamicFR’s tweek widget. You can test it and fill the final result back to the Editor.
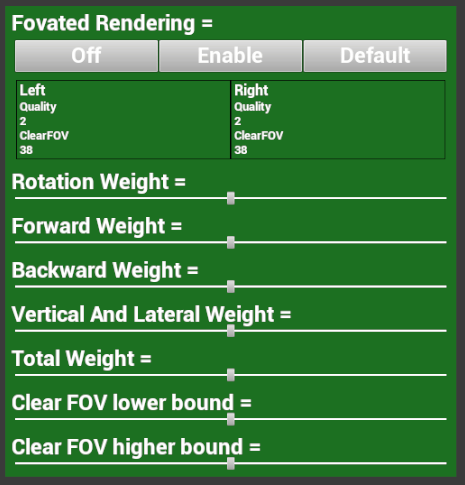
DynamicFR’s tweek widget