Samples
Refer to Wave Samples List for the sample list.
If you import the samples of Wave XR Plugin, samples will locate at Assets > Samples > <package name>.

Note
Samples may have textures/materials in the Resources, Textures or Materials folders. Unity always build all Resoruces files into a release (e.g. APK for Android).
If you have concern about the release size, you need to remove the Resources files those you do NOT need manually.
We suggest not to import the samples into your product project. You can import the samples to another empty project for the implementation reference to prevent sample resource files being built-in.
XR Acceptance Test
The XR Acceptance Test is a series of tests designed by Unity for testing XR projects. You can download it from XRAcceptanceTest.
Some modifications might be needed in order to build the XR Acceptance Test successfully since it has not been updated for a while. The instructions and descriptions of the tests are in its documentation folder. There are also some Unity XR API usages in the scripts for your reference. You can also use it to test for Wave support.
Prerequisite of Wave XR Plugin Samples
If you are going to run Wave XR Plugin sample, we need you complete some configuration. Check the InputManager and Quality sections below.
InputManager
In Wave XR Plugin samples, we use the UnityEngine.Input class to get button state, for example, Input.GetButton("Button8"). This require the button name defined in InputManager of Project Settings. Before you test our samples, please help to define these buttons.
Choose the InputManager tab in Project Settings, and create buttons in InputManager with “Name” and “Positive Button” of the table below.
| Wave Controller Name | Hand | InputFeatureUsage | Name | Positive Button |
|---|---|---|---|---|
| N/A | Left | primaryButton | Button0 | joystick button 0 |
| N/A | Right | primaryButton | Button2 | joystick button 2 |
| Menu | Left | menuButton | Button6 | joystick button 6 |
| Menu | Right | menuButton | Button7 | joystick button 7 |
| Touchpad Press | Left | primary2DAxisClick | Button8 | joystick button 8 |
| Touchpad Press | Right | primary2DAxisClick | Button9 | joystick button 9 |
| Grip Press | Left | gripButton | Button11 | joystick button 11 |
| Grip Press | Right | gripButton | Button12 | joystick button 12 |
| Trigger Press | Left | TriggerButton | Button14 | joystick button 14 |
| Trigger Press | Right | TriggerButton | Button15 | joystick button 15 |
| Touchpad Touch | Left | primary2DAxisTouch | Button16 | joystick button 16 |
| Touchpad Touch | Right | primary2DAxisTouch | Button17 | joystick button 17 |
The button settings example in InputManager tab.
Or you can download this InputManager preset
Put it in your Assets folder, and import it by InputManager.
Quality
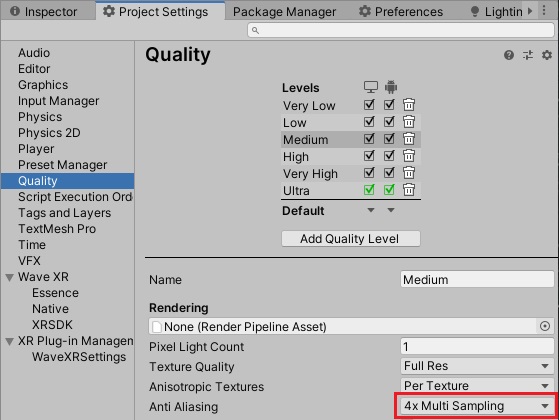
In some Wave XR Plugin samples, they will change quality level by QualitySettings.SetQualityLevel. However if there are Anti Aliasing levels different between the quality levels, the application will crash. Thus we need you set the Anti Aliasing levels to 4x Multi Sampling in all quality levels.

Or you can download this QualitySettings preset
Put it in your Assets folder, and import it by Quality.
Wave XR Plugin Samples
You can use Wave XR Plugin provided samples to test your environment. Most samples have dependency on the PureUnity sample. Please install the PureUnity Sample first. Unless specified, samples are designed to run in Built-in Render Pipeline by default.
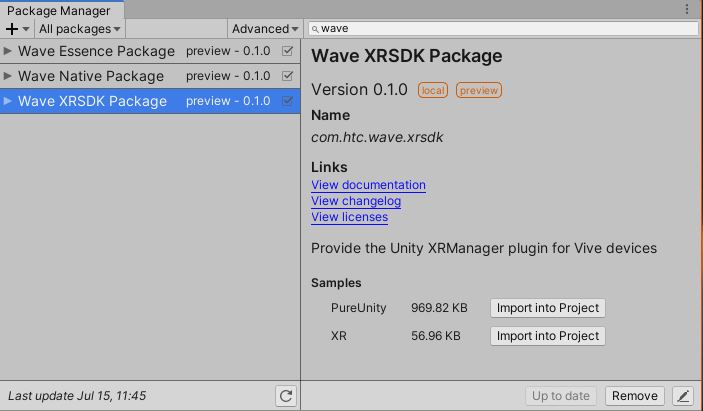
To import samples, open the Package Manager, search for Wave and then select the Wave XR Plugin Package, Native Package or Essence Package. In its Samples, click Import into Project button.

PureUnity Sample
In this sample, there are common scripts, prefabs, and resources which may be used by the other samples. For example, the Wave prefab contains the main camera and a gaze sprite. The InputModule prefab provides a simple UI control through a combination of gaze and button. Before installing the other samples, install PureUnity sample first to avoid errors related to dependency.
Editor Tool
- KeyboardMouseControl
In the Unity Editor Play mode, you can use KeyboardMouseControl to control a target. To enable it, go to Wave > Enable KeyboardMouseControl .

The way KeyboardMouseControl works is similar to Scene View in Unity.
In Game View, press and hold the right mouse button and use the Q, W, E, A, S, and D keys to move your target in 6 directions. Move the mouse to rotate the target in yaw and pitch.
The default controL target is the head. Press the Z key to switch the target to the left hand, X key to the head, and C key to the right hand.
Scenes
There are two scenes in the PureUnity sample.
- VRTestApp
This is the main entry for all samples.
You can test headset and controller pose here, the controller will appear as a white stick when connected.
A simple UI interaction will also be demonstrated here. You can hover the gaze sprite over the UI button and click it by pressing the touch pad on the controller. If the button didn’t work, please check the InputManager settings. For more information, see InputManager.
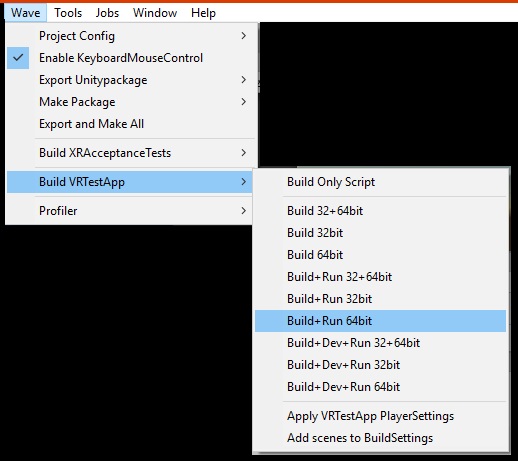
Remember to use use our Wave editor script to build this sample. The script will collect all sample scenes installed in your assets and build them into the APK. You can find the build entry in Wave > Build VRTestApp > Build+Run 64bit. There are other available options to choose from.

- StereoRenderMode
You can learn two things here:
- How to switch between Single Pass and Multi Pass
- How to change the eyeTextureResolutionScale
XR Sample
- RenderMask Test
- Show the RenderMask (Occlusion Mesh) used in Wave VR.
Feature Sample
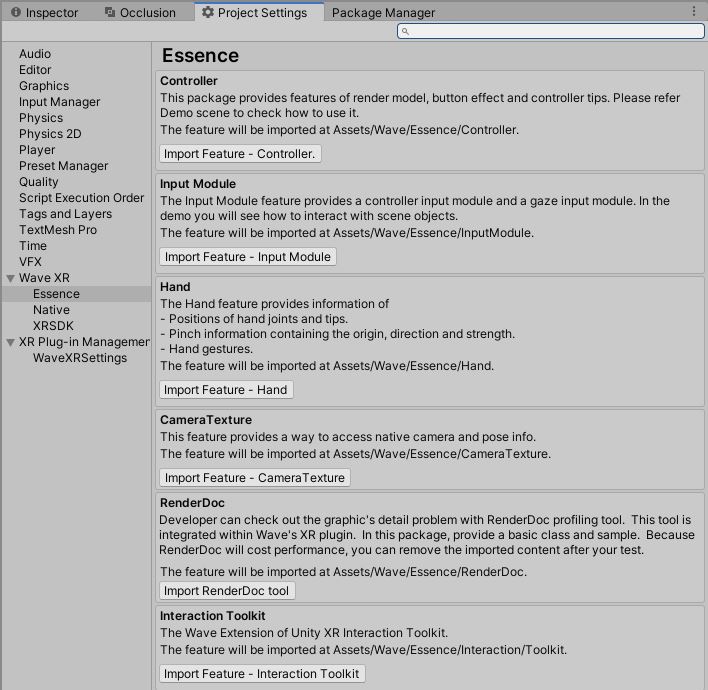
In the Wave XR > Essence page of Project Settings, you can feature packages provided by VIVE Wave XR Plugin - Essence. Some of them contains samples to show you how the features work. Read the description of each feature for more information.
