Bundle Preview
Introduction
Throughout the development cycle, developers often have to build and run APKs in order to check how the application runs on targeted devices, which is repetitive and time consuming. Bundle Preview addresses this by breaking down the build process into modules. By doing so, developers can partially build changes and push it to the device instead of rebuilding the whole project every time. While not as fast as using the built-in Play Mode in Unity, Bundle Preview provides relatively accurate graphical and performance authenticity as it runs on the target device instead of the Unity Editor.
Prerequisite
In Unity Editor, make sure the Android SDK is configured in Edit > External Tools as Bundle Preview uses ADB commands to communicate with the target device.
Also, go to Project Settings -> Wave XR -> Essence to import the Bundle Preview package.
How it works
Bundle Preview works by splitting your build into two main components: Bundle Preview client app and Asset Bundles.
- Bundle Preview client app: Contains all the scripts in your project as well as Assets under Resources directories. It also has a simple scene that is responsible for checking and loading Asset Bundles of the scenes in your build.
- Asset Bundles: Built based on the scenes selected in the Build Settings. It also contains all the Assets that the scenes have dependency on.
This means that you only need to rebuild the APK or modified scene(s) depending on changes that are made to the project. This reduces the time needed to build and transfer project data on each preview (except the first time since you need to build everything).
While the app is running, it checks for changes in the Asset Bundles on the device and reloads scenes during runtime when necessary.
How to use
Note
In the Bundle Preview editor window, there may be times that the device and app status shown are not up to date. To refresh the status, click elsewhere on the screen, and then click on the editor window again.
- Click Wave > BundlePreview to open the Bundle Preview editor window.
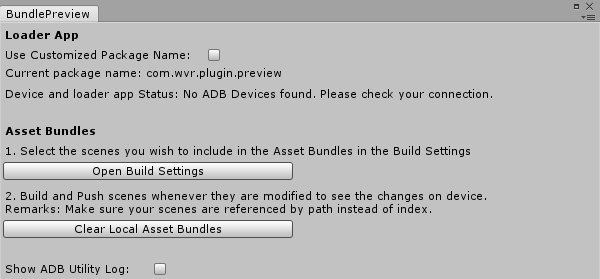
Bundle Preview Window (No device connected)
- Connect the device to your computer. After connecting the device to the computer, you will see the Build and Install button. Click it to build and install the client app onto your device.
Note
The default package name of the client app is yourpackagename.preview. You can change it by selecting Use Customzied Package Name and entering a name in Customized Package Name.
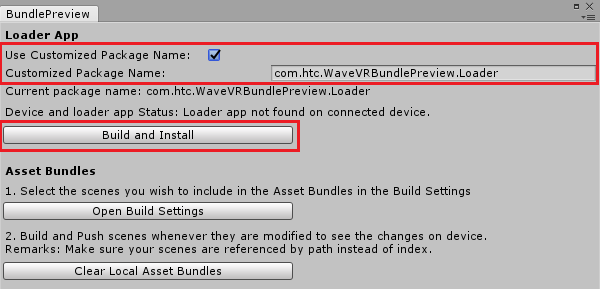
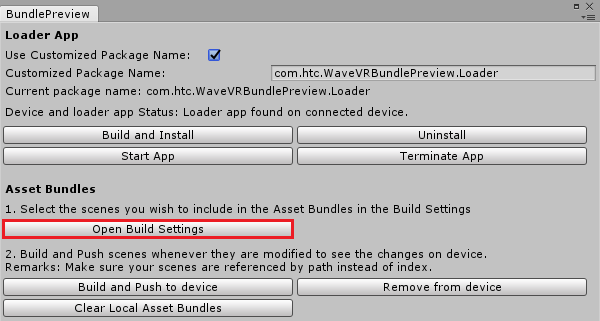
Bundle Preview Window (Device connected and app with current client app package name found on device)
- Once the client app is installed, you can start, terminate, uninstall the client app, or move on to building the Asset Bundles of your project scenes and push them to your device. Before doing that, make sure that the scenes you want to preview are selected in the Build Settings. Access the Build Settings by clicking Open Build Settings.
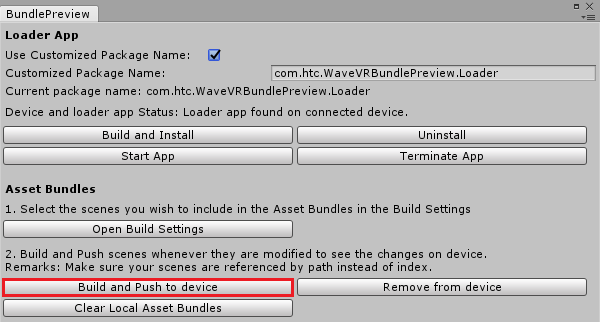
- Click Build and Push to device to start building the scenes into Asset Bundles. Once the Asset Bundles are successfully built, they will be pushed automatically into the app data directory on your device.
Note
You can check the push status of Asset Bundles in the Unity Debug Console.
- With both the client app installed and Asset Bundles pushed, you can now preview the project on the device.
Reminders and best practices
- Changing a prefab in a scene and applying those changes will cause scenes that are dependent on the prefab to rebuild. To avoid rebuilding several scenes just to preview a prefab change, apply the changes directly to the prefab (e.g. by using Prefab Mode). Change the prefab content within one of your scenes as a Game Object and rebuild only that scene to speed up the preview process.
- If there are problems with building and pushing Asset Bundles to the device, try removing existing bundles from your device by clicking Remove from device. You should also remove the local bundles by clicking Clear Local Asset Bundles to prevent any potential file conflicts (all Asset Bundles will be rebuilt on the next preview.)
- If you are previewing multiple scenes that will be loaded during runtime (e.g. Through SceneManager.LoadScene), make sure you are using the full path (e.g. Assets/path/to/scene_name.unity). Otherwise, the reference will be lost due to how Unity loads scenes from AssetBundles.