Starting Sample
In this chapter, we will introduce the easiest way to create an empty sample and add usages of controller(Controller Usage), hand(UnityXRHand) and tracker(Tracker).
Refer to sections 1.Camera, 2.Controller, 3.Hand and 4.Tracker.
Environment Settings
Editor version: 2019.4.15f1 (or newer)
Visual Studio version: Community 2019 (see Configure Visual Studio for Unity)
We used VIVE Wave™ plugin 5.4.0-r.8 in this chapter.
Open the Build Settings window from the menu item File > Build Settings and switch the Platform to Android.
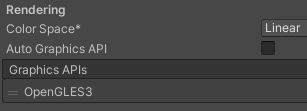
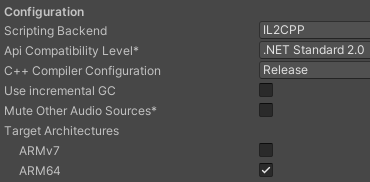
Before imported the Wave SDK we simply configure the Project Settings > Player > Other Settings as below.
1.Camera
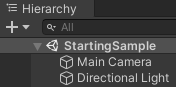
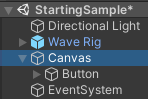
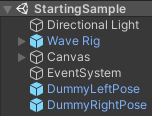
After imported the Wave SDK, click the menu item Assets > Create > Scene to create a sample scene named “StartingSample”.
Now we are going to set up the Camera. We will use the XR Rig instead of default Main Camera.
- Delete the Main Camera from StartingSample.
- Drag the Packages > VIVE Wave XR Plugin - Essence > Runtime > Prefabs > Wave Rig> to StartingSample.
- Add a button from the menu item GameObject > UI > Button.
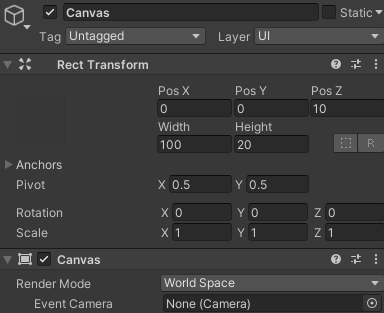
- Configure the Canvas as below illustration. We change the
Render Modeto World Space, change the size of Canvas to (100, 20) and put the Canvas to 10 meters far.
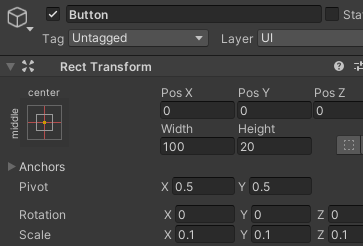
- Configure the Button as below illustration. We change the
Scaleof Button to (0.1, 0.1, 0.1) and change the size of Button to (100, 20).
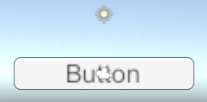
- After configured the button you can see a button in your scene.
- Now you can click the play button and use the mouse to left click the button.
Sample Code
Follow below steps we will write a very simple code to handle the button click action.
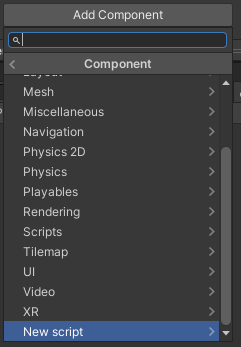
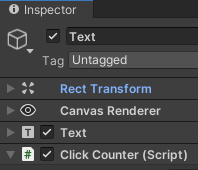
- Browse the GameObject Canvas > Button > Text and click Add Component > New script from the Inspector. Name the script to “ClickCounter”.
- Copy and paste below code to the “ClickCounter” script.
using UnityEngine;
using UnityEngine.UI;

[RequireComponent(typeof(Text))]
public class ClickCounter : MonoBehaviour
{
    Text m_Text = null;
    private void Awake() { m_Text = GetComponent<Text>(); }

    uint counter = 0;
    private void Update() { m_Text.text = "Clicked: " + counter; }
    public void AddCounter() { counter++; }
}
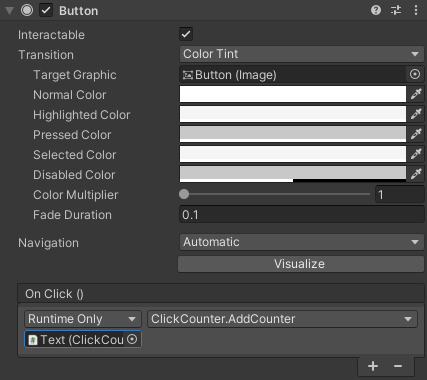
- Browse the GameObject Canvas > Button, click the “+” button of
On Click(), drag the GameObject Text to theNon (Object)field and specify theNo Functionfield to ClickCounter > AddCounter().
- Now you can click the play button and the counter will increase while using the mouse to left click the button.
2.Controller
Now we are going to put controllers in StartingSample.
- Right click on the GameObject Wave Rig > Camera Offset and select Create Empty.
- Name the GameObject to Left Controller.
- Repeat step 1&2 to create another GameObject Right Controller
- Click Add Component of Left Controller to add the Tracked Pose Driver.
- Configure the Tracked Pose Driver as below illustration.
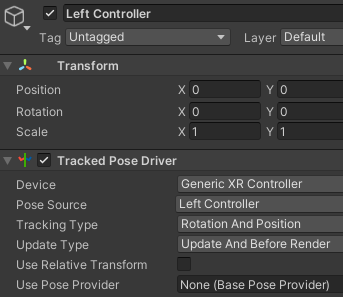
- Repeat step 4&5 to configure the Tracked Pose Driver to Right Controller. Remember to set the
Pose Sourceto Right Controller. - Drag the prefab Assets > Wave > Essence > Controller > Model > 5.4.0-r.8 > Prefabs > WaveLeftController to be a child GameObject of the Left Controller.
- Drag the prefab Assets > Wave > Essence > Controller > Model > 5.4.0-r.8 > Prefabs > WaveRightController to be a child GameObject of the Right Controller.
Simulation Pose
VIVE Wave™ plugin provides simulation poses of Head and Controller. Now we are going to set up the simulation pose of controllers configured in the 2.Controller section.
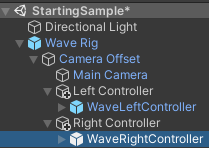
- Drag the prefabs Packages > VIVE Wave XR Plugin - Essence > Runtime > Prefabs> DummyLeftPose and DummyRightPose to StartingSample.
- Specify the
Use Pose Providerof Left Controller’s Tracked Pose Driver to DummyLeftPose and Right Controller’s Tracked Pose Driver to DummyRightPose.
- Now you can click the play button to play the scene. In the play mode, when you press the LEFT-ALT key, the Left Controller will move along with the mouse’s movement as well as the RIGHT-ALT key is used for Right Controller.
3.Hand
Now we are going to put hands in StartingSample.
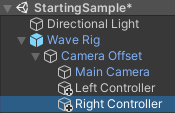
- Create the Left Hand and Right Hand GameObjects under Wave Rig > Camera Offset like the steps 1~3 mentioned in 2.Controller.
- Drag the prefab Assets > Wave > Essence > Hand > Model > 5.4.0-r.8 > Prefabs > WaveHandLeft to be a child GameObject of the Left Hand.
- Drag the prefab Assets > Wave > Essence > Hand > Model > 5.4.0-r.8 > Prefabs > WaveHandRight to be a child GameObject of the Right Hand.
- Note that the Hand Tracking feature is NOT default activated like the Controller. To activate the Hand Tracking feature we have to use the Hand Manager (see UnityXRHand).
The Hand Manager is a component can be added to any GameObject. In this sample we put the Hand Manager on Wave Rig and select the
Initial Start Natural Hand.
- VIVE Wave™ plugin controls the Hand Tracking service in Android by an AndroidManifest.xml configuration. You can simply modify the AndroidManifest.xml of your Unity project by selecting the option Project Settings > XR Plug-in Management > WaveXRSettings > Hand > Enable Natural Hand.
See UnityXRHand for more detail.
Raycast
The Raycast is a convenient feature for the Controller and Hand to select/click/drag an object in a scene. In StartingSample we will use the Gaze, Controller and Hand Raycasts.
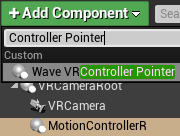
- Add the Raycast Switch component to the Wave Rig.
- Enable all features in the Raycast Switch.
If you would like to disable the Gaze Raycast in application runtime, you can write the sample code below.
using Wave.Essence.Raycast;
RaycastSwitch.Gaze.Enabled = false;
- Create a Pointer GameObject under the Wave Rig > Camera Offset > Main Camera and add the Gaze Raycast Ring component. A Mesh Renderer and a Camera components will be also added automatically.
- It’s a little bit complicated to configure the Controller and Hand pointers. We will create one pointer first and duplicate the pointer 3 times.
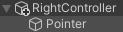
- Create a empty GameObject named Pointer Offset under the Wave Rig > Camera Offset > Left Controller. Create another empty GameObject named Pointer under the Pointer Offset.
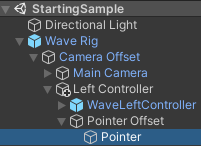
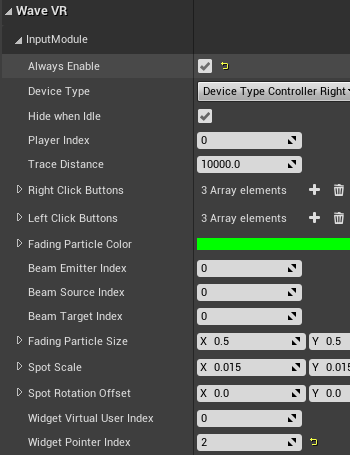
- Add the Image and Canvas components to the Pointer GameObject and configure settings as the illustration below.
Note that the
Raycast Targetoption of Image should be cleared and theOrder in Layerof Canvas should be 32767.
- Duplicate the Pointer Offset to Right Controller, Left Hand and Right Hand. Then we will add the raycast component to the Pointer Offset GameObject.

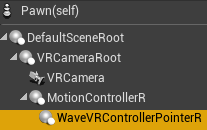
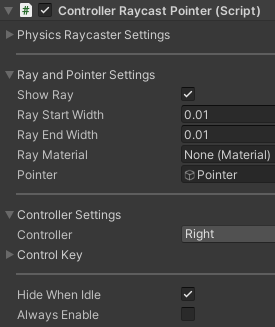
- Add the Controller Raycast Pointer to Left Controller > Pointer Offset, specify the
Pointerfield to Left Controller > Pointer Offset > Pointer and theControllerfield to Left.

- Add the Controller Raycast Pointer to Right Controller > Pointer Offset, specify the
Pointerfield to Right Controller > Pointer Offset > Pointer and theControllerfield to Right.
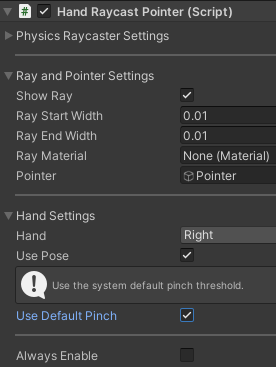
- Add the Hand Ryacast Pointer to Left Hand > Pointer Offset, select
Use Default Pinch, specify thePointerfield to Left Hand > Pointer Offset > Pointer and theHandfield to Left.
- Add the Hand Ryacast Pointer to Right Hand > Pointer Offset, select
Use Default Pinch, specify thePointerfield to Right Hand > Pointer Offset > Pointer and theHandfield to Right.
4.Tracker
We need to import the tracker model from Project Settings > Wave XR > Essence > Import Feature - Tracker Model.
Now we are going to put trackers in StartingSample.
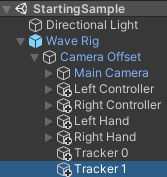
- Create the Tracker 0 and Tracker 1 GameObjects under Wave Rig > Camera Offset like the steps 1~3 mentioned in 2.Controller.
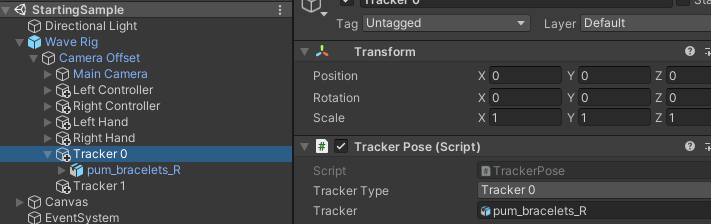
- Drag the prefab Assets > Wave > Essence > Tracker > Model > 5.4.0-r.8 > Resources > PUM_bracelet > prefabs > pum_bracelets_R to be a child GameObject of the Tracker 0.
- Add the Tracker Pose component to Tracker 0, specify the
Tracker Typefield to Tracker 0 and theTrackerfield to Tracker 0 > pum_bracelets_R.
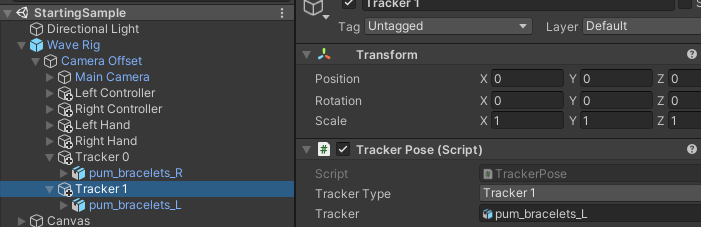
- Drag the prefab Assets > Wave > Essence > Tracker > Model > 5.4.0-r.8 > Resources > PUM_bracelet > prefabs > pum_bracelets_L to be a child GameObject of the Tracker 1.
- Add the Tracker Pose component to Tracker 1, specify the
Tracker Typefield to Tracker 1 and theTrackerfield to Tracker 1 > pum_bracelets_L.
- Note that the Tracker feature is NOT default activated like the Controller. To activate the Tracker feature we have to use the Tracker Manager (see Tracker).
The Tracker Manager is a component can be added to any GameObject. In this sample we put the Tracker Manager on Wave Rig and select the
Initial Start Tracker.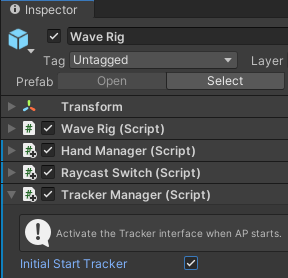
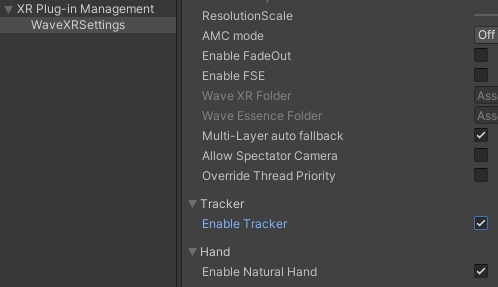
- VIVE Wave™ plugin controls the Tracker service in Android by an AndroidManifest.xml configuration. You can simply modify the AndroidManifest.xml of your Unity project by selecting the option Project Settings > XR Plug-in Management > WaveXRSettings > Tracker > Enable Tracker.
See Tracker for more detail.
Build Android APK
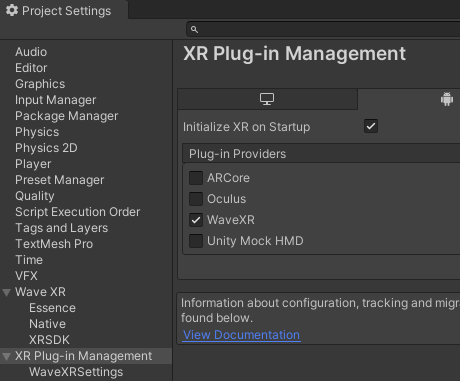
At the Environment Settings section we already changed to platform to Android. To activate VIVE Wave™ plugin we need to select the option Project Settings > XR Plug-in Management > Android Tab > Wave XR.
Then you can build the Android APK from the Build Settings window.
See Also
- Download Wave SDK
- XR Rig
- Controller Usage
- UnityXRHand
- Tracker
- Raycast